Meta: The State Of Linux-Tips #18

Today we’re just going to have another meta article, as I like to do now and then. We haven’t had a meta article in quite a while. These are articles that are just a quick look at what goes on here behind the scenes, an article about how the site is coming along.

I would like to do a meta article every month but there’s not always something worth writing about. As such, I haven’t needed to write a meta article in going on two months. Not much has changed but now’s a fine time to write one.

So, things are going just fine. You may have noticed an outage. The outage was because we were being whisked away to a new server and things did not go as smoothly as planned. Things might have gone better, but I have a fairly complex setup and use a CDN that requires things like an IP address.

I couldn’t even log in to the WordPress control panel, so I knew something was wrong. I was initially concerned that we were hacked, but we weren’t. There had been a DDoS (or at least a whole lot of traffic), but that was at the server level, not the account level. Or, at least it wasn’t my site being attacked specifically.

So, we’re now housed in a New York data center. We moved from Dallas. You won’t notice because I use a CDN. Very little traffic reaches the server directly. You access cached content at a server in your geographical location.

There are endpoints around the globe that cache my content and present it to you. That’s why my site should appear to have nearly 100% uptime (barring server moves) and why the site should load quickly, irrespective of your location on the planet. Ideally, you never even need to know that the server is located in New York, but now you do.

I am sorry about the outage and the trouble caused. I take full responsibility. There’s no reason to think this will happen again in the near future. We should be just fine for the foreseeable future, though I may someday need to move to a bit more robust hosting. This is starting to get to be a large site.

A Meta Article:

So, things are going about as well as they were. Traffic ebbs and flows and we’re in the “summer slowdown” right now, which is when people spend more time outside and not online. This is a well-known internet phenomenon and appears to apply to Linux geeks as well. That’s okay, I’m still getting plenty of traffic.

I’ve decided to share a couple of pictures. They’ll explain a bit. However, you should be aware that web stats aren’t ever all that accurate. These are close enough…

Let’s look at the operating systems that visit Linux Tips:

Statistics - operating system
Those are the operating systems visiting the site.

Let’s have a look at the browsers used by Linux Tips visitors:

These are the browsers that visit Linux Tips.
Again, the accuracy is limited. Chrome will be browsers that identify as such.

So, those are the operating systems and browsers used to visit us here at Linux Tips. You can notice a trend. Those numbers have been pretty static for a while, or at least similar in their percentage values.

This will make the 414th article.
I’ve never missed a publication date.
There are more than 300,000 words in these articles.
The average is 769 words per article.
It’d take you 20h 43 minutes to read the site.
It’d take longer, as you have to wait for load times.

My most popular pages have changed recently. I do not know why. I do not understand the workings of Google. I try to practice good SEO and have a bunch of articles that rank okay for some search terms, but I don’t know why some are ranked higher than others – especially as I write almost all of them to a formula.

Anyhow, these are the most Googled pages:

How To: Quickly Restart The Cinnamon Desktop Environment
Pause And Unpause Your Terminal
Disable Printing And CUPS

I have no idea why those articles are now more popular, but they are.

Either way, I’ve already used up about 20 GB of traffic so far this month, and we’re not even 2/3rds of the way through the month. I did get a donation, which was pretty sweet. The CDN appreciated it. As I’ve said before, there are donation links on every page – but the site’s gonna stay up and running even if you do not donate. So, while they’re appreciated I’m still going to pay for the hosting and extra bandwidth.

Oh, most of my traffic (by far the vast majority of my traffic) comes in via search engines. But, Linux.org is where I get most of my direct referral traffic. Most of you use the “www” subdomain:

Most of my direct referral traffic comes from Linux.org.
See? Those Linux.org folks visit fairly regularly.

I don’t do much with Reddit. The links just get automatically published there, but it’s a small subreddit that pretty much only gets my posts. It has almost no subscribers. I don’t try to promote it. I probably should, ’cause Reddit has a whole lot of traffic.

Let’s see… I’ve covered almost everything, I think…

Oh, there are ads. If you would like to do so, you can easily whitelist this site in your ad-blocking extension. They don’t pay much, but it’s nice that they do. 

Yeah, I think that’s about it.

Closure:

Well, there you have it… You have another article and this time it is a long-overdue meta article. They’re a pain in the butt to write and it’s easier to write about technical things, but I try to remember to write one every so often. Today just seemed like that day.

This time, I mixed it up and included some graphics. That’ll save me some time! (Actually, I probably could have typed out the necessary data faster than I could have taken the screenshot, uploaded it, edited it for publication, and inserted it into the article.) But, still, it’s something different.

Thanks for reading! If you want to help, or if the site has helped you, you can donate, register to help, write an article, or buy inexpensive hosting to start your site. If you scroll down, you can sign up for the newsletter, vote for the article, and comment.
How To: Add A New Line With CURL

Today’s article isn’t going to be all that long and it’s definitely not going to be complicated, as we just discuss how to add a new line with curl. It’s just an annoyance factor and something I was reminded of today. Lacking a better idea, I decided I’d use this annoyance and recollection as a reason to write an article about how to add a new line with curl.

First, this obviously requires a terminal.

Second, this obviously requires curl. You almost certainly have curl installed, so you won’t have to install anything. 

If you’re curious, you’ll find that the curl man page defines the application as:

curl – transfer a URL

You’ll understand why I’d use that in a second, but you can imagine that it’s a pretty handy tool to have in your Linux toolbox. We’ve previously used curl in many articles. Here’s a sampling of those articles:

Let’s Have a Limited Look at Linux’s cURL Application
Weather In The Terminal? We can do that!
How To: Find Your IP Address Through Your Terminal

… and more!

So, in this case, I show ads on the site. To do this, Google relies on a file known as ‘ads.txt’ being in your web’s root folder (often called ‘public_html’). If the file is not there, there’s an ad inventory issue and Google won’t show ads.

Well, if you read the previous article you’d know that there was an outage. During this outage, it appeared that the site was still reachable – except it wasn’t. It was during this time that AdSense decided to check and see if the ‘ads.txt’ file is there. (This is nothing private. Everyone using AdSense has an ads.txt file.)

Because of this, I decided to verify that the ads.txt file existed and contained the appropriate information. To do this, I simply used the following command:

It gave me the answer I wanted, but I disliked the formatting of the output. But, it was enough for me to determine that the file existed and that I just had to wait for Google to confirm this.

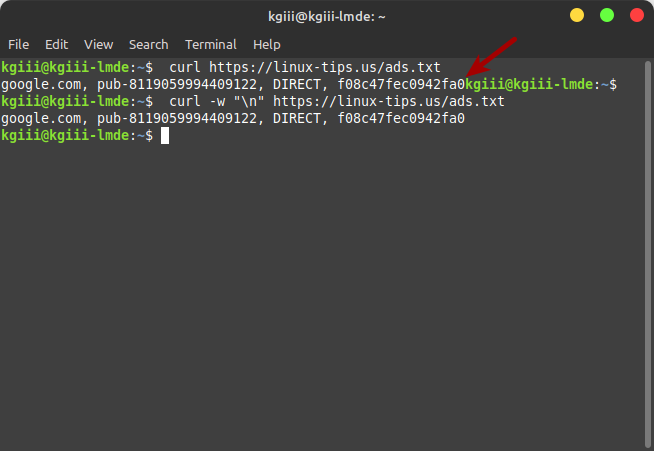
The formatting was horrible. I’ll show you an image in the next section and you’ll see…

Add A New Line With curl:

So, when I saw the output from the above command (feel free to run it on your computer), it just ran the line into the next prompt. I had to dig through my ~/bash_history file because I couldn’t remember how to fix the formatting.

A picture is probably going to describe this best. In the picture, you’ll see the ugly formatting and you’ll see the solution.

adding a new line to the curl output
As you can see, the second command has a much nicer output.

So, to make sure you have a new line, you use the -w (write-out) flag and add the character for a new line in quotes – which is "\n". It’d look like this:

As you can see (and I hit the enter button between commands to start on a fresh new line) the output is much nicer. So, instead of curl starting a new line, a command entry line as it were, you’re starting with a nice fresh new line.

I messed with this way too long before I started digging into my bash history to find other curl commands used over time. Eventually, I found it, but I’d already verified that the file existed and that Google would notice the next time they checked.

Closure:

Well, it’s not the greatest of articles – but it’s useful if you want to know how to add a new line with curl. It’s a much tidier output this way. I just need to remember to do it without having to dig through my bash history each time I want to have a clear curl output.

Meh… I’m sure it’ll eventually be handy for someone…

Thanks for reading! If you want to help, or if the site has helped you, you can donate, register to help, write an article, or buy inexpensive hosting to start your site. If you scroll down, you can sign up for the newsletter, vote for the article, and comment.
Boot To Text Mode In Linux

Today’s article will be a quick and easy article, so easy that a newbie can follow it, and will cover how to boot to text mode in Linux. Booting to text mode is something you might want to do for troubleshooting or repair. It might look hard, and require some good timing, but it’s not all that challenging.

What do I mean?

Well, when you boot your personal computer with Linux on it the system boots into a graphical environment, a GUI. If you boot to text mode, there’s no GUI being loaded. It’s just like you were working in the terminal, but there was no GUI to fall back on. 

For most people using Linux on the desktop, this isn’t something done all that often. It’s mostly useful for things like the above-mentioned troubleshooting and repair. When there’s a problem that’s exacerbated by the GUI, booting to text mode is a good idea and a great feature.

This is only for systemd users and is sometimes called ‘console mode’. This article also assumes that you’re using GRUB as your bootloader. If either of those is not true, you can safely ignore this article.

If you’re asked at a forum to repair your system by booting into text mode, this is the article for you. It’s not something you’ll need often, but it’s something worth knowing, or at least knowing that it can be done. It’s not even all that complicated.

Also, if you noticed an outage yesterday, there was a giant dumpster fire that needed to be put out. It wasn’t a literal dumpster fire, just a bunch of crap that all managed to land at the same time.

The symptoms made me think the site was hacked, but that’s not what happened. There were some changes made at the server level and things did not trickle down. The server migration went well for many people, but I have a complicated setup. I also use a CDN, which further compounded the issues.

Things were fixed upstream. There was no hack, but there were some traffic spikes recently. Nobody’s personal information was leaked. No software was compromised. It was just a ****storm that required more effort than expected.

The server is still being worked on as I write this article. Data was seemingly corrupted in multiple tables, which shows the value of backups. Nothing of any value has been lost in the process – except some traffic. I hope that those people were able to find the information they were looking for, and I formally apologize for the downtime.

Boot To Text Mode:

You need some pretty good timing for this and it may take some people a few tries to get it right. I’ve done this many times and I still don’t always get it right on the first try.

When you boot your computer, it performs the “POST” (which is the Power On Self Test). It goes by quickly these days. In many cases, it doesn’t even tell you that it’s performing the POST. In those cases, it may show you a logo for the computer. It happens on your computer, even if you don’t see it.

Now, between the end of the POST and before Linux starts loading, you need to press a key to stop Linux from loading. You want to access GRUB.

The key you press is going to vary, but it’s just one of two keys.

If you’re using legacy (BIOS) then you need the SHIFT key.

If you’re using UEFI, then you need the ESC key.

After POST ends and before GRUB loads Linux, you need to press the appropriate key. You need to know which you’re using, BIOS or UEFI. You could just keep trying until you find out which one works for you. With the reduced friction between Linux and UEFI, you might not know which system you’re using. I suppose that’s a good thing.

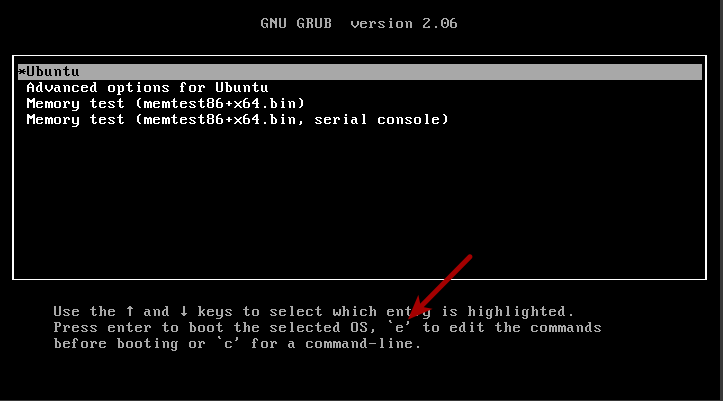
Anyhow, you should end up with a screen that looks like this:

the grub menu
The helpful arrow is your next step in this process of booting to text mode.

As you can see, you next want to press the E on your keyboard.

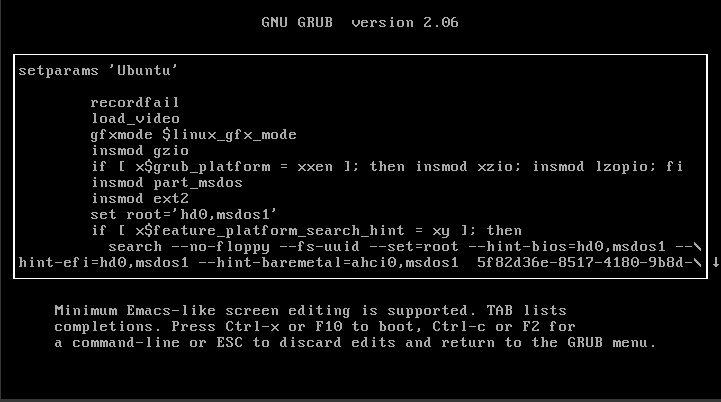
You’ll next see a screen that looks like this:

this is the boot parameters in use
These are the boot parameters in use by GRUB. We’ll edit this.

Use your arrow keys to navigate to the line that begins with linux.

Make sure the line also includes vmlinuz.

The line you want to edit will start with the first word and contain the second word, but it will exist.

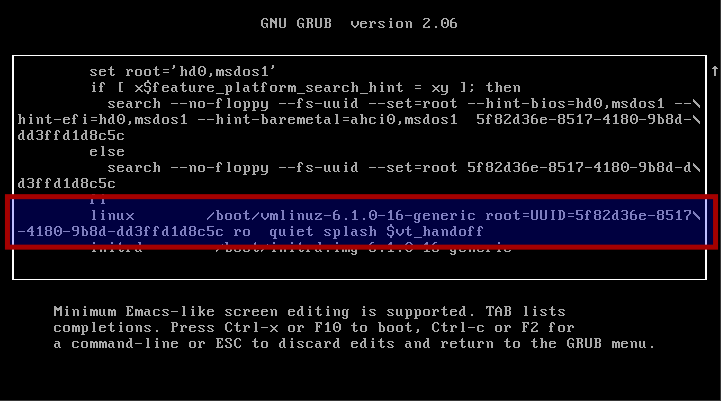
You want to go to the end of that line. Depending on your GRUB resolution, the line may span multiple lines. In other words, you’ll be editing where there’s a hard new line and not paying attention to the actual formatting.

That may look something like this:

this is the file you want to edit.
That’s the line you want to edit. Note that it spans two lines.

At the very end of that line, you simply need to hit the space bar and add the number three. Like, literally, you’re just adding:

In the example image above, that 3 would be added just after the word ‘handoff’. The 3 is telling the system to boot to the multi-user.target and doesn’t load a graphical environment.

There are directions at the bottom, but just press F10 to continue booting to text mode. The next screen you see should look a whole lot like this one:

This is the result if you decide you want to boot to text mode in Linux.
Tada! That’d be a success. If you see that, you’ve booted into text mode! Congratulations!

This isn’t a permanent change. When you use this method to boot to text mode, you’re only going to boot into text mode that one time. There are ways to set the computer to always boot to text mode, but that’s not within the scope of this article. 

You may have to try this a few times. The process is simple after you get to the GRUB menu, but accessing that GRUB menu may be problematic. You may need good timing (unless you’re set to display this screen on every boot) to access the menu in the first place.

Again, you’ll need to know if you’re using BIOS or UEFI. That’ll help you avoid frustration. I linked to it above, but it wasn’t all that well highlighted. I’ve written an article that teaches you how to tell if you’re using BIOS or UEFI.

Knowing which key will bring up the GRUB menu might just save you a bunch of frustration, as I know this has frustrated people in the past. This bugged one user enough for them to insist their OS didn’t have the option, that it was impossible to do. (They were using one of the official Ubuntu flavors, with a default install. So, they were just upset that they couldn’t get it working.)

Closure:

If you remember the intro well, you’ll know that this article has some drama behind it. You’ll know that the site was down yesterday and that there were continued issues today. I was awake at 04:30 to see if the site was up and running. Things looked pretty good.

I then wrote one article and the system went crazy, crashing when I tried to schedule it for publication. The upstream hosting company then tried some more magic potions and they wanted me to try again.

Alas, that ate the article I wrote…

Fortunately, WordPress is awesome and they stored a cached copy in my browser’s cache. They found this and propagated almost all of the fields. This was great!

That was when I noticed that I’d already covered that subject in the past – twice in fact. In my defense, I write a lot of articles and this was a fine subject to write about. 

At this point, I just wrote another article. That’s this article, for those who weren’t keeping track. We’re still not 100% certain that all the bugs are ironed out, but we’ll see. I’ll schedule it for publication at the usual time and try to observe this as much as I can. This presumes that I’m able to save it and schedule it without any problems. We shall see… (The save draft button does appear to work.)

Thanks for reading! If you want to help, or if the site has helped you, you can donate, register to help, write an article, or buy inexpensive hosting to start your site. If you scroll down, you can sign up for the newsletter, vote for the article, and comment.
Let’s Count The Number Of Files In A Directory

Today’s article probably isn’t all that useful unless, of course, you want to count the number of files in a directory. This can be useful if you want to quickly see if all the files were copied over or the like. Maybe you’ve made a backup and want to ensure the number of files matches. Who knows? It’s your terminal, you do what you want!

This article comes from my notes. These notes were right next to the notes used for the last article, where we learned to count letters, words, and lines in a file. I did get some feedback about why some folks want to know that information, which is always good feedback as far as I’m concerned. It’s great to learn the ways you put these commands to work.

Seeing as I’m lazy and just using the next notes in line, we’ll be using the ‘wc’ command again. If you didn’t read yesterday’s article, or got here by way of a search engine result, then the wc command describes itself like this:

wc – print newline, word, and byte counts for each file

You can expect the wc command to be included in every distro. It is a fundamental application and small enough to be a default application. Even the tiniest desktop distros will likely have this application and you won’t need to install anything. You will need an open terminal.

Count The Number Of Files In A Directory:

As I said in the intro, you’re going to need to use the terminal. Regular readers will notice a trend. We use the terminal a great deal. Just press CTRL + ALT + T and you should be good to go. (Some distros don’t do that as a standard. I’m looking at you, Elementary OS.)

With your terminal now open, navigate to your favorite directory with:

For example:

Then, when you’re there, try the following command:

You can also specify the path, just like you would with the regular ls command. That’d be something like:

If you want to count all the files, including the hidden files, the command would be quite similar:

In case any of this is unclear, I’ve made an image showing how I can count the number of files in a directory with a few similar commands. It looks like this:

using the ls and wc commands together to count the number of files in a directory
See? If you want to count the number of files in a directory, you can do that!

As always, be sure to check the man page for both of these commands:

And:

So, have fun counting the number of files in a directory – while learning a bit about ls, wc, and the almighty pipe (which I’ve not yet written about in any great detail).

Closure:

Of course, I hope you have fun with this one. I’m not sure how many creative ways you can use this set of commands, but it’s nice to use the pipe in an article, even if it’s just one where we count the number of files in a directory. We did use it in a fun article about cowsay and fortune. It has also been used in a few other articles, but we should have an article all about it.

Thanks for reading! If you want to help, or if the site has helped you, you can donate, register to help, write an article, or buy inexpensive hosting to start your site. If you scroll down, you can sign up for the newsletter, vote for the article, and comment.
How To: Count Letters, Words, and Lines

Today’s article isn’t going to be all that interesting unless you happen to want to know how to count letters, words, and lines in a file. If you’re worried about publication length, a student, or perhaps a journalist, this might be the article for you.

For everyone else? Well, you can read this as a curiosity. It’s one of the neat things you can do with your Linux terminal, but probably not the most interesting of things. Still, you can probably find a way to have fun counting letters (characters, really), words, and lines in the Linux terminal. Who doesn’t want to have fun in the terminal?!?

The tool we’ll be using is ‘wc’ and it will almost certainly be installed by default. The wc application will be installed by default on some of the smallest Linux distros. It’s a tool that does this:

wc – print newline, word, and byte counts for each file

That happily sums up why we’ll be using wc in this article’s exercise. It is the most appropriate tool for the job, installed by default, and remarkably easy to use. If you want to count a file’s letters, words, and lines, this is the tool for you. You can learn a lot about this very tool by checking the man page. To do that, just type:

If that doesn’t spit out some information, you don’t have wc installed and should install it. Assuming it does, and it should let’s get into the meat of the article…

Count Letters Words And Lines:

Oh yes… I mentioned the terminal in the intro. That means you’ll need an open terminal for this. It isn’t easy to word this differently in every article, but you can just press CTRL + ALT + T and your default terminal should open.

With your terminal now open,  you can first count the letters (characters) in a file. That’s nice and easy. It’s just this command:

For example, let’s use a file most of you will have:

See? Nice and simple…

Now, if you want to count the words in a file, that’s just this command:

Finally, if you want to count the number of lines in a file, you can do just that. The command is fairly obvious and looks like this:

Now, of course, there are other options with the wc command, but I’ve covered the few that you’re most likely to use. The intro had a command that will show you the man page and you should use that if you have any questions about what more the command can do.

Closure:

Yeah, this is a nice and simple article. It’s only useful for those folks who want to count letters, words, and lines. There’s a subset of users who will want to know this. For instance, I ran this on a computer I don’t use that often and discovered that I’d never set up an infinite bash history file on this computer.

Thanks for reading! If you want to help, or if the site has helped you, you can donate, register to help, write an article, or buy inexpensive hosting to start your site. If you scroll down, you can sign up for the newsletter, vote for the article, and comment.

Linux Tips
Creative Commons License
This work is licensed under a Creative Commons Attribution 4.0 International License.