How To: Get CDROM/DVD Information From The Linux Terminal

In today’s article, we’re going to learn how to get CDROM/DVD information from the Linux terminal. What we’ll be doing is getting hardware information. It should be a brief article, as we’re just going to cover two commands.

I won’t even need to detail the various options, as we’re just after the hardware information. I’d say it’s going to be a short article, but that has a way of blowing up in my face and those articles sometimes end up longer than the “regular” articles! You get what you get. If  you don’t like it, write an article or two for me!

This particular article is actually based on one of my unix.stackexchange.com answers that didn’t get much notice, even though it was the accepted answer. Frankly, in modern days there’s not much need to know this information, as optical disks become a thing of the past. I decided to place the content here, hoping it’s easier for people using search engines. People still use optical media.

As you may know, most of my traffic comes from search engines. That’s the primary motivation for moving this answer here. I’m also motivated by laziness! I want a nice and easy day, for reasons I’ll probably detail in the next meta article. I also want it more easily indexed.

If you don’t know much about your CDROM/DVD player/recorder, then this would be a good article for you. In fact, even if you do know the basics, this is still probably a good article for you. You can learn a lot with a few simple commands. You’ll see…

So then, let’s learn how to get CDROM/DVD information from the Linux terminal. Sure, there’s probably a GUI way to do this, but let’s just stick to the terminal – after all, every Linux user has a terminal available. Plus, I don’t know a GUI method.

How To: Get CDROM/DVD Information:

In today’s article, we’re going to learn how to get CDROM/DVD information from the Linux terminal. What we’ll be doing is getting hardware information. This will require an open terminal. So, to open a terminal, just press CTRL + ALT + T and your default terminal should open.

With your terminal now open, you may need to install the first application we’ll be using. The first application we’ll be using is ‘wodim’, an application used to write data to an optical disk. If you’re using a major distro, it’s in your default repositories. If you’re using apt, then install it with:

Of course, adjust that command to suit the distro you’re using, be it yum or even zypper. Then, run the following command:

Consult the output. That’s it. It should be obvious. Also, if you get any errors from this command, along with the second command I’ll share, remove any disks from the drive. 

For the second command to find CDROM/DVD information, and cdrecord is more likely to be installed by default, you need only to use this command:

Note the similar flags. It’s pretty much the same as you’re going to get with wodim, except cdrecord has a chance of being installed already. I don’t think I’ve come across a distro with wodim installed by default, but I could be wrong. I have come across distros with cdrecord installed by default. So, there’s that.

If I’m wrong and a distro exists with wodim installed by default, be sure to yell at me in the comment section! I’ve been wrong before, so this won’t be a first. I’m a big boy, I can handle it! Also, I’m kinda curious, so please do let me know in a comment.

Anyhow, enjoy the output from either command. They’ll tell you a bunch of information about your optical drives. Both of the commands will help you get CDROM/DVD information. Pick the one you like best and run with it. It’s your computer, you do what you want!

Closure:

As you can see, it’s pretty easy to get CDROM/DVD information from the Linux terminal. As you can also see, you have yet another article! There sure have been a lot of ’em. Again, I reach out to see if you’d like to write an article. I sure could use a break! We’ll soon cross the 300 articles mark! I am very grateful to those who have already helped. 

Thanks for reading! If you want to help, or if the site has helped you, you can donate, register to help, write an article, or buy inexpensive hosting to start your own site. If you scroll down, you can sign up for the newsletter, vote for the article, and comment.
How To: Check For Bad Sectors On Your Disks

Today, we’re going to examine one way to check for bad sectors on your disks. Once again, it won’t be a particularly taxing article, but it’s something everyone should know how to do. This being Linux, I’m sure there are alternative tools.

Hard drives, from spinning platter to solid-state, are divided into sectors. Sometimes, these sectors go bad. The disk’s software manages this to some extent, and actually has more space available than listed so that it can make up for bad sectors as time passes.

But, you still get bad sectors. It’s just the nature of the game, and no disk drive is immune to this. All you can do is accept them and, in some cases, repair them.

See, there are two types of bad sectors. The first is a hard bad sector, which is hardware related and can’t be fixed. The second is a soft bad sector, which is a software issue and it can be fixed. I’ll someday write an article about how to fix soft bad sectors, but I won’t bother getting into that today.

With all that in mind, the tool we’ll be using is appropriately named ‘badblocks’, which describes itself thus:

badblocks – search a device for bad blocks

Badblocks has a variety of uses, so you can always get a head start on this article by reading the man page. 

So, with that already covered, let’s just jump into the article.

Check For Bad Sectors:

This article requires an open terminal, like many other articles on this site. If you don’t know how to open the terminal, you can do so with your keyboard – just press CTRL + ALT + T and your default terminal should open.

With your terminal now open, you should probably identify your drives with the following command:

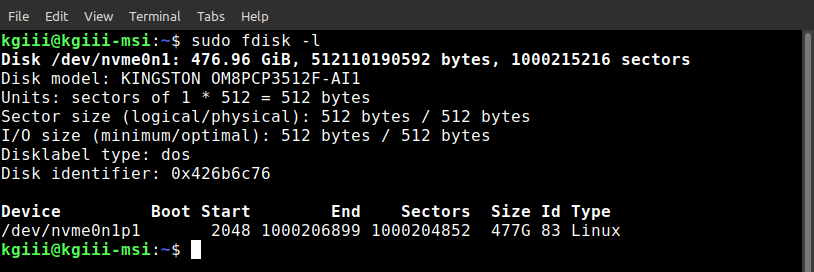
The output of this may look a bit like this:

output of fdisk -l
You can see your drive’s identification with the output of fdisk -l.

As you can see,  it’s listed as /dev/<device_ID>  and that’s the information you want to hold onto.

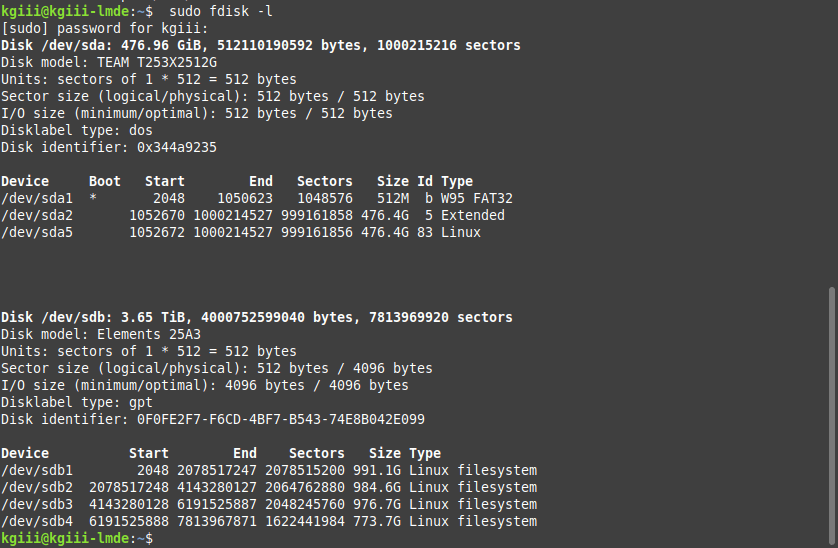
Sometimes, it’s a lot more complicated, and will look something like this:

output of fdisk -l
This is a bit more complicated than the first one – plus the drives are all ‘sd*’ in nature.

As you can see, they’re all start with ‘dev/sd*‘ and end up as /dev/<device_ID>. The system I ran badblocks on is quite a bit more complicated than the output from the laptop I used in the first instance.

Now, you want to scan your individual device to check the for bad sectors. That’s actually just a simple command. You can use:

The -v ensures the output is verbose and sent to the screen. You can also write that data to a text file for reference. To do that, you just use a command similar to this:

Then, you’ll have a badblock.txt file you can refer to, showing you information about any bad blocks. I wanted to show you the output from a disk with bad blocks, but I don’t appear to have any to show you. I tried quite a few, but it was a no-go. Ah well… You’ll figure it out easily enough. It’s not even a little hard to check for bad sectors!

Closure:

Yup… You have another article. This time you learned how to check for bad sectors, a pretty handy tool – especially if you’re finding corrupt files on your disks. If you are facing corrupt files, this would be the first step I’d suggest taking.

Anyhow, the show does go on and you got a new article. I am more or less feeling just fine now, just some lethargy and not a whole lot of energy. Sweet!

Thanks for reading! If you want to help, or if the site has helped you, you can donate, register to help, write an article, or buy inexpensive hosting to start your own site. If you scroll down, you can sign up for the newsletter, vote for the article, and comment.
How To: Check Disk Usage With ‘df’

In today’s article, we’re going to do exactly what the title suggests; we’re going to check disk usage with ‘df’. This means we’ll be checking disk usage in the terminal. Seeing as ‘df’ is included with every distro on the planet (I’m pretty sure) it means this won’t be all that complicated.

I am still a bit under the weather, but the show must go on! I’ve gone this long without missing a publication date, so I might just as well keep the  streak up. 

As the title suggests, we’ll be using ‘df’ to check disk usage. This will already be installed as one of the default tools, so you won’t need to install it. That’ll save some time! If you’re curious, the ‘df’ tool describes itself as:

df – report file system disk space usage

If you want to get a head start, you can check the help page. To do that, you’ll want to run:

If you’re like to check the version, the command is:

So, with that in mind, let’s just jump into the article.

Check Disk Usage With ‘df’:

Obviously, this is yet another article where we’re learning about doing things in the terminal. That means you’ll need an open terminal. If you don’t know how to open the terminal, you can do so with your keyboard – just press CTRL + ALT + T and your default terminal should open.

With your terminal now open, you can just run the command by itself:

In some cases, it will throw an error and not be able to read everything. That’s usually easily resolved. Just run the command as a privileged user. So that would look like:

Now, you can use that output to do a bunch of math, or just pay attention to the percentages. Or, if you’re wanting, you can use the -h flag and get the output in human-readable format. That looks like:

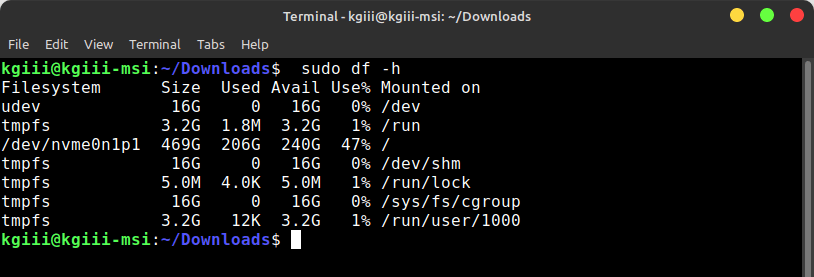
The output of which might look a little something like this:

the output of sudo df -h
See? No errors and it is nice and readable! You can’t go wrong with that!

As you can see in the picture, I’m only using less than half of my available disk space. I don’t need to worry about running out of space any time soon, but if it gets low I can always check disk usage with ‘df’. Also, it doesn’t matter what directory you’re in when you run the command. As you can see, it runs just fine while in the Downloads directory.

I also wrote an article about using GUI methods to visualize disk space usage. You might prefer one of those methods, but you can always just use the terminal to check disk space.

Closure:

It seemed like a good idea to do a quick article tonight. I’m watching IMSA’s last race of the season and feeling poorly, so hopefully I get some sleep at a reasonable hour. Still, as I mentioned, the show must go on. The site has had a new article every other day for quite a while. I might as well keep up the schedule.

Thanks for reading! If you want to help, or if the site has helped you, you can donate, register to help, write an article, or buy inexpensive hosting to start your own site. If you scroll down, you can sign up for the newsletter, vote for the article, and comment.

Let’s Find The Size Of A Directory

Today’s article is one where we’re going to find the size of a directory. Why? Because that sounds like something fun to do. The site has more than 250 articles, most of which are reasonably productive and authored by me. (I do love me some guest articles – so long as they’re from the community. No more paid stuff! That lesson was learned.) They can’t all be winners!

So, why would you want to know the size of a directory? How should I know? Maybe you need to make space? You could want to upload the directories and want to know if you have space at the destination? Perhaps you are going to transfer the files and you want to estimate how long that will take? You do you. I don’t care why you want to find the size of a directory. That sort of thing is between you and your directories!

Anyhow, we’ll be using ‘du’ in this article. If you want a GUI way to find the size of your directories, you can visualize disk usage easily enough. You can also easily find large files. You shouldn’t need to install ‘du’, it should be installed as a part of the standard toolkit (GNU coreutils). To find out if you have ‘du’ installed, you can just try du --v in the terminal, which will spit out some version information.

So this should be a fairly short article – nice and easy. Let’s get on with it!

Find The Size Of A Directory:

This article requires an open terminal, like many other articles on this site. If you don’t know how to open the terminal, you can do so with your keyboard – just press CTRL + ALT + T and your default terminal should open.

We’re going to us ‘du -h‘ for everything, because that -h stands for ‘human readable’ and it’s just easier than seeing byte sizes. You don’t actually have to use the -h, it just makes good sense to do so.

The format for this is largely ‘du -h /directory‘, like so (using the Documents directory as an example):

You can just add more directories as needed (we’ll add downloads):

That will output the size of both directories. If you are unaware, the ~ (tilde) is a shortcut meaning your home folder. For example, if you’ve navigated away from your desktop, you can cd ~ and get back home. It’s faster than clicking your heels together three times!

By the way, if you’re stringing directories together, you can get the total size of the directories with the following:

That’s about it. That’s all you really need to know for this exercise. I told you that it’d be quick and easy! Most of my articles involve opening the terminal, and yet so many of them are really quite simple to learn and remember. I strongly urge new Linux users learn a bit about the terminal, not because it’s hard but because it’s often easier and faster than using a graphical tool.

Closure:

I wasn’t kidding about there being more than 250 articles. There are 256 of them at this time, and this will make 257. So far, I haven’t run out of ideas and I’ve been able to get one out to you every other day. I hope you find these articles as useful as I’d like them to be. It does take me longer to come up with ideas, so it might have to slow down at some point. I mean, I can’t keep writing these kind of articles forever,  can I? No… No, I don’t think I can.

Thanks for reading! If you want to help, or if the site has helped you, you can donate, register to help, write an article, or buy inexpensive hosting to start your own site. If you scroll down, you can sign up for the newsletter, vote for the article, and comment.

How To: Adjust Swappiness

In today’s article, we’re going to learn how to adjust swappiness. It’s something you might want to do, as many don’t like the initial value set by the developers. It’s relatively easy.

I’ve written about swap before. I think you’ll find the best information in my recent article telling you how to remove a swap file. In that article, I tell you why I still use a swap file – even when I have lots of RAM available.

The reason for that boils down to how a swap file isn’t just some place that the kernel sticks things when you’re out of RAM. It has other uses as well. I figure I’m not smarter than the kernel and evidence tells me that the kernel uses swap even when there’s all sorts of RAM available. So, I use a swap file (not a swap partition these days). You might also want one if you plan on using advanced power management features like hibernation or sleep.

Anyhow, one of the only settings you can change regarding swap is the ‘swappiness’ value. That setting is basically how aggressively the kernel will use swap. The higher the number, the more the kernel will use swap. The lower the number, the less the kernel will use swap. It’s pretty basic in theory.

I don’t actually normally adjust the swappiness value. It works just fine at the default setting, so it doesn’t seem to me like I need to adjust it. Other people adjust it, and that’s fine. Either way, I’m going to tell you how to adjust the swappiness value. You do what you gotta do.

Adjust Swappiness:

This article requires an open terminal, like many other articles on this site. If you don’t know how to open the terminal, you can do so with your keyboard – just press CTRL + ALT + T and your default terminal should open.

With your terminal open, let’s see what value swappiness is set at before we decide to adjust swappiness. Enter the following command:

The default is usually 60, at least in the Ubuntu world, and some folks think that’s too aggressive. That value is easy enough to change. But, what I’d suggest doing is adjusting the value temporarily so that you can see what happens when you adjust swappiness. To set the value temporarily, you can just use this command:

Adjust the ’30’ to any number you want between 0 and 100. Both extremes are likely bad, but I’ve used values as low as 10. You could even set it to 0, which should stop the kernel from swapping anything.

Once you find a swappiness value you like, you can make it a permanent change to your system. That’s pretty easy. You just:

Add the following lines of text:

Use your own value if it’s not 30 and save the file. To save a file in nano, press CTRL + X, then Y, and then ENTER.

You can then reboot, or just wait until your next reboot, and the new swappiness value will be used. If you don’t feel like rebooting immediately, just adjust it temporarily and reboot when it’s convenient for you.

Closure:

There you have it, another article! This one has you learning how to adjust swappiness to a value that you can work with. I’d encourage folks to read the linked swap file article to see why I use a swap file even when I have gobs of RAM. If nothing else, using one won’t break anything.

Thanks for reading! If you want to help, or if the site has helped you, you can donate, register to help, write an article, or buy inexpensive hosting to start your own site. If you scroll down, you can sign up for the newsletter, vote for the article, and comment.

Linux Tips
Creative Commons License
This work is licensed under a Creative Commons Attribution 4.0 International License.