Let’s Use ‘netstat’ To Find Out What Process Is Listening On A Specific Port

Today’s article is going to teach you how to use ‘netstat’ to find out what process is listening on a specific port. If you have open ports and don’t know why – and what’s listening on that port, you’re not making good security choices.

Let’s say you followed an article about how to monitor TCP/UDP in real time. If you’re new, or even just not all that advanced with Linux and networking, you might not know why there are all those ports and all that activity. Well, one of the things you should know is how to identify what process is listening on a specific port.

There are a number of ways to do this, but we’ll be using ‘netstat’. The ‘netstat’ application can be pretty advanced, but what we’ll be doing is pretty straightforward. If you’re curious, ‘netstat’ defines itself thus:

Print network connections, routing tables, interface statistics, masquerade connections, and multicast memberships

As you can see, it’s a pretty advanced application. It has a rather expansive man page, and we’ll largely ignore that as we really only need some limited functionality. All we really need to do, for this exercise, is find out what process is listening on a specific port.

With that in mind, let’s leap into the meat of the article…

What Process Is Listening On A Specific Port:

This article requires an open terminal. If you don’t know how to open the terminal, you can do so with your keyboard – just press CTRL + ALT + T and your default terminal should open.

Once you have that open, you’ll need to find out if you have ‘netstat’ already installed. There are many ways to do this, I prefer:

If you do not have ‘netstat’ installed, it’s certainly available for all mainstream distros and easily installed from your default repositories. Here’s how to install on a few distros:

Debian/Ubuntu/Mint/etc:

RHEL/CentOS/Fedora/Rocky Linux/etc:

SUSE/OpenSUSE/etc:

If you’re using a different distro, root through the default repositories. It’s a pretty common tool and I’d like to imagine it’s easily available to anyone.

Once you have ‘netstat’ installed, the command we’re going to use is really, really, simple. In fact, I wrote this whole darned article mostly for just one command. I probably could have made it shorter. Still, it might as well be long enough to give some extra information along the way.

Anyhow, the command you run is this:

For example, you might have an open port 22 and want to know what process is listening on that specific port. So, you’re command would look like this:

The end result will look something like this:

netstat being used to find out which process is listening at a specific port
While not completely clear, you can deduce that it’s just the SSH daemon listening on port 22.

It may not be completely clear, but you can use this to deduce what process is listening on a specific port. If it’s not completely clear, you can get actually dig a little deeper. See the “1100” in there? Well, that’s the PID (Process ID) and you can use the following command to get more informtion. It looks like this:

The output from that in this case is:

Which, as we know, is the daemon for SSH and thus nothing unexpected is running on port 22. See? Security!

Closure:

And there you have it, another article. This one is a pretty handy one, especially for when you want to know what process is listening on a specific port. If you have things running that you can’t identify, you can always stop by Linux.org and ask for help. Someone there will try to find out what’s going on for you.

Thanks for reading! If you want to help, or if the site has helped you, you can donate, register to help, write an article, or buy inexpensive hosting to start your own site. If you scroll down, you can sign up for the newsletter, vote for the article, and comment.
How To: Make ‘curl’ Ignore Certificate Errors

In today’s article, we’re going to learn how to make ‘curl’ ignore certificate errors. If you do a lot of ‘curl’ing, this is something you’ll want to know. It’s not a dreadfully difficult task to ignore certificate errors, just a couple of options, but we might as well learn them both today.

We have previously covered the curl command, though the article only touched the surface – covering the basics that a regular Linux user might want to know. If you’re unfamiliar with curl, it’s a tool that’s used to transfer data to or from a server. It defines itself as a tool that you use to ‘transfer a URL’ and it’s an expansive application, with myriad options only a true guru would need or want to know.

What we haven’t really covered much is SSL and certificates. Briefly, SSL stands for “Secure Sockets Layer” and means that there’s a secure connection between you and the site. The certificate contains information like the URL and IP address – and is the confirmation used in the secure socket layer. Meaning, the certificate matches the site and this confirmation is what lets you use SSL without any warnings. Any break in the chain should throw an error up on your screen about a broken or missing certificate.

But, what if you still need that information? What if that data is essential? If the certificate is broken then curl will throw an error and not complete the transfer. It’s for this reason that you’ll want to learn how to …

Make ‘curl’ Ignore Certificate Errors:

Obviously, curl is an application used in the terminal, so this article requires an open terminal. If you don’t know how to open the terminal, you can do so with your keyboard – just press CTRL + ALT + T and your default terminal should open.

These days, everything is expected to have a security certificate and SSL. Even this site has one, as you can tell by the https:// in the URL. Some folks want them for everything on the web, but I’d contend not every site really needs to have one – especially sites that aren’t interactive and don’t collect personal information. But, I have one and would have one regardless – simply because we do exchange some personal information (like email addresses) and I want folks to know we take security seriously.

Moving on…

The syntax is simple and, again, we’re only tackling part of the curl application. It’s simply too large a program, with too many variables, to cover it all in just one article. You basically have two choices:

And the other option is:

Either of those will let  you make curl ignore certificate errors, allowing  you to fetch whatever it is you were after. I suppose you should be careful with this, always verifying what you fetch is what you were actually after. Be extra careful to ensure the address is the one intended, of course. Just practice some careful scrutiny and you’re likely to be just fine.

Closure:

Yup. Another article. This one will help you use curl and to ignore certificate errors. It’s especially useful if you use curl a great deal. If not, stick it in the back of your memory banks and recall it when you do end up needing it. You never know when a tool like this will come in handy.

Thanks for reading! If you want to help, or if the site has helped you, you can donate, register to help, write an article, or buy inexpensive hosting to start your own site. If you scroll down, you can sign up for the newsletter, vote for the article, and comment.
Change Snap Application Privileges In Lubuntu

In today’s article, we’re going to learn how to change Snap application privileges in Lubuntu. With Ubuntu, it’s a bit more straightforward. In Lubuntu, you have to dig around a little bit. Don’t worry, ‘snot hard – it’s just not all that intuitive. 

Snap applications come with their own privileges. This is useful because sometimes you may want to change them, to enable something that was disabled or to disable something that was enabled. I think it’s sorted now, but at one point you even had to change the permissions to let the Firefox browser access removable media.

In Ubuntu it’s pretty straightforward and there are a ton of tutorials already out there that will help you change Snap application privileges. It’s just one of those things that comes with Snaps, so we’ll cover Lubuntu.

I’ve written about Snap applications before, including sharing how to disable Snaps completely. However, the reality is that they’re going to be a part of the Ubuntu ecosystem for the foreseeable future.

Like them or not, they will be a part of Ubuntu and official Ubuntu flavors. I suspect trying to avoid them will get more difficult. With the new Lubuntu, for example, the Firefox browser will come as a Snap application by default.

So, well, even we folks using Lubuntu must come to grips with Snap applications. This can be a pretty painless process, if you’re armed with some information. That’s what this article is meant to do. This article is meant to teach you how to …

Change Snap Application Privileges In Lubuntu:

This is actually pretty easy, but not necessarily intuitive. Unlike many of my articles, you don’t actually have to start with an open terminal. No, you need to start with “Discover”.

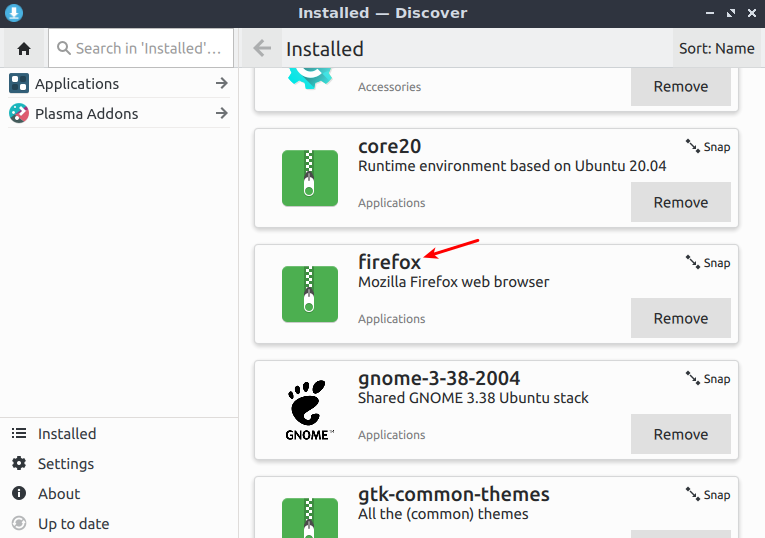
So, crack open your menu, click on System Tools, and then click on Discover. Once you have Discover open, you can use the search or installed option to find the application in question. In this article, I decided to just use Firefox – seeing as we Lubuntu users will be faced with a Snap app Firefox.

When you find the application, you just click on it. It looks like so:

click on Firefox to begin
See? I even started you off with a handy arrow! It’s a recurring theme!

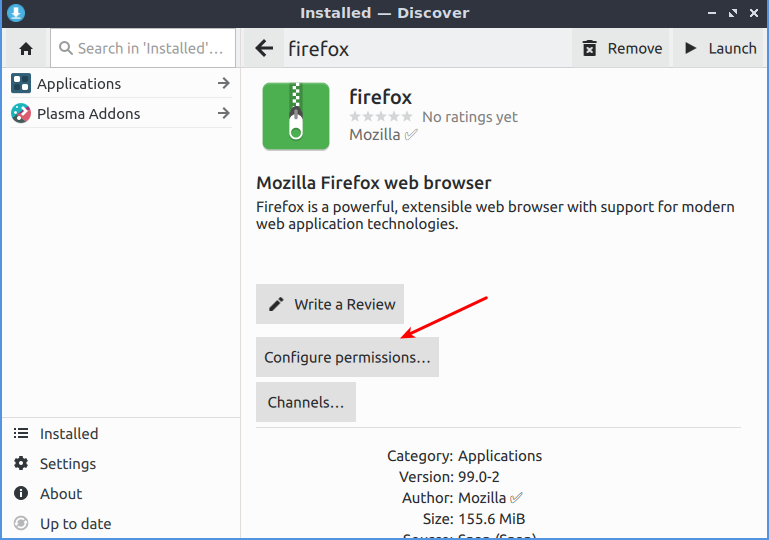
Once you’ve clicked the application, then you just click on the obvious! You just click on “Configure permissions”. That looks like this:

click on permissions to continue
Yup. I gave you another handy arrow – but it should be obvious now.

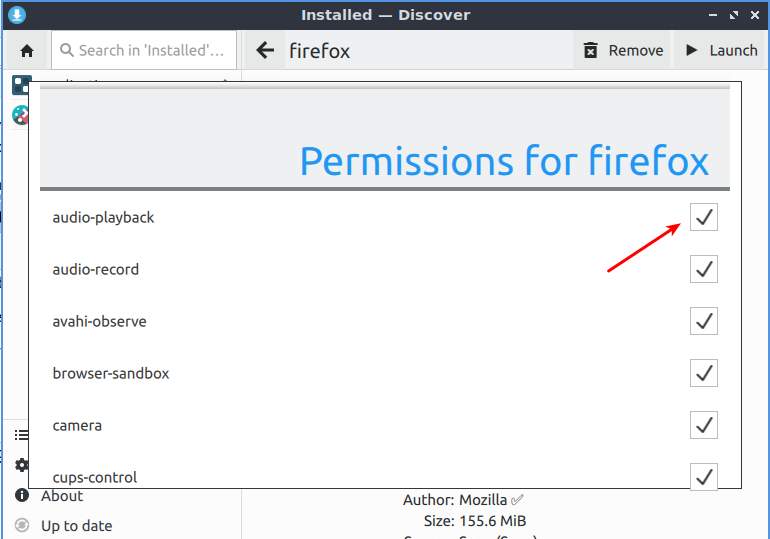
Finally, you can adjust the individual permissions. That looks like this:

finally, adjust your permissions as needed
There are a bunch of settings you can change. Again, you get a handy arrow!

That’s about it, really. The thing is, you have to use Discover. While the Muon application is able to install applications, it doesn’t deal with Snap applications. Only the Discover application has these menus and it’s the only way (at least graphically, by default) for you to adjust the individual Snap application privileges.

So, while it’s not necessarily intuitive – it’s not dreadfully difficult. You just have to know where to look and then it becomes obvious.

Closure:

Guess what? As of tomorrow, a day where no article is scheduled, it will have been a full year that this project has been alive. That’s right! I’ve gone the full year without missing  a single publication date! If I can do it, so can’t you! 

So, am I done? No… No, I don’t think so. I still have articles that need to be written, things that need to be said. I’ve had a great deal of fun, though it has been a lot of work. I’ve learned some, you’ve learned some, and I’d say it’s a net benefit to the Linux community – though I suppose I’m a bit biased. (Feel free to agree with me!)

I may take a few days off. I’m not actually sure. I haven’t decided. I have decided that this can’t be the last article, so there’s that. Which is nice… If nothing else, I’ll see you again in a few days. I might enjoy taking a break. Then again, I kinda suck at taking breaks. I truly suck at retirement.

Thanks for reading! If you want to help, or if the site has helped you, you can donate, register to help, write an article, or buy inexpensive hosting to start your own site. If you scroll down, you can sign up for the newsletter, vote for the article, and comment.
Check To See If SELinux Is Working

In today’s article, you’ll learn how to see if SELinux Is Working on your system. Your system may not have SELinux, but many do. This article is for those people. You’re welcome!

SELinux stands for Security-Enhanced Linux and its function is to provide greater controls over who can access the system. It was actually developed by the US spy-agency – the NSA. You’ll often find SELinux in distros that fall within the RHEL family tree. The link at the start of this paragraph will give you even more details.

This article is just about checking to see if SELinux is working. It should be noted that SELinux has three operational states. I’ll cover them lightly here.

The first operational status is usually the default, which is ‘enforcing’. This means that it’s working and blocking as designed.

The second possible result is ‘permissive’. When SELinux is in this state, it is not blocking anything – but it is logging everything. So, you’ll see things after the fact, when you check the logs.

The third is simply ‘disabled’. That’s self-explanatory. If it’s disabled, it means it isn’t working. If it’s disabled, it’s easy enough to start it. If you choose not to, you’re not taking advantage of a security tool.

It’s not a very difficult article to follow, I don’t imagine. Pretty much anyone can figure this out. We won’t be going into details other than what the headline, and explaining everything about SELinux would take a lot of time and is beyond my level of expertise. 

See If SELinux Is Working:

This article requires an open terminal, like many other articles on this site. If you don’t know how to open the terminal, you can do so with your keyboard – just press CTRL + ALT + T and your default terminal should open.

With your terminal open,  the very first command you can use is simply:

That’ll spit out exactly the answer you’re looking for. However, the command that’s more interesting is the one that follows, an arguably better command to learn more about the status of SELinux:

That command outputs a ton of information. The output of that command has more information. Included in that information is the SELinux status. It’s a quick way to see if SELinux is working. 

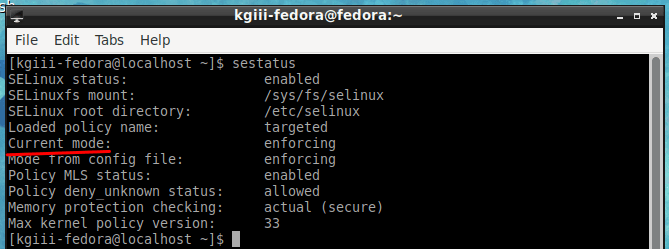
The output of that command would look something like this:

selinux status
See? The output lets us see that everything is fine. 

See the line – which is “Current mode:”? Well, that’s how you see if SELinux is working. It also feeds you other information, for a more deep view of your SELinux status.

I suppose if you use that command and want to narrow it down, you could do something like:

Which is really just a bit silly when you already have the getenforce command available. There’s no reason to occupy one of your memory banks with that command, as it’s really just some fun with grep.

Closure:

Yup… There you have it. You have another article! ‘Snot really all that handy for those of us who don’t use SELinux. But, if you are using SELinux, this is a perfectly handy way  to see if See If SELinux Is Working.

Thanks for reading! If you want to help, or if the site has helped you, you can donate, register to help, write an article, or buy inexpensive hosting to start your own site. If you scroll down, you can sign up for the newsletter, vote for the article, and comment.

Linux Tips
Creative Commons License
This work is licensed under a Creative Commons Attribution 4.0 International License.