Find Your Last Boot Time In Linux

It’s a weekend so today’s article will be short and easy, an article for when you want to find your last boot time in Linux. If you want to know when you last booted your computer, there are many ways to get that information. We’ll just cover one way…

We’ve covered a couple of ways to do this in the past. If you want, you can read the following article:

When Did I Last Reboot My Linux Box?

I wrote that article more than two years ago. It was one of my earliest articles. In that article, I covered a couple of different ways that you can find out when you last rebooted your Linux computer. 

In that article, we covered commands like:

There are some advanced commands you can use, so do read the previous article to learn more about how you can find your last reboot time.

In that article, I also mentioned that you could see how long your computer has been on since the last reboot with the uptime command. That’s simply done:

Speaking of the uptime command:

How To: Find Your Uptime In Linux
The Meaning Of “Load Average” On Linux?

Those articles might be of interest. This is a simple article, but it does allow you to read quite a bit more related content.

Find Your Last Boot Time In Linux:

You guessed it. We’ll be doing this in the terminal. That means you’ll need an open terminal. If you’re not sure how to do that, look in your application menu or press CTRL + ALT + T and your default terminal should open.

For this article, we’ll be using the who command. You can check the man page with man who to learn more about the command. If you do that, you’ll learn that the who command is described as:

who – show who is logged on

That may not be as descriptive as it could be. If you just run the following command, you’ll be able to see everyone who is currently logged into your system. That’s just this command:

That simply tells you who is logged in. Your output might look a little like this:

As you can see, I am logged in both on tty7 (the desktop) and tty3.

If you did check the man page, you’d have possibly seen the -b flag. That flag is described accurately:

-b, –boot
time of last system boot

See? Now it should be obvious why I’ve chosen to write this article about how you can find your last boot time with the who command. The command is simply:

Which will output something similar to this:

See? That’s all you need to know if you want to find your last boot time! It’s not all that difficult to get started with the Linux terminal. This is a command any Linux user can learn. It’s also a pretty easy man page to decipher. So, that’d be good for new users as well!

Closure:

It’s a weekend and I’m lazy today. So, you have an easy article. It doesn’t have to be all that easy. I gave you plenty of links that you can (re)visit. Visiting those links will also show you how much the site has changed – specifically with how I write the articles. This particular article is a lot like how I wrote many of the articles, but I’ve been mixing it up quite a bit. I was just really in the mood for an easy article today, so you got this one about using the who command to show when you last rebooted your system.

Thanks for reading! If you want to help, or if the site has helped you, you can donate, register to help, write an article, or buy inexpensive hosting to start your site. If you scroll down, you can sign up for the newsletter, vote for the article, and comment.
Yet Another Way To Find Files By Extension

You might look at the title and think that you’ve seen this before, and you have, but this is another way to find files by extension. That’s right! This is Linux! There’s almost always a variety of ways to think about this. There are almost always a variety of ways to accomplish the same task!

Well, this article will touch on a theme we’ve seen before. We’ve seen it recently. I’ve even explained why you might want to find files by their extension type. Fortunately, I’ve even explained the limitations this has.

See a shell script file could have a .txt extension but still work just fine as a script. Linux cares about the file itself more than it cares about the extension. If you have files mislabeled as an .iso file, this operation will still list them as .iso files. This is only about the extension and using that as a search category. It has limitations.

You can read these articles for more:

Another Way To Locate Files By Extension
Find Multiple Filenames By Extension – With Locate
How To: Find Multiple Filenames By Extension

See? It might seem that this article is like beating a dead horse, but it’s not. There are use cases for all of these options, including the option I’ll give you in this article.

Also, it seems like a good day to take it easy. Life has sent me a bit of extra stress. That won’t stop me from writing this article. It seems nothing will stop me from writing these articles!

The ‘ls’ Command:

This is kind of the sledgehammer way to find files by their extension. It’s a good way. It’s even an easy way to remember, without needing extra commands. At the same time, it’s a pretty basic way to do so.

The first command we’ll work with is one you have installed already. You won’t need to add any software to follow along with this article. We’re simply going to use the ls command to list directory contents. 

If you check the man page for the ls command, you’ll see this:

ls – list directory contents

What did I say in the paragraph before that? I said we’re going to list directory contents. Sure enough, Linux provides the perfect tool for this. 

As an aside, what you can accomplish with a basic Linux install is amazing. You can accomplish a whole lot of work without actually adding any additional software. This is awesome. Thank you, Linux.

The ‘grep’ Command:

The second command we’ll be using is the grep command. If you’re a regular on this site, you’ll have used the grep command many times. You can think of the grep command as a filter. You use the grep command to process the output of another command (more often than not) and, more specifically, you use it to filter that output.

You want to use grep when you’re trying to isolate some information. Well, sure enough, we can check the man page for grep. If you do so, you’ll find that grep accurately describes itself like this:

grep, egrep, fgrep, rgrep – print lines that match patterns

You’ll see that grep comes in many forms. You’ll also see that it’s used to print lines that match patterns. The command is filtering out those lines that don’t match the prescribed pattern.

In fact, I used it as an example in the previous article:

Find Out When A File Was Created

Scroll down to see how you can use the grep command to filter out the lines that aren’t important when you simply want to find out when a file was created. Simple, eh? Yes… Simple!

Find Files By Extension:

As you can guess, we’ll be using both the ‘ls’ command and the ‘grep’ command to find files by extension. As those are terminal-based commands, this will be a terminal-based article. You’ll need to open a terminal and you can (more often than not) do so by pressing CTRL + ALT + T.

With your terminal now open, this is the syntax I want you to use for this exercise. We’ll keep it simple:

If you’ve used mix-case, maybe having extensions of .TXT (in capital letters), you can add the -i flag to the grep command. That will (don’t forget to check the man page) tell the grep command to ignore the case. So, an example of the syntax for that command might be:

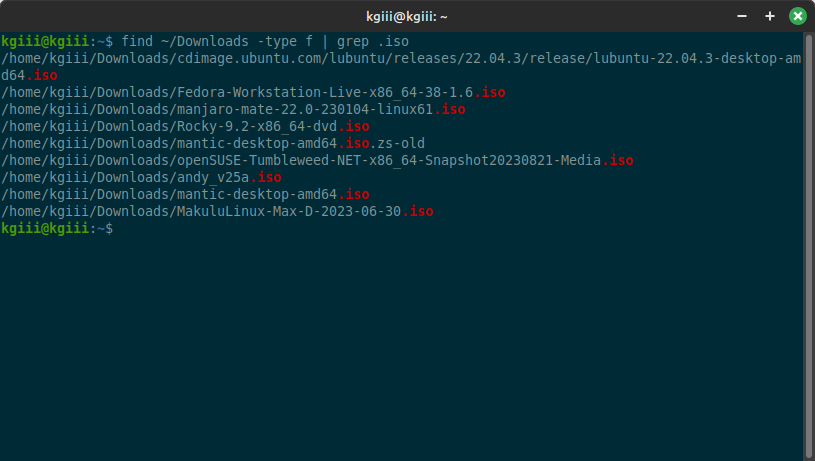
For example, I might want to search my ~/Downloads directory for .iso files, finding the various distros I’ve downloaded on this computer. If I wanted to do that, my command would look like this:

And, sure enough, here’s an example output from that very command:

See? That output shows you all the .iso files that I have in my ~/Downloads directory. There’s no fuss. There’s no muss. It’s just a simple way to find files by extension.

Anyone can do it and they won’t need any additional software to do so. Everyone (except maybe someone with a very light embedded Linux system – and probably still them) can find files by extension without adding anything to their system. It’s maybe a bit creative, but it’s effective. I’m not sure about you, but I like effective things. This meets that definition squarely – it’s effective.

Closure:

Well, I guess this is still a fairly long article. I’ve been making them longer and this one just got written that way. My style of longer writing isn’t without thought. I have altered the format of these articles a half-dozen times.

Each time I do so, I do so for you. The goal of altering the format is to make it easier for you to digest and to offer more information than previous articles – even for the more basic articles like this one. I do not know if I’ll settle on this style. Evidence would suggest that I’ll improve upon it as I go.

I welcome feedback on this. I don’t suppose you’ll give me that feedback. The odds are good that you won’t even read this far down. Still, please let me know if you like the current writing style. I’ve consistently written to a formula, but that formula has changed over time. This is the most recent iteration, so please let me know what you think. Thanks!

Thanks for reading! If you want to help, or if the site has helped you, you can donate, register to help, write an article, or buy inexpensive hosting to start your site. If you scroll down, you can sign up for the newsletter, vote for the article, and comment.
Another Way To Locate Files By Extension

I figure that today is a good day for a shorter article, so we’ll look at another way to locate files by extension. This is something that you can do in so many different ways. We’ll just cover another one, simply because we can.

You might want to locate files by extension when you’re doing file management tasks. When you have a directory containing many files, the output from the ls command can be pretty cluttered. For example, you might want only to list the files with a .txt extension. This article will help with that.

It should be noted that Linux doesn’t much care about file extensions. If you create a plain text file without any extension at all and add some text to the file, Linux will know that it’s a text file. See this article on Wikipedia about magic bytes:

List of file signatures

See also this article:

Magic Number on Wikipedia

About a year ago, I wrote a couple of articles on this same subject – that is finding files by extension. Of course, those articles are different than this article. This is a different way to locate files by extension. Those previous articles were:

Find Multiple Filenames By Extension – With Locate
How To: Find Multiple Filenames By Extension

So, finding files by their extension type has been covered before. We’re just going about it another way. The previous examples were a bit convoluted and this is just going to be an “easier” way. (I suspect that it’ll be easier. I guess that depends on what you consider to be easy!)

Locate Files By Extension:

Yes, we’ll be doing this in the terminal. I’m sure there’s a GUI way to do so, but that’s going to be a matter of the file manager you use. They will not all have the same features and not all of them will access those features in the same way. So, let’s get started by opening your terminal – just press CTRL + ALT + T and your default terminal should open.

With your terminal now open, we’ll use the find command again. You almost certainly won’t need to install anything but you can confirm that you have find installed with this command:

See? You have the find application installed already. 

If you check the man page (with man find), you’ll see find is described as:

find – search for files in a directory hierarchy

We’ll also be using grep and a pipe “ |” in this article. You should know that grep helps you sort stuff and that the pipe lets you take the output from one command and use it in another. The pipe is a very underrated tool by people who don’t know much about the terminal.

The command we’ll be using is a find command. The syntax is quite simple and would look something like this:

For example:

The -type f is telling the find command to only look for regular files. Then, the output from that command is then piped to the grep command. After that, the grep command looks for file names that contain a . and the specific extension you’re looking for. The output might look like this:

using find and grep to locate files by extension
This is a fairly new installation and most of my .iso files are stored on the network.

Now, this isn’t going to work if you just use wonky file names. This isn’t going to find files without that extension name. Remember, we’re trying to locate files by extension. We are not determining if the extension is correct and we are not determining what the file really is.

See? Pretty simple!

Closure:

Well, I said today’s article would be shorter. It’s also fairly simple. If you need to locate files by extension, there are many ways to do it. Some methods are easier than others. Perhaps some are more robust than other methods. Either way, you can now locate files by extension type. 

You might also be interested in this article:

Find Out What A File Is

Otherwise…

Thanks for reading! If you want to help, or if the site has helped you, you can donate, register to help, write an article, or buy inexpensive hosting to start your site. If you scroll down, you can sign up for the newsletter, vote for the article, and comment.

Show Mounted Partitions

Today we’ll have a fairly easy article, one that won’t be too long, as we discuss a couple of ways to show mounted partitions. This isn’t anything complicated. A new user should be able to follow along, so long as they’re not too afraid of the terminal.

Even if a new user was afraid of the terminal, none of these commands perform actions other than providing information. If you are careful, even using copy and paste, you won’t risk harming anything. Then again, this is pretty basic stuff. You can handle it just fine! (I have faith!)

Did you notice how I said “a couple of ways”? Well, I said that because there are all sorts of ways to show mounted partitions. 

If you don’t know what a partition is, it’s pretty easy to understand. You have a storage drive. By itself, it’s pretty useless. You have to decide on a filesystem and add at least one partition for that storage drive to be useful. There are also virtual partitions that are created by, and used by, the operating system.

Additionally, that partition must be mounted to be accessible for normal read and write operations. Sometimes, you may need to unmount a drive to perform certain operations. For example, you can’t change the size of the partitions on a mounted drive.

All we will be doing in this article is showing the mounted partitions. I haven’t just picked two commands, I’ve picked the two commands that I think have the most easily processed output.

Show Mounted Partitions:

The very first paragraph mentioned the terminal. That’s because we’ll be using the terminal for these exercises. So, go ahead and press CTRL + ALT + T. Hopefully, that will open your terminal.

We shouldn’t need to install any new software for the tasks covered in this article. We will be using two different applications, but those are going to be installed by default more often than not. I told you that this one will be easy!

Show Mounted Partitions With The ‘df’ Command:

With your terminal open, you can start by verifying that the df command is installed on your system. You’d do that with this command:

With that information, you’ll not only get the version you’ll see why it’s probably installed by default. The df command is a part of ‘GNU coreutils’, which is a set of GNU-provided applications that should be installed by default.

When you check the man page, you can also that df is described as being:

df – report file system disk space usage

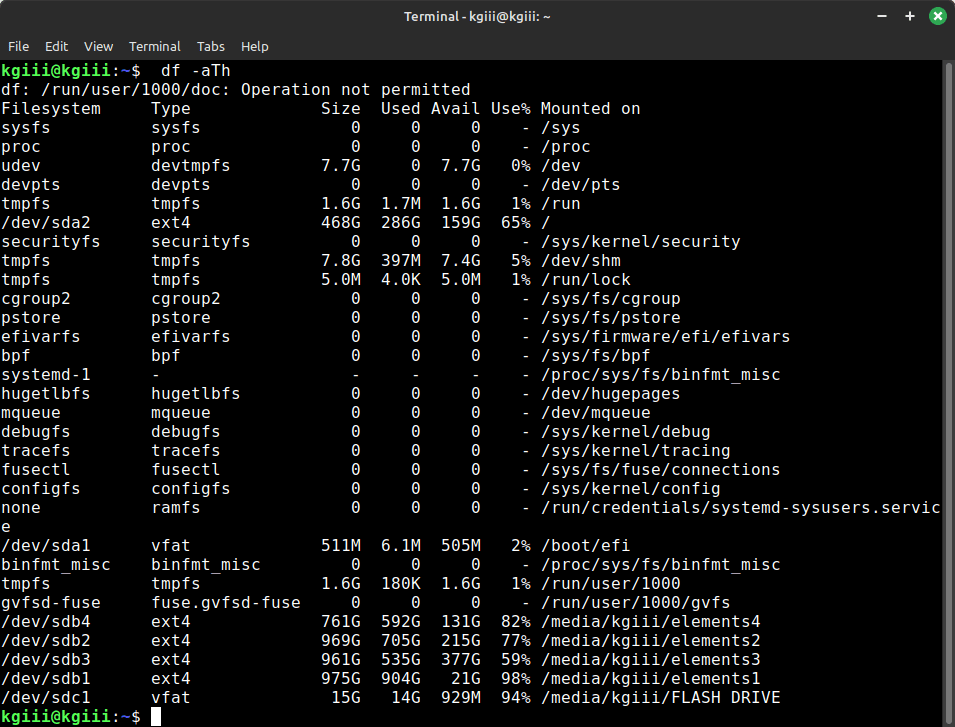
So, that’s probably a pretty good tool for showing your mounted partitions. The df command we’re going to use is quite simple. It looks like this:

You can check the man page to see what those flags are doing:

The command output is nice and easy to understand, but very thorough. The next command we’ll use only shows a subset of the above-mentioned virtual partitions. 

Anyhow, that command may look a bit like this:

using the df command to show mounted partitions
Yes, a lot of that is information you don’t really need to know – but now you do.

As you can see, the output from this df command is very thorough. You almost certainly won’t need that much information. Fortunately, the next command is more concise and will net you about all the information you might need in your day-to-day computing.

Show Mounted Partitions With The ‘findmnt’ Command:

This too is done in the terminal and is another way to do much of what you did in the previous section. You probably don’t have to install anything. The findmnt application is a part of ‘util-linux’ and will also be installed by default.

You can find out if the findmnt command is available with this command:

As you’ll see, is indeed part of the util-linux applications. You might as well check the man page, seeing as we’re already here. To check the findmnt man page, you’d use this command:

While you’re checking the man page, check to see how findmnt describes itself. It’s described like:

findmnt – find a filesystem

If you recall the introduction, I mentioned how you’d need a filesystem to make a partition useful. Findmnt appears to be a pretty good application for those who want to show mounted partitions.

You can run the command and get a cascade of data, much like the df command. Run this command:

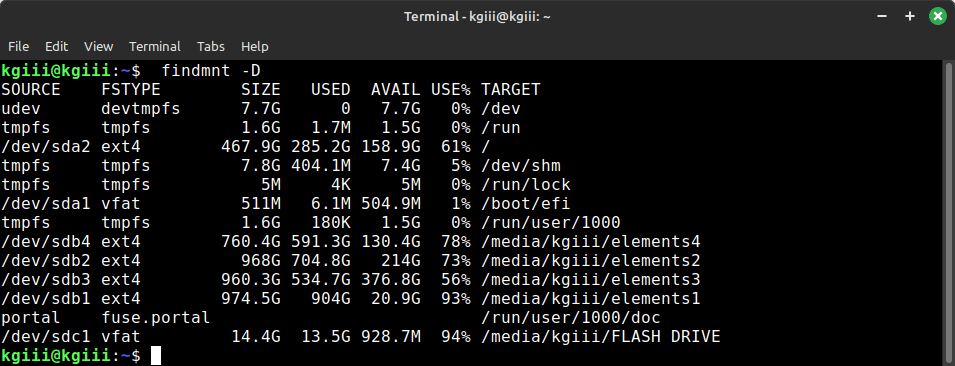
But, you can run this command with a -D flag and get a subset of that partition information and this subset of information is probably all you’re going to need regularly. That command looks like this:

The more concise output from that command looks something like this:

showing mounted partitions with the findmnt command
Realistically, this is all the information you’ll likely need when you show mounted partitions.

(It was kind of broken for a while, but I fixed it so that you can click on the images and have them enlarge properly. The bug was a devious bugger, but I think I’ve nailed it.)

The output from that findmnt command is easy to read and doesn’t contain nearly as many of the virtually mounted partitions. It still contains some and I’m not sure why or what the difference is. You can see that both commands spit out slightly different bits of information – but the essential bits are there and, thankfully, they match one another.

See? I told you that it’d be easy!

Closure:

Well, at some point you may want to show mounted partitions. It’s handy information to have when you want to perform some disk operations. It can also be handy to ensure a drive is mounted properly.

There are all sorts of reasons why you might want this information. Then again, there are also a zillion ways to get this information (such as running the sudo fdisk -l command). I’ve just picked a couple of ways, though I had a preference for outputs that are easiest to read. 

Thanks for reading! If you want to help, or if the site has helped you, you can donate, register to help, write an article, or buy inexpensive hosting to start your site. If you scroll down, you can sign up for the newsletter, vote for the article, and comment.

Benchmark Your GPU In Lubuntu

Today we have a simple enough article, meant for fun and information, as we talk about how to benchmark your GPU in Lubuntu. This won’t be a very long and complicated article. Even a new user should be able to follow along.

We all like to know where we stand in life. This is true even with computers. At the very least, we want to know that our computer can accomplish the tasks we need it to accomplish. One of the ways you can do this is to benchmark your computer.

I’ve previously written a couple of articles that involve benchmarking.

Benchmark Your Linux Box With Geekbench 5
Check Disk Speed In The Terminal
Graphically Examine Hardware Info With HardInfo

So, this isn’t a foreign concept to my regular readers (whom I appreciate a great deal).

A benchmark pushes your hardware to the limits and then gives you a score telling you how well it did. Usually, the next step will be using your search engine to find out how well you did against other computers. (Those with older and slow computers may not do this, but I did with a recently purchased refurbished device, and it did not do well – but it still perfectly satisfies my needs.)

Your GPU obviously controls your graphics. I do not need massive graphic capabilities. I’m content with onboard graphics and my benchmark score shows this. At most, I’m going to stream a video, watch a movie, or play a game that doesn’t require high-end graphics.

You should know about Lubuntu already. The directions for this article are for Lubuntu, but will likely work with most other distros. For this exercise, we’ll be using glmark2.

Installing glmark2:

The first step to using glmark2 is opening your terminal. To open your terminal, CTRL + ALT + T. Then, with your terminal now open, enter the following command to ensure your system’s application database is up to date:

Let that run its course and don’t worry about upgrading at this point. You can always do that later, though I’d suggest doing so as soon as realistically possible because updates tend to contain security updates and those are important.

The next goal is to install glmark2 and you do that with this command:

If you’re not using Lubuntu and you’re using a distro with Wayland, then you want a different command. That command might be something like this:

With glmark2 now installed, it would be worth your time to check the man page. This article will only cover the very basic command, literally running the command without any flags, but there are many options available for you. To check the man page, use this command:

As you can see, there are quite a few options available. I will not be doing a deep dive into those options. You can easily figure most of them out on your own. Heck, you can probably figure them all out with a little trial and error.

Now that you have the GPU benchmarking tool, glmark2, installed in Lubuntu you can run the command in the terminal…

Benchmark Your GPU In Lubuntu:

If you’ve installed glmark2 and checked the man page, you’ll see that we’ve chosen the right tool for the job. The man page describes glmark2 as:

glmark2 – OpenGL (ES) 2.0 benchmark suite

So, assuming you’ve kept your terminal open (if not, open it again) then you need to simply use the command’s name to run a benchmark on your system. It’s that simple to benchmark your GPU in Lubuntu. Just try this command:

In theory, you should not do anything with your computer while this runs. I, of course, did not listen to that advice and I’m perfectly okay with that. As I mentioned above, my graphical needs are not high. The Intel graphics are just fine for me.

That’s going to take a while, especially on an older computer like mine – and one with just an onboard GPU. This should open a new window and display a bunch of graphics in that window. If you didn’t do this in full-screen mode, that is without any flags to set that value, you’ll also be able to see quite a lot of information scrolling by in your terminal. Someone smarter than I am can tell you what that information means.

Wait for the benchmark to end, that’s when the new window closes, and collect your score from the terminal. Mine was not very high.

Then, use your favorite search engine to see how well you did compared to other users. If you want to compare your score against other computers, you can try this OpenBenchmarking link. I’m sure there are other sites where you can compare your score with others. That’s just the one I happened to find in a very brief search.

Closure:

So, I don’t know if you actually want to benchmark your GPU in Lubuntu. If you do, now you know how. It’s not terribly complicated and it is something you can do in just a few short minutes.

You’re not supposed to use your computer at the same time, but I had dozens of windows open and was streaming a video during my benchmark. In my case, it doesn’t matter to me. I have no need for more powerful graphics and I’m content with the performance I get from this device. It’s perfectly capable of meeting my needs.

Thanks for reading! If you want to help, or if the site has helped you, you can donate, register to help, write an article, or buy inexpensive hosting to start your site. If you scroll down, you can sign up for the newsletter, vote for the article, and comment.

Linux Tips
Creative Commons License
This work is licensed under a Creative Commons Attribution 4.0 International License.