Disable Window Grouping In Lubuntu

Today’s article will only matter if you use Lubuntu and want to disable ‘window grouping’ in Lubuntu. I find window grouping an annoying ‘feature’ and look to turn it off whenever I come across it. If you’re like me and want to disable window grouping in Lubunt, read on ’cause this article is for you!

I’m not sure how well I can format this like a normal article, but let’s start with the basics and see where things end up.

What is ‘window grouping’?

Window grouping is when your desktop groups similar applications together. If you have 3 instances of Firefox open, you’ll only have one instance shown in the panel (taskbar). If you click/highlight that one instance of Firefox, you’re then able to pick which of the Firefox instances you want to bring to the front.

This is an example of window grouping, where I have multiple instances of PCManFM-Qt open:
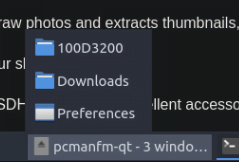
window grouping
That’s ‘window grouping’. Ugh…

I dislike this feature a great deal. It slows me down. It doesn’t reduce clutter, it adds clutter where I don’t want it. If you like window grouping, by all means, enjoy the feature.

If you are like me and find it to be an annoyance rather than a benefit, I have good news! The good news is that it can be turned off! If you’re using something other than Lubuntu, you can probably also turn it off. If you’re using another distro, a distro that’s using LXQt, you can also follow these directions.

Anyhow…

Disable Window Grouping In Lubuntu:

If memory serves, and it has been a while, if you were using Lubuntu during the LXDE days (no longer supported in any iteration of Lubuntu), you’d disable window grouping through PCManFM. This is not the case with modern Lubuntu. The current Lubuntu, and all supported Lubuntu versions, uses LXQt and it’s a different process to disable window grouping.

You can right-click on the bottom panel and select “Configure Panel” (you may have to mouse around a bit to find an empty place in the panel). From there, you’d click on Widgets (on the left) and then on “Task Manager”.

Alternatively, if you have a nice blank space in the task manager section of your panel (the bit of information at the bottom of the screen), you can skip the above step because you can just pick ‘Configure “Task Manager”‘ from that pop-up.

Either way, you end up at the following screen, at which point it should probably become obvious. Find and disable the window grouping option. It will look like so:
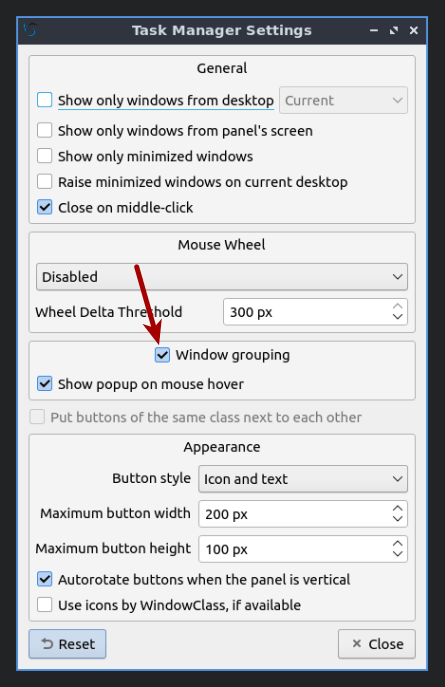
there's an option to disable that window grouping feature
Just un-tick the box and you’re on your way! Hit the close button.

When you’ve done that, the changes will take effect immediately and you can just hit the close button, happily going about your day without that silly window grouping feature. Just for completeness, it’d look like this:

the lubuntu task manager without window grouping enbled
I prefer it this way. I am not a fan of window grouping. It’s pretty easily disabled, thankfully…

If you decide you want to keep the window grouping, it’s easily reversed. You can also adjust other features while you’re there, should you want to do so. If you get there via the “Configure Panel” option, you can go through the “Widgets” and customize them as you see fit. You can also add and remove them while you’re there.

Closure:

Hey! There you go. You have another article! This time we’ve not even used the terminal! This time, we’ve just decided to learn how to disable window grouping in Lubuntu. It’s pretty easy once you know how to do it and what the feature is called. It’s one of the defaults that I change soon after I do a fresh installation.

Thanks for reading! If you want to help, or if the site has helped you, you can donate, register to help, write an article, or buy inexpensive hosting to start your site. If you scroll down, you can sign up for the newsletter, vote for the article, and comment.
A Couple More Ways To Find Your Network Interfaces

Today’s article is mostly just for fun, as we examine a couple more ways to find your network interfaces! I’ve shown you a variety of ways at this point, but this is Linux. If you just want to have some fun finding your network interfaces, read on – ’cause this article is meant for those who like to travel a different path!

One of the things that make Linux so awesome is the myriad choices we have. There are so many different ways to accomplish the same goal. In fact, we sometimes get defensive about ‘our way’ of accomplishing things. It can make for some amusing (and sometimes a bit heated) discussions. 

Anyhow, I’ve covered this before. I’ve even covered it recently, which is why this is still fresh in my memory. You can start with this article if you want:

How To: Show Your Network Interfaces

Just to touch on it, a network interface is a device that your computer uses to communicate over the network. In most folks’ cases, you’ll locally use your network interface to connect to the Internet, perhaps first to your router or modem. These networking devices have names.

It’s important to be able to point to a specific networking interface, which is why they have names. If you want to issue commands, you want to send them to the right networking interface. If you want to monitor a connection, you need to know the correct name for the network interface.

So, these network interfaces have names. These names should be unique in your system, meaning you shouldn’t have more than one device per name. The names should not be shared among the devices and each working networking interface should have a name of its own.

If you want to know the network interface names, this article’s for you…

Find Your Network Interfaces Continued:

This article requires an open terminal, like many other articles on this site. If you don’t know how to open the terminal, you can do so with your keyboard – just press CTRL + ALT + T and your default terminal should open.

With your terminal now open, we’re going to show you a couple of new ways to find your network interfaces. It’ll be fun!

For starters, and probably one I should have already covered, we’ll use a command we’ve covered here and here. We’ll use the ‘netstat’ command, and the ‘netstat’ command you need to find your network interfaces is simply:

(If you don’t have ‘netstat’ available, install the ‘net-tools’ package from your distro’s repositories. It’s almost certainly available.) The output is nice and clear and will show you the names of your network interfaces.

The next command we’ll use is one we’ve used many times before. It’s just a two-letter command, so trying to search for it (on this site) is neigh on impossible – but you can be certain that we’ve used it before. (We’ve at least covered sorting and formatting the output from the ‘ls’ command.)

Anyhow, the command we’ll use to list the network interfaces is pretty simple, it’s just this simple command:

That ‘ls’ command should spit out a list of your network interfaces all nice and easy. If there’s going to be one command that’ll work on any system, it might be this one.

Speaking of which, as this is Linux, there are all sorts of ways to accomplish goals. Because of this, that also means they’ll not always work on every system. You may need to try multiple commands to get the output you’re after – but both of today’s commands should result in you getting the names of your network interfaces (even if you have to install ‘net-tools’ to do so).

Closure:

There you have it, another easy article. Ugh… I do wish I was feeling a bit more up to snuff. Meh… At least I’m writing and writing this sort of stuff. In this case, it’s another article that’ll show you how to find your network interfaces. It’s information worth having. They’re tools that will go well in your growing toolkit of Linux tools.

Thanks for reading! If you want to help, or if the site has helped you, you can donate, register to help, write an article, or buy inexpensive hosting to start your own site. If you scroll down, you can sign up for the newsletter, vote for the article, and comment.

How To: Find Linux News

Today’s article will be really easy for anyone to follow, as I share how it is I find Linux news. It’s amazing how many people don’t keep up with any Linux news. Read on, as this is sure to be a fairly short article. 

I might even speculate that most Linux users don’t keep up with Linux news. I’d speculate that it’s an even smaller group that does things like read the release notes for their updates and upgrades. They don’t read the notes about software upgrades and they don’t definitely don’t pay attention to what’s going on at the project(s) level(s).

This is too bad. There’s a lot to learn and gathering information is good.

These are the people who are then surprised by things that were covered in the release notes, just as people are surprised by changes that have been covered by the journalists. (Well, I’m going to call them journalists for the sake of this article, and to avoid unneeded complexity.)

Now, I admit that I’m not always as diligent as I would suggest others be. I can be pretty lazy. I might even move to a new distro point release without actually reading the release notes. So, do as I say, not as I do!

Or not…

Just keep up with what you want to keep up with. For the most part, you’ll be just fine. Anyhow, I am not feeling all that great and I need a quick/easy article. So, you get this article about finding Linux news.

How I Find Linux News:

Below, you’ll find some links to news sites that I use when I want to keep up with Linux news. If you have your own sites, feel free to add them as a comment below. If you want your site added, feel free to ask in a comment below and I’ll take a look.

My first stop is quite often just an aggregator. It’s not complete, but it’s useful. I’ll often visit some of their aggregated URLs in person. If you just visit one site, this is a good choice:

tuxurls.com

My next choice is a site that tends to have plenty of content. I try to catch them daily, but obviously don’t always have time to do so:

linuxtoday.com

This next choice also has a ton of content. In theory, you can comment on the stories, but there’s not a lot of community involvement in those regards. Still, they tend to have a bunch of Linux news:

lxer.com

This next one doesn’t always have the same amount of content as some of the others, but it’s usually pretty good. Plus the site is well-designed and it even looks like a proper news site:

linuxinsider.com

If you want less content, but things like tech data and well-thought-out articles that tend to be a bit more in-depth, then you would do well to consider this site long-lived Linux news site:

phoronix.com

This next site tends to have some good content – and it’s reader-supported. As such, you will find there’s some decent commentary here. If you don’t know what to think about an article, you can head to the comments and someone will tell you what to think! See:

lwn.net

There are more but this is the final one I’ll list. I know, not everyone likes Google. But, their news section is usually pretty good at finding Linux news that might not have been covered elsewhere. I actually tend to check this one fairly frequently. The link should work for you, regardless of where you live:

news.google.com/search?q=Linux

So, those are a few of the places I go to for news. You should also consider finding your distro’s news outlet (often a blog of sorts). There you can keep up with distro-specific things and find stuff like release notes. You should be able to find that on your own.

Closure:

There you have it, you have another article. This time, we’ve seen a few of the places I go to when I want to find Linux news. I try to keep up with a bunch of it, and some subjects interest me more than others. If nothing else, you may want to consider keeping up with the news published by the distro you’re using. You’ll know more and not be surprised when changes happen.

Thanks for reading! If you want to help, or if the site has helped you, you can donate, register to help, write an article, or buy inexpensive hosting to start your own site. If you scroll down, you can sign up for the newsletter, vote for the article, and comment.

How To: Make Google Chrome Use Less RAM (UPDATED)

Today’s article is going to be a brief article about a previous article, where I gave you one way to make Google Chrome use less RAM. Consider this an updated article. So, if you’re trying to make Google Chrome use less RAM (and power, I guess) read on!

As tech goes, the situation has changed. As the tech changes, so too must we change our reactions to said changes. The thing with tech is that it never stands still, something that I (for one) appreciate.

The article in question is about making Google Chrome use less RAM. This applies to other browsers, but I concentrated on Chrome. Here is that article:

How To: Make Google Chrome Use Less RAM (And Other Browsers)

In that article, I recommended folks use the “Auto Tab Discard“ plugin. That recommendation has not changed. It’s a great add-on that will discard unused tabs, saving you both RAM and some power (which is useful for mobile devices).

Now, Google (along with other browsers) have enabled a new(ish) feature. Basically, to save power, the browser does what Auto Tab Discard does – it puts unused tabs to sleep. So, when you open those tabs that were sleeping you will need to wait a moment for them to reload.

That’s not a problem. The problem is, Google does this indiscriminately by default. Chrome does seem to make an exception for tabs that are playing audio or video, but all other tabs are fair game and will be put to sleep.

I repeat, all other tabs are fair game. They can and will be put to sleep. That’s downright annoying when you distinctly want to keep some tabs from going to sleep.

Fortunately, you have options.

You can disable this feature in your settings and continue using an extension like “Auto Tab Discard”. That’s a fine choice. That was my choice. It’s probably the wrong choice, but it is a choice.

Your other choice is to manually add sites to the whitelist, telling Google to keep those tabs open. So, you won’t need the extension if you choose to do it this way. This is probably the best choice. This is the choice I did not make.

I’ll show you how to make that choice, and kinda format this like a ‘regular article’…

Make Google Chrome Use Less RAM:

For once, you don’t need to open a terminal!

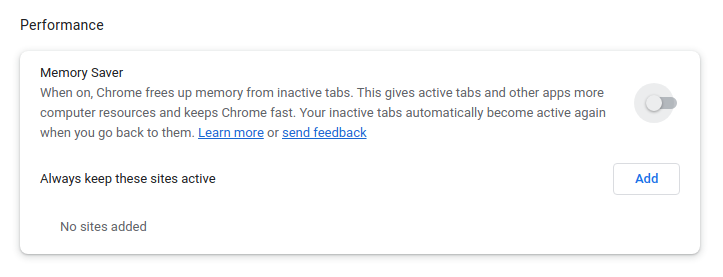
Instead, open Google Chrome. Then, click on the vertical three-dot menu in the upper right, and then you need to click on “Settings”. When that tab opens, click on “Performance” (on the left) and the rest should be fairly obvious.

If you’re like me, you can just disable the feature. That looks like this:

disable the power saving feature for Google Chrome
At this stage you can modify your settings as you see fit. I’ve turned the feature off. Go me!

If you want, you can keep the feature enabled (it was enabled by default at my house) and just add your favorite sites to the list of sites that always remain active. I don’t feel like messing around with it, so I’ve simply disabled the feature and opted to keep the extension.

I suppose that might mean I use a little extra RAM, I haven’t tested but it’d be a very trivial amount and I quite like the GUI offered by the installed extension. When I next do a clean install, I’ll probably just let the browser deal with it instead of using the extension.

Other browsers may use similar tactics to save power (and free up RAM, the two are related). As of the time of this publication, this was not yet a feature that’s in Google’s opensource counterpart Chromium. Right now, this appears to just be a function in the proprietary version, but tech changes and that too may change.

Closure:

And, well, now you can see why this is an article all of its own. It was more than I could reasonably add as an update to the existing article and was enough information to make a new article. After publication, I’ll update the previous article to link to this article. I hope… Hopefully, I remember to do that.

Hmm… I think I forgot to do a ‘meta’ article in February. February is a pretty short month, plus I’ve been otherwise distracted. But, I’ve not been too distracted to skip a publication date! We’re rapidly approaching the two-year mark. It has been a pretty good ride!

Thanks for reading! If you want to help, or if the site has helped you, you can donate, register to help, write an article, or buy inexpensive hosting to start your own site. If you scroll down, you can sign up for the newsletter, vote for the article, and comment.

Let’s Let AI Write An Article About ‘sed’

Today’s article is going to be about ‘sed’. However, I’ll be letting AI write it, just so we have an excuse to play with ChatGPT. I love new tech and I’m going to go against the advice given and just post the resulting article directly. 

Also, I picked ‘sed’ as an article topic because it’s a pain in the butt to explain even the basics. It’s such a powerful tool that knowing where to start can be tough. As such, I’ve decided it’s a perfect article for testing AI. I will only be formatting the suggested article.

Hey, it was this or write a meta article. I hadn’t written one for February and this will be the last article in February. Not much had changed, though we did cross some milestones, and I figured this article would be even more interesting to my readers.

Again, if there are errors, I am not to blame. I am posting the entire output after asking ChatGPT to write the article. I am only editing for the format. So, read on to see how AI is coming along. Hint: It’s doing well! It’s coming along nicely!

About ‘sed’:

“sed” is a stream editor in the Unix-like operating systems. It is used to perform basic text transformations on an input stream (a file or input from a pipeline). The sed command reads the specified files, or standard input if no files are specified, and applies the transformations which have been specified.

The syntax for using sed is:

Where OPTIONS can be any of the options available in the man page and COMMANDS are the instructions that tell sed what transformations to perform on the input.

One of the most common uses of sed is to replace strings. The basic syntax for string substitution is:

Where old-text is the text you want to replace, and new-text is the text you want to replace it with. For example, to replace the word “apple” with “banana” in the file “fruits.txt”, the following command could be used:

You can also use regular expressions in the old-text argument to match a more complex pattern. For example, to replace all occurrences of “apple” or “Apple” with “banana”, the following command could be used:

Another common use of sed is to delete lines. To delete a line, you can use the d command. For example, to delete the first line of the file “fruits.txt”, the following command could be used:

To delete multiple lines, specify the line numbers separated by a comma. For example, to delete lines 1 to 3 in the file “fruits.txt”, the following command could be used:

sed also supports multiple commands in a single execution. Simply separate the commands with a semicolon (;). For example, to delete the first line and replace “apple” with “banana” in the file “fruits.txt”, the following command could be used:

In addition to the commands mentioned above, there are many other powerful commands available in sed, such as inserting text, printing selected lines, and more. To learn more about these commands and other features of sed, consult the man page by running man sed in your terminal.

In conclusion, the sed command is a useful tool for performing basic text transformations on files or input from a pipeline. Its syntax is straightforward, and its wide range of commands makes it versatile enough to handle a variety of text manipulation tasks.

Closure:

There you have it. You have an article about sed – and it wasn’t written by me. So, what do you think of it? Do you think I can hang up my hat and just let AI write my articles from here on out? Do you spot any mistakes? It’s supposed to be an overview, not a complete dissertation. I think it does surprisingly well!

Thanks for reading! If you want to help, or if the site has helped you, you can donate, register to help, write an article, or buy inexpensive hosting to start your own site. If you scroll down, you can sign up for the newsletter, vote for the article, and comment.

Subscribe To Our Newsletter
Get notified when new articles are published! It's free and I won't send you any spam.
Linux Tips
Creative Commons License
This work is licensed under a Creative Commons Attribution 4.0 International License.