A Couple More Ways To Find Your File System Type

Today we’re going to revisit a previous subject and share a couple more ways to find your file system type. I’ve covered this subject before, but I only shared a couple of ways. This being Linux, there are multiple file system types and multiple ways to find the details. So, let’s cover it again but with different options.

If you did your installation manually, you probably already know this information. You probably know the file system types you chose to use during the installation process. On the other hand, if you did your installation by just letting the installer use the defaults, you might not know this information. This may also be something like an unknown computer you’re tasked with fixing. So, there are real-world reasons why you might want to know the file system types in use.

If you want to visit the previous article, you can find that here:

How To: Find The File System Type

You could easily have multiple file system types in use right now. This is quite likely if you’re dual-booting with Windows or you’re using EFI as your boot method. You could even have external disks formatted in all sorts of file types.

All of these various file types may need specific commands to repair them and maintain them. You don’t want to go using the wrong tool for the wrong file type. That’d likely make your problems even worse. So, this is good information to have and this article will show you how to find your file system type.

Find Your File System Type:

This requires an open terminal. Like many of these articles, we’ll be using a terminal. It’s painless and it’s a good idea to know some of these commands. The terminal is fairly universal, so you can open your terminal (usually) by pressing CTRL + ALT + T.

In the previous article, we used lsblk and we also used df. Those are both excellent tools and excellent ways to get this information. They’re simple and easily memorized. The two commands we’ll use today will be similar in those regards. This truly is not a complicated task, it’s just fun to cover the different methods that one could use.

Using The mount Command:

The first command we’re going to learn about is the mount command. Don’t worry, this is part of your standard installation and you won’t need to do anything extra to use it. You can check the man page with man mount if you’d like. If you did do so, you’d find that the mount application is described as:

mount – mount a filesystem

No, we won’t be mounting and unmounting anything. We’ll just be using the command to find your file system types. That command’s syntax would look like this:

That’s the command that will show you all of your drives and all of the drive’s file system types in one go. I plugged a couple of external drives in so that I could run the command and show you the expected output:

using the mount command to find the file system type
You can see that there are vfat and ext4 file systems in use. That’s normal. It’s all good!

There’s nothing too eccentric in that output. Those are fairly normal file systems as far as Linux systems go. There are more. There are many more. You can check a list of file system types on Wikipedia.

Using The fsck Command:

Yes, you can even use the fsck command to find the file system types. You’re telling the command to not actually run and just spit out some information, so there’s nothing laborious or complicated with this command. You will need to know the path to the disk in question. I’m sure you know how to do that. Heck, the first command in this article will do that for you.

When you do this with the fsck command, you’re doing so on a disk-by-disk method. If you’re unfamiliar with the fsck command, you can check the man page with man fsck. Once again, you won’t have to install anything. The fsck command is a part of the standard base, files you’ll find on pretty much every distro by default. Anyhow, the man page describes fsck as:

fsck – check and repair a Linux filesystem

We will not be repairing a Linux filesystem (I’ve intentionally stylized this as ‘file system’ as it appears both spellings are in common usage) but we will sort of be checking them. We won’t be checking them for errors because that’d take too long and isn’t a part of this article. If you do want to check your file systems for errors with fsck, you should read this article:

How To: Check A Disk For Errors

Or maybe this article:

Repair Your Linux Filesystem With a Live USB or DVD

Anyhow, if you want to find your file system type with fsck, the syntax is simile and is as follows:

This is usually going to start with a /dev and then the drives populate  (enumerate?) as is logical. You would have drive sda, then partitions on that drive might be sda1, sda2, etc… So, an example command might be:

An example output is as follows:

you can use the fsck command to find the file system type for a specific drive
This only really works on one drive/partition at a time. That’s plenty useful.

See? Pretty useful if you need to know a file system type before working on it.

Closure:

So, we’ve covered a couple of new ways for you to find your file system type. This time around, we’ve used fsck and mount and both of them are perfectly useful for this application. If you work on multiple computers, if you work on someone else’s computers, if you work on remote computers, etc. then these commands may come in useful. 

Plus, this seemed like a fun article to write. There are all sorts of older articles that could have more information added to them. Some of the older articles contain errors that should be fixed. Some could use being written again but with a more suitable format.

A couple of the articles are just plain garbage and should have been deleted. They weren’t… They should have been, but they weren’t. I should probably go back and write those over again in their entirety. I’ve completely blown it a few times. I do like to point out that I probably learn more than you do by writing these articles and (importantly) getting feedback on them. I do love some feedback, though it’d be cool if it was left here when it adds something to the article.

Thanks for reading! If you want to help, or if the site has helped you, you can donate, register to help, write an article, or buy inexpensive hosting to start your site. If you scroll down, you can sign up for the newsletter, vote for the article, and comment.
Let’s Make The rm Command A Little Safer

In today’s article, we will discuss a simple trick that will help you make the rm command a little safer. This isn’t something everyone will do, but it might be something a cautious user might do. It might also be something a new user might want to consider doing. After all, you can’t be too safe!

Now, when I say safe, I mean preventing you from accidentally removing files you don’t want to delete. I do not mean safe as in security. I mean safe as in preserving data that is important to you. This isn’t a foolproof method, but it gives you a chance to rethink things.

Obviously, we’ll be using the rm command. Don’t worry, that’s not something you’re going to need to install. It’ll be there with your distro as a part of the standard tools, probably from the nice GNU folks.

For those that don’t know, the rm command is a terminal-based command used to remove files and directories. It does exactly what you tell it to do and sometimes you may tell it to do things you don’t want it to do. Either way, the man page (man rm) describes the rm command succinctly:

rm – remove files or directories

See? Nice and simple.

We’ll also be adding an alias. I intend to write a good article about aliasing things, but this is not that article. Don’t worry, you won’t need to know a whole lot about aliases in order to follow along with this article. I’ll make it nice and simple.

Make The rm Command A Little Safer:

As mentioned in the preamble, the rm command is used in the terminal. So, of course, you’ll need an open terminal for this one. It won’t be too complicated, so press CTRL + ALT + T and your default terminal should open. If it doesn’t, find it in your software menu and open it that way.

NOTE: This article relates to the removal of files over which you the user have control, eg ~/home/<your-username>. If you’re removing files with sudo, root, or as another user, the rm command will function as normal.

Alright, so what’s an alias? An alias is a substitution. You can create an alias that inputs ‘foo’ even though you typed ‘bar’, and that’s the trick we’ll be using to make the rm command a little safer for you. If you don’t do this and you remove important files, all I can say is I told you so! 

I’m going to assume that you have Nano installed. If you do not have Nano installed, you can use a different text editor. For simplicity’s sake, we’ll just go over doing this with Nano.

Let’s Install Nano (With Some Bonus Information)

With Nano installed, your first command is going to be opening up your ~/.bashrc file for editing. You do that with this command:

Yes, the . means that it is a hidden file, but Nano finds it just fine.

Now, you want to use the arrow keys to scroll to the absolute bottom of that file and add the following line:

Next, you’ll save the edited .bashrc file by pressing CTRL + X, then Y, and then ENTER.

With that done, you’ll need to tell the system to reload the .bashrc file. You do that with this command:

Now, when you use the rm command, it will add the -i flag. This will show you the files that the rm command is going to delete and give you a chance to back out of it.

Closure:

See that? You’ve now managed to make the rm command a little safer and you’ve added an alias to the rm command. Pretty neat, I think. This means that you’ve got that second chance when you misfire an rm command. It also means you get to really think about it and that the process doesn’t run without your giving it confirmation to do so.

One of these days I’ll figure out how to write an article about aliases. They’re really handy things to have around and you can use them for all sorts of neat things. I suppose you could just search for that information. Other people have written articles on the subject, probably better than I will. So, there’s always that option… Which is nice…

Thanks for reading! If you want to help, or if the site has helped you, you can donate, register to help, write an article, or buy inexpensive hosting to start your site. If you scroll down, you can sign up for the newsletter, vote for the article, and comment.

Access Recovery Mode On Ubuntu

Today’s article shouldn’t be too long, but covers something important, which is how to access recovery mode on Ubuntu. If your Linux system has problems, you may need to access the recovery mode in order to fix it. This shouldn’t be a very long article, and I don’t think it’s all that complicated. Others may view this as complicated, but it seems pretty basic to me.

It isn’t all that complicated a process, but it’s something you should memorize, just in case you have no other way to access a search engine to learn this information. This is one of those skills you really ought to know by rote. It is one of those things about Linux that you probably should have memorized. 

What is Recovery Mode?

When you boot to recovery mode, you’ll be given a choice of booting to any of your currently installed kernels. The system then boots with the minimal amount of resources and mounts the root partition as read only.

You might be interested in a recent article on the subject of multiple kernels:

Show Installed Kernels In Ubuntu

Recovery mode lets you access the system to troubleshoot problems. It probably isn’t a necessary step for most issues, but it’s a necessary step that you will want to take if your desktop isn’t otherwise loading. If you’re unable to get to the GUI desktop, you should try recovery mode.

You can also try previous kernels by doing this. Recovery mode is just one option you’ll have from the GRUB menu. You get to pick your other kernels and even enter a text mode to work on your system via the CLI. For most folks that have had the kind of difficulties that stop the GUI from loading, trying recovery mode is a good step to take.

This may very well work in other operating systems. I’m being specific to Ubuntu because that’s what I have pictures for. Well, technically I’m using Lubuntu in a VM to get the pictures, but this should work for all sorts of distros. Do me a favor and leave a comment if you know this works in other distros. It’s way too late in the day and I don’t have time to check.

Access Recovery Mode On Ubuntu:

Well, you don’t need a terminal for this exercise, but you do need to reboot your computer. I suppose we can do this from a terminal, if you really want. You can just as easily use the GUI, or you can close things down gracefully and then run the following command in the terminal:

BEFORE YOU DO THAT…

We need to know if you are using EUFI/EFI boot or if you’re using the legacy BIOS mode to boot your computer. Fortunately, I’ve already covered this!

How To: Tell If You Are You Using UEFI or BIOS

Now, when your computer reboots, it’s going to perform a quick POST (Power On Self Test). That’s the point when you can decide to just let it boot or decide to enter a temporary boot menu. These shouldn’t be confused. If you’re interested in accessing your temporary boot menu, read this article:

How do I ‘Boot to USB’? (Or CD/DVD, if Such is Available)

As soon as POST ends and the OS starts to load, there’s a very brief window of time when you can press a key and access the GRUB menu. Trust me, this works. You may have to try multiple times before you get the hang of it, but this 100% works.

If you have a working keyboard, this works. You just need to time it right. You can try pressing and holding the right key as soon as you reboot, or you can try tapping the key over and over again. Should you have issues getting it right, check your settings for “Fast Boot” and temporarily disable that to give you more time.

If you’re using UEFI, the key you’ll press is the ESC key.
If you’re using BIOS, the key you’ll press is the SHIFT key.

Assuming you’ve done this right, you’re now at the GRUB menu…

The GRUB Menu:

GRUB stands for “Grand Unified Bootloader” and is what you’ll be seeing (and using) on a stock Ubuntu configuration. There are other bootloaders out there, but we’re assuming you’ve not changed from the default.

If you’ve done the above steps properly, you’ll see a GRUB screen. If you haven’t done this correctly, you’ll see the splash screen as the operating system starts to load. When you see the splash screen, you might as well just reboot so that you can try this all over again.

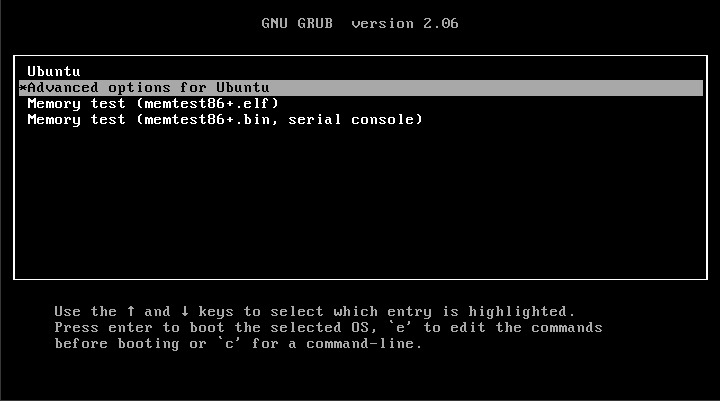
The first screen you’ll see will look like this:

the grub boot screen
I’ve highlighted the choice you want to select with your arrow keys and enter button.

As indicated, you want to select the advanced options for Ubuntu. Of course, that won’t be the case if you’re using a different distro. You’ll want to pick the advanced options for that distro.

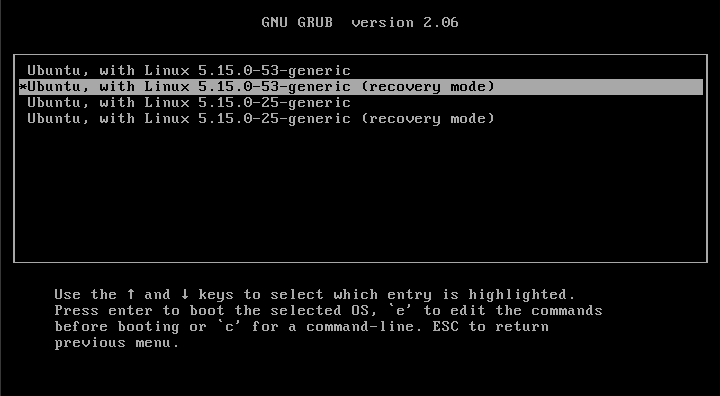
Finally, you need to select the correct option to access the recovery mode on Ubuntu. It’s really obvious, but here’s a handy picture:

grub option to pick the recovery mode for ubuntu
You can see that you can also select the recovery mode from an older kernel.

Once you’ve done that, and with any luck, your computer will boot to the recovery mode, and you’ll have learned how to access recovery mode on Ubuntu. You can see the option to boot to an older kernel is there as well. That’s another useful tool to have in your Linux toolbox.

Closure:

Well, if everything goes perfect (and it seldom does), you won’t need to access recovery mode on Ubuntu. It’s just not something you’ll need to do. But, if things don’t go perfect – and we tend to tweak, modify, and break things as Linux users, you do have a recovery mode, and it’s not too hard to access it. Of course, what you do once you’ve entered recovery mode is up to you and will depend on your problems, but you now know how to access it.

Thanks for reading! If you want to help, or if the site has helped you, you can donate, register to help, write an article, or buy inexpensive hosting to start your site. If you scroll down, you can sign up for the newsletter, vote for the article, and comment.

Generate Random Numbers

Today’s article is going to be more or less an intellectual article, as there isn’t much need for folks to generate random numbers. It’s just a fun article that will show you a neat trick you can perform in the Linux terminal. If you’ve ever wanted to generate random numbers, this just might be the article for you!

First, let’s say a few things…

One, this is not true random. True random is something you’re not going to get with a computer. While Bell’s Theorem insists that true random exists in the universe (such as the rate of decay in a radioactive isotope), it’s really hard to achieve randomness.

Instead, we rely on pseudorandom – and we rely on it a great deal. Cryptography relies on it as much as a security certificate. They all deal in randomness and there are different degrees of random. What’s important is predictability.

While I’d love to turn this into a giant mathematical discussion, let’s just agree that you’re never going to get true randomness from your computer. But, we can also agree that you’ll get results that are random enough for our purposes.

Even with security certificates, we do not have true random as our backing. However, it’s random enough for advanced certificates to be reasonably unbreakable at this time. Trust me, I’d love to make this a geeky discussion, but for our purposes just accept that there’s a spectrum between predictable outcomes and true random. Everything you’re ever going to approach is going to be on that spectrum.

If you want true random, there’s random.org which claims to generate truly random numbers based on atmospheric noise. (Basically, they’re using what you’d think of as static as a source for randomness.) I am going to highly suggest those interested view the following article from the random.org website:

Introduction to Randomness and Random Numbers

That’s going to be complicated for some of my viewers, but I have high hopes that some of my viewers will be appropriately ‘geeked out’ by the discussion. It takes true Philosophers of Mathematics to grasp the intricacies (and implications) of random, pseudorandom, and true random.

There are those (including myself) that are a bit skeptical of the concept of true random – but those, like me, accept the aforementioned Bell’s Theorem because it has been thoroughly tested and stands as being the most acceptable answer to our observations. We call this science and I’m a firm believer in the scientific method.

So, at this time, we have ‘conclusive’ evidence that true random exists in the universe. It’s just REALLY complicated and takes many pages of math to describe. After all, there are things like this:

Random numbers certified by Bell’s theorem (Nature)

And, for the truly daring, I encourage you to view the following Wikipedia article that delves into the theorem itself:

Bell’s Theorem (Wikipedia)

Trust me, all sides of this have been thoroughly discussed at the Muddy Charles Pub. People far smarter than myself have hashed this out over many pints, both from a mathematical and scientific viewpoint and from a philosophical viewpoint. After all, we humans have a nasty habit of claiming something is random while the reality is that our understanding is just incomplete. As such, randomness is a tricky subject.

We’ll be using the ‘shuf’ command in this exercise. It’s installed by default and uses both /dev/random and /dev/urandom for its output. The command is simple enough to use and suitable for making your own random dice generator for your next Dungeons & Dragons game. Given manufacturing discrepancies, it’s probably more random than actual dice. 

The ‘shuf’ command describes itself as this:

shuf – generate random permutations

Every distro will likely have this installed by default. If it’s not installed in your distro (check shuf --version to ensure it shuf is installed) you’ll need to install it for the sake of this exercise in generating random numbers.

Other than that, you won’t need anything but an open terminal…

Generate Random Numbers:

If you can’t tell, this is a subject I’m passionate about. Many of you will know that my background is being a mathematician, albeit retired. To me, the subject of randomness (and I hope to have given you a taste) is fascinating. This won’t be true random, but it will be fun. So, let’s just press CTRL + ALT + T and get that terminal open.

With your terminal open, the syntax of the command is as follows:

If you execute that command, it will list every number between those two values (lowest number and highest number) in random order. For example:

If you only want a few random numbers, the syntax would look like this:

For example, you might want to get three random numbers between 1 and 20. That’s easily done. You’d simply use this command:

An example of that output might be:

So, if you wanted to replicate a 3d6 roll (three die six) with a single output would be done like this:

Of course, if you wanted to be fancy for your D&D-playing friends, you could expand the command. (I rolled an 18 on my first try!) See this:

See? Good times! If you want to generate random numbers (for a fun definition of random, and a truly useful random) you can do so quickly and easily from right there in the Linux terminal.

Closure:

Trust me, this is the short version… I wanted to write more about randomness. I have a love for mathematics that I suspect isn’t shared by many. I know it isn’t shared by many – and there’s a reason for that but this isn’t the site or topic to get into that. (Hint: It has to do with how mathematics is taught at an early age.)

So, for me, random is a special subject – much like infinity. These are concepts to be mulled over and considered. They are ideas that we’ve taken and made real. Even if they didn’t exist (and infinity still doesn’t exist), we’d use them as concepts, which is good enough for the real world.

These are concepts that are as old as mathematical and logical thinking has existed, as math is just logicism at its core. They’re like a fine wine, sipped at and quantified – but never quite fully understood. And that’s okay. For us, we sip and dine at the table of logic, using what tools we have to appreciate the experience.

Thanks for reading! If you want to help, or if the site has helped you, you can donate, register to help, write an article, or buy inexpensive hosting to start your site. If you scroll down, you can sign up for the newsletter, vote for the article, and comment.

Install A .deb Package In The Terminal

Today’s article is a basic article where we discuss how you can install a .deb package in the terminal. It isn’t all that complicated and there is almost always more than one way to accomplish things, especially when it comes to the terminal. If you want to install a .deb package in the terminal, this article is for you.

Obviously, this article only applies to distros that use the aptitude package manager, or ‘apt’ for short. These are generally the Debian-based distros. You’ll find that apt is used in Debian, Ubuntu, Linux Mint, ElementaryOS, and many more. It’s a pretty common theme among the more commonly mentioned desktop distros.

If you type man apt into the terminal, we get the following:

apt – command-line interface

That’s not very helpful, but it does give us some clues. It’s a command-line interface (often called “CLI”) for the package management system. If we read the man page a little further, it goes into more detail.

apt provides a high-level commandline interface for the package management system. It is intended as an end user interface and enables some options better suited for interactive usage by default compared to more specialized APT tools like apt-get(8) and apt-cache(8).

See? That’s a bit more helpful. When you’re reading the man page for an application, it’s a good idea to read the description portion of the man page. It explains a great deal, more often than not.

We will also be using ‘dpkg’ in this article. The man page (accessed with man dpkg) describes it accurately enough:

dpkg – package manager for Debian

Where apt is a “high-level” application, the ‘dpkg’ application is considered a “medium-level” application. The ‘dpkg’ application may be used by a higher-level application, providing a more stable command set and being used behind the scenes.

As a previous article about installing .deb files didn’t mention it, I figured it’d be worth an article of its own. I’ll still include installing software with apt, just so the folks arriving by search engine needn’t view multiple articles.

If you don’t already know, “.deb” files are packages for installing software. They adhere to the standard and are standard ar formatted archives. They’re meant to be used for installing software on your system, especially when you don’t have that software in your repositories. They often contain changes to system configurations and do the aforementioned software installations, so you need elevated permissions to run them.

If you’re curious about what’s inside, I wrote an article about that.

Extract Files From .DEB Files

For most users, they’re not all that interesting on the inside. You can extract them (even graphically) to see what’s on the inside. You can also use the extracted files if you can find a use for them.

So, today we’re going to learn how to extract a deb package from the terminal. We’ll cover a couple of different ways. If you want to do this graphically, you can do that. I’ve written another article about installing .deb files (not quite like this one) and the second section covers doing this graphically.

How To: Install .DEB Files In Ubuntu

With all that said, and hopefully understood, let’s get to it!

Install A .deb Package In The Terminal:

As the title implies, this is installing .deb packages in the terminal. To do this, you’ll need an open terminal. If you don’t know how to open a terminal, you may wish to learn. A terminal is a handy tool and you can usually open it by pressing CTRL + ALT + T.

With your terminal open, the absolute easiest way to install a .deb package in the terminal is to use that apt command mentioned earlier. It’s very simple:

Frankly, that’s probably the best choice. Using the higher level apt means that any dependencies will be sorted – if they can be sorted. If they’re not able to be sorted by downloading them from the default repositories, the application will fail gracefully and throw an error message. At that point, you can try to resolve the dependencies on your own, but that can be a pain in the butt.

Note the use of a full path. If you use apt, you must supply a path – something like ./foo.deb, ~/Downloads/foo.deb, or even /home/Downloads/foo.deb. Without a path, apt will not find the .deb file.

Anyhow, you can also install a .deb package in the terminal with the dpkg tool. It’s possibly a bit more complicated, but the syntax is as follows:

This is often adequate, but not always. The limitation is that the dpgk command doesn’t automatically resolve dependencies. It is because of this that I seldom recommend using dpkg and prefer to suggest using apt.

Never fear, this is still not lost. You can trivially resolve the dependencies (if they can trivially be resolved) with the following command:

That command will go through your installed software and try to fix (-f) any missing dependencies. If there are no dependencies needed, you do not have to run this command after installing packages with dpkg. 

Though, as you can see, it still relies on using apt. My thinking is that you can save all that hassle by just using apt in the first place. But, it’s your system. You have options when you want to install a .deb file in the terminal. It’s worth the article just to let folks know.

Some folks still recommend installing with dpkg and then running the apt command to resolve dependencies. I do not know why. If you have any good ideas about why, do feel free to let me know in a comment.

Closure:

Well, there you have it. You have yet another article, and yes it’s another one that relies on using the terminal. There are GUI tools that happily take care of all of this for you.

There’s no need to use the terminal to install software, but I prefer it. It’s just as quick for me to type out a command as it is for me to open software, type my password, and then click a button or two. It’s probably faster for me, as I always have a terminal open.

Thanks for reading! If you want to help, or if the site has helped you, you can donate, register to help, write an article, or buy inexpensive hosting to start your site. If you scroll down, you can sign up for the newsletter, vote for the article, and comment.

Linux Tips
Creative Commons License
This work is licensed under a Creative Commons Attribution 4.0 International License.