Let’s Install Nano (With Some Bonus Information)

This site mentions Nano quite a few times but never tells you how to install Nano. Today, this changes! Today, we make sure you have Nano available! Not all distros have Nano installed by default, but in pretty much all distros Nano would be a useful tool to have.

The Nano text editor (GNU nano) has been around since 1991, 21 years at the time of writing. I’ve written about it a few times, but nothing major. I think the most I’ve written about it was in an article about My Three Favorite Text Editors. If it’s not obvious from all of this, Nano is one of my favorite editors.

Rather than gush, I think I’ll just explain why I like Nano. It’s simple. When making quick edits to text from the terminal, I don’t need to know things like :q! just to exit the program, I can see how to exit the program because it’s written at the bottom. Nano has plenty of features, even a viable, albeit not great, find-and-replace function.

In Nano, you can do the obvious text manipulation tasks – like cut and paste, of course. You can jump to line numbers and all that stuff. At the end of the day, it’s a great terminal text editor that just works and is simple to use. If you’re new to Linux and think Nano looks daunting, you should introduce yourself to Vim or Emacs!

I like simplicity and effectiveness. For the things I do in that situation, quick file creation or editing, it works just fine. I don’t need anything more robust – or more complex.

Install Nano:

Sadly, Nano doesn’t come installed by default on all distros. It’s a tiny application that just works, so I’d be happy to see it as the default (or available by default) on more distros. Until that time, we’re stuck installing it ourselves.

Fortunately, there’s not much trouble installing Nano in the major distros. You just need to start with an open terminal. You can open one with your keyboard. Just pressing CTRL + ALT + T should open up your default terminal. Pick the appropriate command below and it should install nano for you.

Arch/derivatives:

RHEL/Fedora/derivatives:

OpenSUSE/derivatives:

Debian/Ubuntu/derivatives:

For everyone else, hunt around or download and compile it from source

Once you have Nano installed, you’ll need to know how to use it. Fortunately, for most users and most uses, there are a few shortcuts to learn and that’s it. For most people, you don’t need to know a whole lot for basic functionality. As you’re making basic edits, that works. It’s pretty easy.

My usual blurb (that I cut and paste) to tell people how to save a file in Nano is just this little snippet:

(Which, when formatted properly, comes out looking like “press CTRL + X, then Y, and then ENTER“.)

And, that’s it. That’s pretty much all you need to know when making quick text edits in Nano. However, there’s so much more to Nano than you might be expecting.

Bonus Nano Info:

While Nano is simple, it is deceptively simple. If you type nano into the terminal, you’ll see just a few options on the bottom. And, like I said, that too is a bit deceptive. With your terminal still open, type the following:

As you can see, there are a whole lot more options. There are far too many options for me to even begin to touch on them, and you won’t need any/most of them for the basic text editing for which we usually rely on Nano.

You can open a file with Nano like this:

You can also just open an instance of Nano and name the file when you’re closing it. If you want to create the title when you’re starting, you can just use:

That’ll auto-populate the name field when you’re saving the file. So, you can use Nano to create a new text file easily enough.

While you’re in there, you can use CTRL + W to search. If you then use ALT + W to go to the next instance of the text you searched for. Searching is even kind enough to support regex, case-sensitive searches, and can even be used to replace text.

At the bottom of the output, you’ll see directions that tell you how to use Nano. The ^ means you use the CTRL as the modifier. The M (such as M-A to undo) means you use the ALT as the modifier. So, to cut, you’d use CTRL + K and to undo something you’d use the previously mentioned ALT + M.

You’ll get used to it, I promise. You’ll learn it much faster than you’ll learn Vim or Emacs – but those too have their place. I wouldn’t want to spend hours in Nano, but it’s great for a few minutes when you need to make a quick edit.

Like I said, this is just touching on the surface. Look at the man page ( man nano) for more information. There’s a lot to this little editor and the advanced features are there if you need them. For example, I often open files with the -l flag so that it will show line numbers.

Closure:

Yup… There’s another article. This one tells you how to install Nano and has some bonus information about how to use Nano. I didn’t have time (and this isn’t that kind of site) to tell you about all the other nano options. Those options are just a man nano command away, should you want to use them.

Thanks for reading! If you want to help, or if the site has helped you, you can donate, register to help, write an article, or buy inexpensive hosting to start your site. If you scroll down, you can sign up for the newsletter, vote for the article, and comment.
Benchmark Your Linux Box With Geekbench 5

Today’s article will teach you how to benchmark your Linux box with Geekbench 5. It’s a fairly simple exercise, even for a beginner. Parts of the directions for this exercise will change with time, so I hope to make it obvious how you would make said command changes.

What is a benchmark? It’s a measure of your system’s performance. In this case, it tests things like CPU performance, graphics performance, and memory performance. When done, it gives you a handy URL where you can see the results online and share them with your friends.

For example, I have a benchmark result here. That one isn’t as good as it could have been. For example, I had a pile of applications open and hadn’t even been rebooted in about 60 days. See?

Ideally, you’ll run your benchmark with a clean slate. That’ll give you the best results. Be sure to reboot and make sure you’re running as few processes as is reasonable to get the best result.

Why benchmark? Well, it’s good to know how your hardware stacks up. It’s also good for bragging rights, if you’re into that sort of thing. It’s a valuable bit of information if you’re into overclocking. (Overclocking is tweaking at the hardware level to make your system run faster than it is designed for.) It’s a way to measure the performance gains from overclocking.

Well, this article will tell you how to benchmark, using Geekbench 5. It’s not as challenging as one might think!

Benchmark Linux With Geekbench 5:

This article requires an open terminal. If you don’t know how to open the terminal, you can do so with your keyboard – just press CTRL + ALT + T and your default terminal should open.

Once you get your terminal open, run the following commands:

That’s going to download the Geekbench 5 benchmarking software for Linux. However, that URL is going to change because the name of the download is going to change when Geekbench releases new versions.

If it has changed – and it WILL change eventually – you can get the new address by clicking on this link. The name of the file is also going to change the following command. It’s an obvious change that you’ll need to make. The current next command is:

That will extract all the files into their own directory. The directory name will also change. So, for this particular file, the next command is this:

Oddly, I didn’t need to make the “geekbench5” file executable, I just ran it with sudo. It looks like:

Now, you wait…

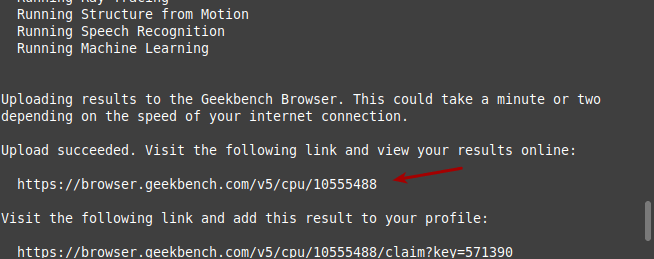
It shouldn’t take very long, though it may take a while on older computers. It will tell you what it’s checking as it checks it and, when done, it will give you a URL to check your results. It’ll look something like this:

geekbench click to see results
That address is where you’ll be able to see your results. Uploading is mandatory with the free version.

You can pay for a copy of Geekbench 5 and get your results locally, or so I understand. I’ve not actually tried it. The free version uploads the results, which I presume they use to crunch additional data, gauging the computers currently in use. They may even provide said data to others, but I’m sure it’s reasonably anonymous. Their privacy policy is located here.

Closure:

And there you have it. You now have your benchmark results in a handy web-page. You can also register to keep track of your previous benchmarks, even adding new results to your collection as you go. Me? I only bothered benchmarking my test laptop and it turned out better than I had expected.

There are other benchmarking utilities. You can use ‘hardinfo’ for some benchmarks, even comparative benchmarks – but older ones, by reading my hardinfo article. If you do benchmark your systems, feel free to leave some comments here or wherever you find this on social media.

Thanks for reading!

If you want to help, or if the site has helped you, you can donate, register to help, write an article, or buy inexpensive hosting to start your own site. If you scroll down, you can sign up for the newsletter, vote for the article, and comment.
Let’s Install Ubuntu Restricted Extras

If you’re using Ubuntu and want to use some patent/license encumbered features, such as playback for certain media formats, you need to install Ubuntu Restricted Extras. This is fairly normal and is done because the software licenses prevent Ubuntu from releasing the distro with that software. In some cases, you also will need to agree to different user-agreements. This is unlike most other software you will use on Linux, as software should never ask you to agree to anything.

Because of the license Ubuntu is released under, and according to their legal council, they just don’t include these sort of things by default and you’ll need to install them later, on your own. On the other hand, if you don’t need to use patent-encumbered files, then you don’t need to install the ‘ubuntu-restricted-extras’ metapackage at all.

This shouldn’t be a very long article, though I’ll break it up a bit. If you’re new to Ubuntu (or an official Ubuntu flavor) then you might as well install the restricted extras. If you are morally opposed to software patents, restrictive software licenses, or binary blobs then you may wish to avoid installing it.

About Ubuntu Restricted Extras:

When you install the ubuntu-restricted-extras, you’re actually installing a metapackage. It’s one package but installing it will install multiple packages, all relatively related by license restrictions. In this case, they’re packages that wouldn’t be installed by default and may help with your computing experience. They’re not all multimedia codecs, but most of them are.

So, what’s in the metapackage? As I said, it’s a package with multiple things in it that will also download along the way. These are the contents of ubuntu-restricted-extras:

gstreamer0.10-ffmpeg
gstreamer0.10-fluendo-mp3
gstreamer0.10-pitfdll
gstreamer0.10-plugins-bad
gstreamer0.10-plugins-ugly
gstreamer0.10-plugins-bad-multiverse
gstreamer0.10-plugins-ugly-multiverse
icedtea6-plugin
libavcodec-extra-52
libmp4v2-0
ttf-mscorefonts-installer
unrar

As you can see, it’s some fonts, a bunch of codecs (so that you can play patent-encumbered media files), software that lets you open .rar compressed files, and use Java applets in the browser. It’s some pretty handy stuff, but because it’s all non-free/non-FLOSS Ubuntu doesn’t include it by default.

Install Ubuntu Restricted Extras:

For starters, you won’t even find the ‘ubuntu-restricted-extras’ unless you enable the ‘multiverse’ repository. An easy way to do so is to open the terminal (press CTRL + ALT + T) and enter the following:

Next, you need to make sure that your system knows about the new software choices. It might do this automatically, after adding the repository above, but it can be manually done with this:

With that done, you install the Ubuntu Restricted Extras with:

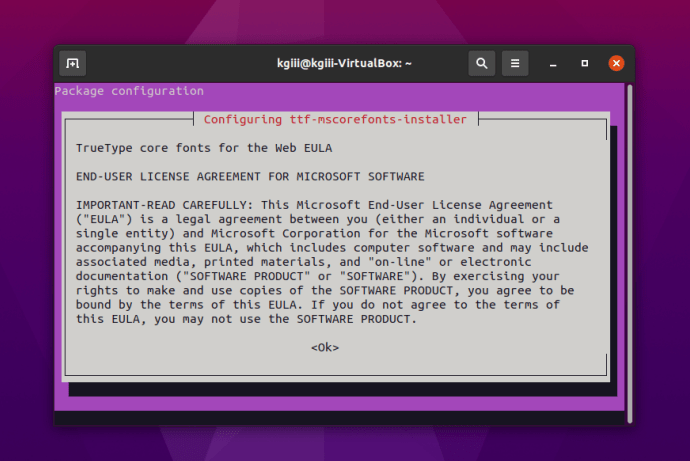
That downloads a bunch of stuff and shows a screen that trips up a lot of newer users. There’s no obvious way to use a mouse and, indeed, you have to use your keyboard to agree to the user agreement. Like this:

accept the eula
Yes, you have to agree to proceed. It’s pretty easy, but it is also mandatory.

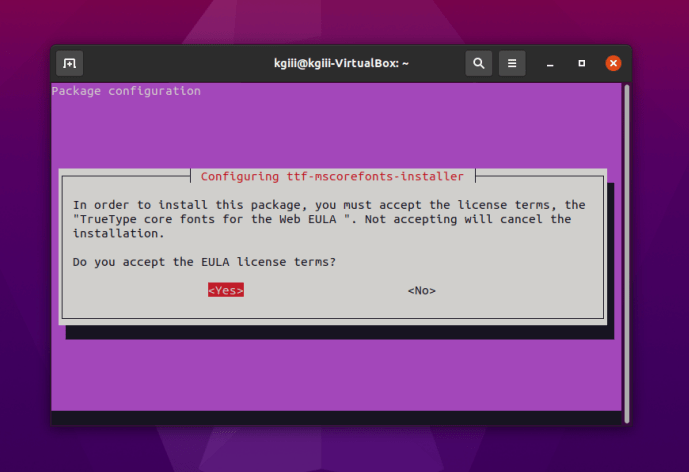
You can use your TAB (or arrows) key to make selections and use the ENTER button to submit your answers. The same on the next screen.

more eula
Use the tab or the arrow keys and the enter to agree. You got this!

That one will download some files with fonts in them, so that it can extract them to the right directories – just so that you can use them. These things are free as in beer, but not free as in libre.

Closure:

There it is, another article in the books and this one is about installing Ubuntu Restricted Extras. Most folks do this so that they can play encumbered media files, and I have no issues with doing so. If your morality doesn’t let you watch encumbered media, then there’s really no reason for you to care about any of this.

Thanks for reading! If you want to help, or if the site has helped you, you can donate, register to help, write an article, or buy inexpensive hosting to start your own site. If you scroll down, you can sign up for the newsletter, vote for the article, and comment.
How To: Create And Enable A Swapfile

Today’s article is about how you can create and enable a swapfile. It largely ignores the debate about whether a swapfile is needed or not, though I make it clear that this is something I prefer. I know that others will have different views, but I also make it clear why I enable it.

A swapfile, or swap partition, isn’t just where the OS crams stuff when it has run out of RAM. It’s more complicated than that. Sometimes, the OS knows where it wants to store cached items and prefers the swap partition or swap file.  The OS can put items in swap while freeing up RAM for other bits that need caching. 

To make it abundantly clear, you absolutely can use Linux without a swapfile. You can also use Linux with a swapfile. If you want to enable a swapfile, read on. I’ll touch on this a little bit later in the article.

Some Swapfile Background:

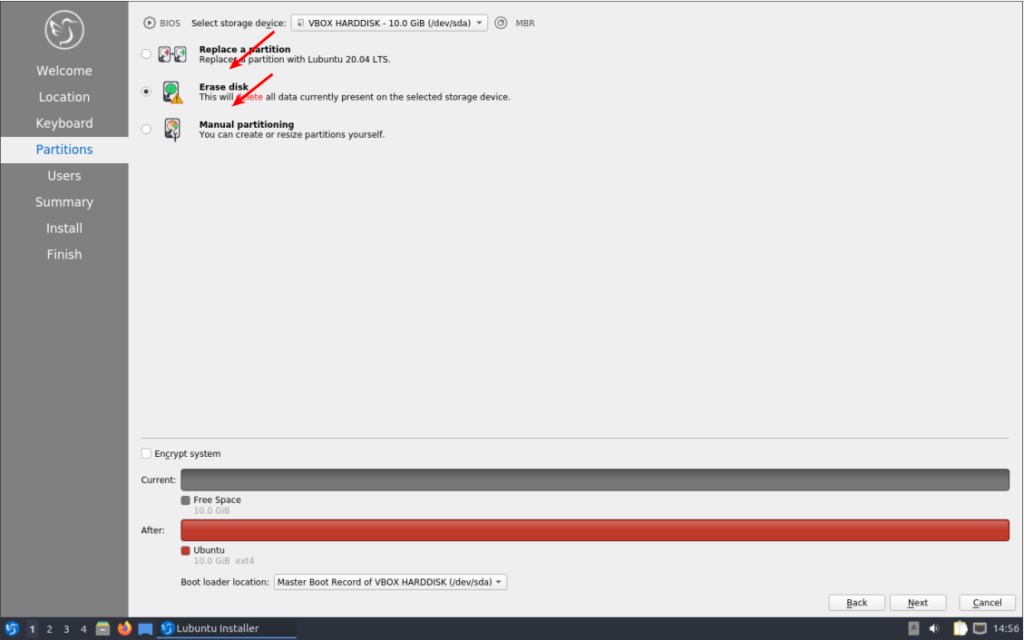
I have a modern, large SSD and more RAM than I’ll ever possibly use. I still want to use swap, in this case a swapfile. Imagine my dismay when I installed Lubuntu 20.04 and found there’s no swapfile available during the basic installation? (It’s there in 21.04 and proceeding versions.)

no swapfile
See? There’s nothing there!

I could have manually made a swap partition during installation, but that didn’t seem like something I wanted to do – and messing with manual partitioning can be tiresome and tedious. I knew I could enable a swapfile later, which is what I did.

Again, trying to avoid the debate – just sharing my reasoning; I have ample disk space and storage is cheap. If it has any chance of helping, it’s a small investment. I should also mention that swap is far more complicated than ‘a place where the kernel sticks stuff when there’s no more RAM left’. In fact, it’s a lot more complicated than that. It’s where the kernel pages content that’s seldom used, and it’ll happily use swap even when there’s plenty of RAM available.

Since the option to enable a swapfile isn’t there during the installation, we might as well learn how to add a swapfile to Ubuntu. It’s a pretty painless process. 

Is Swap Already Enabled?

You should first check to see if you already have swap enabled. The process is the same with both a swap partition and a swapfile. To check we first need to open your terminal emulator. You can do that by pressing CTRL + ALT + T.

Now, let’s check to see if you’ve already got some swap going on.

If the output of that command shows nothing but a new line, you have no swap. If it says anything else, you’ve got swap enabled already and this article is not one you need to read. As this article is only about a swapfile, it won’t be helpful for questions about a swap partition. This article also won’t tell you how to resize your swapfile, though you could put some pieces together and figure it out for yourself.

Let’s Make A Swapfile:

Seeing as you already have your terminal open from the previous step, you can just leave it open. That’ll make this easier. Start with this first command and work your way through the article – making sure to not skip any steps.

Why 8 gigabytes when I have ample RAM and an SSD? Because I don’t want to worry about it ever it again. I should be able to open up every app I have and leave them open for a month. You do you and decide how big you want it to be!

Now that we’ve allocated space for the swapfile, we need to set some permissions. We don’t want anyone and their kid brother writing to swap, we only want root writing to swap.

Next, we need to let the OS know that’s swap space, to be used as a swapfile.

Then you turn it on with:

And you now have swap in the form of a swapfile and it’s turned on.

Permanently Enable A Swapfile:

I suppose we should make this change permanent, as it’d be an unneeded step to have to do it every time the system reboots. To make this permanent, we need to edit fstab and nano is a good tool for this.

And add this at the bottom of that document:

Those are 0, the digit, in case the font here makes it confusing. And seeing as we’re using nano, you save your by pressing CTRL + X, then Y, and then ENTER

At the end of this exercise, you should have a swapfile that gets loaded on reboot.  You shouldn’t even have to reboot for it to effect, it should already be currently loaded and working. You can next edit the swappiness value, if that’s something you feel like you want to do – or have a reason to do. In Ubuntu, it is a default of 60. If you want to edit it, you’ll have to wait for another article.

Closure:

There you have it! We’re on the downhill side of this project and it’s an article about how you enable a swapfile. If you don’t use swap, that’s fine. This article is for those who do want to use swap.

Thanks for reading! If you want to help, or if the site has helped you, you can donate, register to help, write an article, or buy inexpensive hosting to start your own site. If you scroll down, you can sign up for the newsletter, vote for the article, and comment.

Delete Directories From The Terminal In Linux

In your Linux journey, you’ll eventually want to delete directories as you do some housecleaning. Keeping your computer tidy makes you more efficient. Deleting directories you no longer need helps keep your system tidy. 

It’s easy enough to manage and remove directories while you’re in your graphic file manager. Though sometimes, if you’re managing files in the terminal, you might just as well learn to manage directories while you’re in there. It’s not too terribly difficult.

As an example of why this is worth knowing, you may be working with a headless system, something without a GUI desktop environment. In that case, you will have no choice but to delete directories from the terminal. It’s just something you’ll come up against as you learn file management.

Either way, being able to delete directories from the terminal is a skill that comes in handy, a skill that you should know. And so it should be something you have in your toolbox.

The tools we’ll be using for this article are rmdir and rm. They’re both basic commands that have existed since the earliest of Unix days, and they’re both useful commands today.

The rmdir command describes itself as:

rmdir – remove empty directories

And rm describes itself as:

rm – remove files or directories

So, with that in mind, let’s jump into the exercise.

Delete Directories From The Terminal:

Deleting directories from the terminal obviously requires said open terminal. If you don’t know how to open the terminal, you can do so with your keyboard – just press CTRL + ALT + T and your default terminal should open.

The first command is really simple. If it’s an empty directory that you want to delete, you can use the rmdir command. As you read in the intro, the directory MUST be empty for this command to work. It’s also really simple to run:

So long as the directory is empty, you should be all set to go. If the directory you want to delete is not empty, you have to use the rm command. It’d look like this:

If you’re curious, the -r flag means recursive – it’ll even delete directories (and the files within them) within the directory. The -f flag means force – it should delete all files and directories no matter what and without any confirmation.

If you’re curious about either of those two commands, and there should someday be an article about ‘rm’, and for now you can just check the manual. You’d use either man rmdir or man rm. There’s not much to the first, and the latter is complex enough to warrant its own eventual article.

Closure:

Whoop! There it is! It’s another article in what’s turning into quite a long list of articles. If I’m going to keep this up for a full year, I might just as well have fun with it – and this was a nice, easy, and fun article. It’s mostly aimed at new users, as long-term users would hopefully already know how to delete directories from the terminal.

Thanks for reading! If you want to help, or if the site has helped you, you can donate, register to help, write an article, or buy inexpensive hosting to start your own site. If you scroll down, you can sign up for the newsletter, vote for the article, and comment.

Linux Tips
Creative Commons License
This work is licensed under a Creative Commons Attribution 4.0 International License.