Find A File While Ignoring Case Sensitivity

Today we’ll have a fairly short article as we’re simply discussing a way to find a file while ignoring case sensitivity. This can be a pretty handy command to have in your toolbox, so I’ll do what I can to turn this into an article. If you’re into finding files, especially with the terminal, you might just want to read this article!

I might even give you a bonus method! Maybe… It depends on how well you behave yourself! Don’t make me pull this car over!

Alright… Back on topic…

So, what is case sensitivity? We usually have lowercase files and commands. Linux is case-sensitive. If you type sudo APT update nothing is going to happen. Why? Because apt is lowercase. Similarly, a file named  FOO.bar is not the same as foo.bar.

If you try to perform an operation on a file with the wrong case, the operation will not take place. The file isn’t found, because you’ve used the wrong case. In the above command, not even SUDO apt update will work. You have to use lowercase.

Much of Linux is in lowercase. You can’t even use capital letters in your username, by default. Sure, you can force Linux to accept a bad username, but that’s not what the system is expecting.

So too are filenames. Well, mostly… Sometimes you will come across files that use mixed case or maybe all capital letters. You might even have created a file yourself with mixed case letters. When performing an operation on those files, you need to use the correct case.

Now, you can find files while ignoring the case. That’s what this article is all about accomplishing. It shouldn’t be too long.

The Find Command:

The find command is used in the terminal, so we will have to open the terminal to follow along with today’s article. However, on the plus side, you absolutely shouldn’t need to install anything. This find command should be available by default – unless you’re on an extremely stripped-down version of Linux.

If you check the man page, you’ll see that find is the right application for this.

find – search for files in a directory hierarchy

As we’re trying to find files (while ignoring case sensitivity) that seems like one of the good tools for the job – and it is.

Find A File While Ignoring Case Sensitivity:

As mentioned above, we do this in the terminal. More often than not, you can just press CTRL + ALT + T and your default terminal should open. Otherwise, you can open your terminal via your application menu.

With your terminal now open, let’s change directories and create a file.

You can confirm that the file exists by running the ls command.

Next, try this command:

Unless you have another file with that name, you will not get any results from that command. That’s why you need the -iname flag. Simply add that to your command and you can find the file while ignoring case sensitivity.

So, in our case, it’d be:

Sure enough, that finds HeLLo.txt.

If you don’t feel like changing the directory, you can change the command up a bit. The syntax would look like this:

So, in our example:

And, sure enough, that finds the file while ignoring case sensitivity! 

Pretty neat and pretty easy, right?

How about that bonus?

Find A File While Ignoring Case Sensitivity (with locate):

You probably don’t have locate installed by default. You’ll need to install it.

To that end, read this previous article:

And Still Another Way To Find Files By Extension

Specifically this part is of interest (saving you a click):

With your terminal open, we can get mlocate installed with one of the following commands:

Debian/Ubuntu:

Arch/Manjaro/etc:

RHEL/CentOS/etc:

OpenSUSE/GeckoLinux/etc:

There are other package managers. If your package manager isn’t covered, just go ahead and search for “mlocate” and you’ll likely find that it’s available by default.

So, with locate now installed, the syntax is also very simple. You simply need the -i flag to find files while ignoring case sensitivity.

First, we should update the locate database:

Next, try this command:

That will not find the file in your ~/Documents directory. Add the flag and run the command again, like so:

If you want to run that locate command in a specific directory, you can do that. The syntax is a little different than many other commands, but it’s easy enough.

Or, in our case, it’d look like this:

Sure enough, that outputs the information exactly as planned. It will happily ignore the case sensitivity and find your file named HeLLo.txt.

And now you’ve learned two ways to find a file while ignoring case sensitivity. One of the ways is even a nice bonus way to do accomplish this goal.

Closure:

As the headline and opening paragraph suggested, you can find a file while ignoring case sensitivity. It’s not particularly taxing and there are multiple ways to accomplish this goal. I figured I’d give some ‘bonus’ information with this one and share how to find a file while ignoring case sensitivity with the locate command used in the previous article. Why not?

Thanks for reading! If you want to help, or if the site has helped you, you can donate, register to help, write an article, or buy inexpensive hosting to start your site. If you scroll down, you can sign up for the newsletter, vote for the article, and comment.
And Still Another Way To Find Files By Extension

Today we will cover a subject we’ve covered before, as we discuss yet another way to find files by extension. This is Linux! We have options! There are so many ways to find files by extension – and this is one of the more interesting of those ways. So, if you want to find files by extension, this might be the article for you.

You might be interested in previous articles that covered this topic:

Another Way To Locate Files By Extension
Yet Another Way To Find Files By Extension

You can search to find more. This is a task that has all sorts of ways to accomplish it. Some ways are easier than others. I’d say that the method we use to find files by extension in this article will be fairly easy. There’s not a whole lot to it.

We will be installing software. We’ll be installing mlocate but the man page will refer to it as plocate while the command we’ll be using will just be locate. Sound confusing? Well, it is. Don’t worry, the directions are still simple.

mlocate:

We’ll be installing mlocate as our tool to find files by extension. We’ll do this in the terminal, a fairly universal way to do things. Pretty much every distro is going to have at least one terminal available. You can usually open your default terminal by pressing CTRL + ALT + T on your keyboard.

When you do get mlocate installed, you can check the man page with ( man locate). There, you’ll see that locate is described like so:

plocate – find files by name, quickly

Yes, it has now been called mlocate, plocate, and locate. No, I do not know why. I do not think I’ll try to find out why. This is just one of those things you sort of accept and move on. Please feel free to research this and leave a comment. I’m not terribly curious, but other people might be.

With your terminal open, we can get mlocate installed with one of the following commands:

Debian/Ubuntu:

Arch/Manjaro/etc:

RHEL/CentOS/etc:

OpenSUSE/GeckoLinux/etc:

There are other package managers. If your package manager isn’t covered, just go ahead and search for “mlocate” and you’ll likely find that it’s available by default.

Configure mlocate:

Now that you have mlocate installed on your system, you need to update the database. The locate command requires a database. On slow systems with many files, this can take a few seconds. It should not take long on a modern system.

The only command you need to run at this stage is this:

Let that finish. It should not take very long. If it’s taking a long time, something might be amiss.

That’s all you have to do. The database will happily keep itself updated, though may take a short while to do so. If you add a new file, it might not be in the database immediately. In theory, this lag could mean you miss something – but the odds of that are rather low unless you’re constantly generating additional files.

I guess that means we should talk about using the locate command.

Find Files By Extension With The ‘locate’ Command:

As the title indicates, our goal is to find files by extension. We’ll be using the newly installed and updated locate database. The syntax is really simple. You’d just run a command like this:

For example,  you can find .iso files this way. That command would look like this:

That command will find everything with .iso in the name. If you have a foo.bar.isotext file that’s not really an .iso file, you’ll have to ignore that result because the locate command is going to find it.

But wait, there’s more!

You can limit the search to just a single directory. The command may not look conventional, but the syntax is as follows:

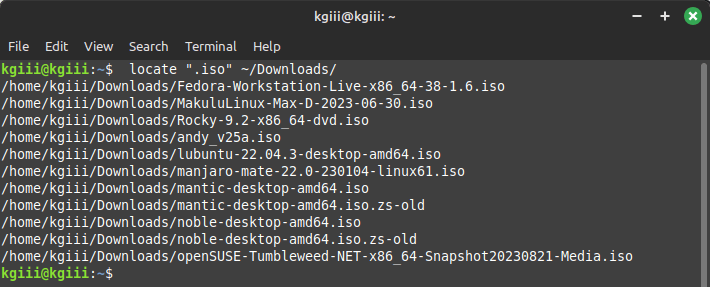
Let’s say that I want to find all the files ending with .iso in my ~/Downloads/ directory. That command would be simple. It’d look like this:

An example output might be something like this:

using the locate command to find files with a certain extension
It’s not hard to use the locate command to find files by extension. You’ve got this!

See? It’s not too hard to use the locate command. You can do more with the locate command, but this is just using it to find files by extension. Read the man page to learn more about it.

EDIT: Closed parentheses thanks to @Osprey.

Closure:

Well, this is a fairly short article. This time around, we just used a different method to find files by extension. There are lots of tools at your disposal and we use the locate command for this one. Just remember to update your database before you use it. Other than that, it’s pretty simple. It’s easy enough for new folks to use it!

Thanks for reading! If you want to help, or if the site has helped you, you can donate, register to help, write an article, or buy inexpensive hosting to start your site. If you scroll down, you can sign up for the newsletter, vote for the article, and comment.
Prevent Brute-Force SSH Attacks With fail2ban

Today’s article is one I could have already written and it’s about how to prevent brute-force SSH attacks with fail2ban. The reason I haven’t written it yet is because it either has too much substance or too little substance. I think I can strike a middle-of-the-road here and write an article with just enough substance.

See, and we’ll get to this later in the article, most folks won’t need to do a whole lot more than just install it. You can configure it a great deal, but the defaults are just fine for most people. On top of that, you can even make fail2ban send you email reports but we won’t be covering that in this article. Instead, we’ll largely have directions for installing fail2ban so that you can “prevent” brute-force attacks via SSH. I put the “prevent” in quotes because a diligent attacker could time things, use varied IP addresses, and try brute forcing your login credentials.

I think we need to start at the beginning.

What is SSH:

SSH stands for “Secure Shell” and is a tool to connect to a server remotely. If you check the man page for SSH it is defined as:

ssh — OpenSSH remote login client

This allows you to connect two computers over the terminal. It also comes with SFTP so that you can securely transfer files. You can do a whole lot more with SSH, including forwarding the graphical environment.

Here are a few SSH articles:

Install SSH to Remotely Control Your Linux Computers
Check Your SSH Server Configuration
Show Failed SSH Login Attempts

Then, there are a whole lot more SSH articles. I love SSH, so there have been quite a few articles on the subject. It’s a tool that I use quite often. I encourage familiarity with SSH as it’s sometimes a useful tool to effect a repair on a computer that is otherwise unresponsive to local inputs.

Servers are typically managed with SSH. As you can imagine, servers are a juicy target for malicious people. This means that SSH is a means with which malicious people will use to attack servers. One of the ways they do that is with ‘brute-force’.

What is Brute-Force:

There are many ways that one can try brute-forcing something. The name is as it implies. Rather than knowing the login credentials, they try to brute force them. That means they’ll try one combination of username and password and then keep trying various combinations until they eventually crack the system and figure out the login information.

That is the goal. Their goal is to find the login credentials. Instead of finesse, they use brute force.

This can include a dictionary attack. This can include a progressive attack where they start at the letter a, then try aa, then try aaa, etc. until they find the login credentials. They may also have a list of commonly used usernames and passwords and will systemically work their way through this until they find their way in.

This is one of many attacks and a modern computer can make many attempts in a short amount of time. Add to this modern bandwidth speeds and you can get thousands of attacks in just a short amount of time. It goes even faster if they know one part of the data, such as the username of a privileged account.

Enter fail2ban:

If you’re using a major distro, you have fail2ban available, one way or another. It’s usually easily installed and in your default repositories. When you do install it, you can check the man page. However, fail2ban is described as:

fail2ban – a set of server and client programs to limit brute force authentication attempts.

So, as you can see, fail2ban is the correct tool for the job. After all, and as the headline suggests, we’re trying to prevent brute-force SSH attacks with fail2ban.

Installing fail2ban:

We’ll be using a terminal to install fail2ban. You may also need to remotely connect to the server on which you want to install fail2ban. That too will require a terminal (or some SSH application like PuTTY). Simply press CTRL + ALT and your default terminal should open. If not, you can open a terminal from your application menu.

With your terminal now open, we can install fail2ban.

Debian/Ubuntu/etc:

RHEL/CentOS/etc:

Fedora with dnf:

I believe those are correct. That’s what is in my notes. If they’re not correct, please leave a comment and I’ll update the article. Other distros will have fail2ban available, just search your default repositories and you’ll likely find fail2ban available for installation.

Using fail2ban:

Now that you’ve installed fail2ban, you’re pretty much done. The default configuration is pretty much all you need – but you can customize it. There are a bunch of options available, so you can configure fail2ban in many ways. There are so many ways that we won’t be covering them. They’re reasonably obvious.

Once installed, fail2ban should start automatically. If it doesn’t, run this command to start it:

Next, we’ll make sure to enable fail2ban to start at boot time. That’s this command:

I assume that you’ll want to at least examine the configuration files and I’ll get you started with that. The first thing you want to do is cd to the right directory.

If you run ls you’ll see that there’s a file called jail.conf and you do not want to edit this file itself. Instead, fail2ban will look for configurations in a file called jail.local first. To make that file, you run the following command:

sudo cp jail.conf jail.local 

Next, you might want to make a backup of that jail.local file. 

You can now use Nano to edit your fail2ban configurations:

As you can now see, there are a bunch of options available. They’re far too many to explain here but they’re fairly well described. If any of the options confuse you, you can get help on the man page (man fail2ban ).

After you’ve set fail2ban’s configuration files the way you want them, you’ll need to restart the service for the changes to take effect. That’s done like this:

If you screw up the configuration, just remove the jail.local with this command:

Then restore from your backup like this:

Then, of course, restart the service with this command:

There are a lot of options with this application. You can explore them at your leisure, though I find the defaults to be adequate for most of my needs. As mentioned above, you can install sendmail and have the system send you notification emails. There are many other options as well.

Closure:

Like I said in the beginning, there’s a lot of substance with fail2ban. There’s a lot to it. If I added more to the article, it’d end up quite long. I may write a bit more about this application, but I don’t want to end up with a 2500-word article that will make your eyes gloss over. That doesn’t do me any good and it doesn’t do most people any good. Most folks are going to be fine with the basics before they explore the configuration options on their own.

If you do have a server (or even a personal computer) that’s running SSH, it’s worth your time to install fail2ban. If there’s any chance that someone can try to brute-force your system, they will.

Some bots crawl the ‘net looking for servers that respond on the default SSH ports. They can and will find you. You can also change the port SSH uses for some added obscurity (but remember that obscurity isn’t really security). So, it’s a good idea to prevent brute-force SSH attacks with fail2ban. Yes, it’s a good idea even for us ‘little guys’ who aren’t running servers with valuable information on them.  

Thanks for reading! If you want to help, or if the site has helped you, you can donate, register to help, write an article, or buy inexpensive hosting to start your site. If you scroll down, you can sign up for the newsletter, vote for the article, and comment.
Install A More Current Version Of LibreOffice In Linux Mint

Today’s article won’t be too difficult for most readers as we install a more current version of LibreOffice in Linux Mint. This is something we do from inside the terminal, but I’ll include clear directions that are simple enough for anyone to follow. If you do have issues, you can always leave a comment.

In reality, this applies to any distro that can take advantage of PPAs (Personal Package Archives). You could even make distros that don’t support PPAs out of the box support PPAs, such as Debian or ElementaryOS.

In fact…

Enable PPAs In Elementary OS

You might also want to read:

How To: Add A PPA To Ubuntu

But, adding a PPA will just be one step in today’s article. There will be more to it and none of it will be technically challenging, so long as you can follow directions.

What Is LibreOffice?

As you’re using Linux Mint, your version of Linux came with LibreOffice already installed. You can think of LibreOffice as being an alternative to other office suites, such as the venerable Microsoft Office.

LibreOffice is a fork of OpenOffice that was made after Oracle acquired the rights to OpenOffice. I don’t have any statistics, but there’s a lot of evidence that would suggest LibreOffice is now the more popular of the two – at least in the Linux world.

If your distro has a full-blown office suite installed by default, it’s probably going to be LibreOffice. It’s because of this that I strongly suspect that LibreOffice is more popular than the original OpenOffice. There are other office suites available for Linux and all sorts of alternative applications for the applications contained in the LibreOffice suit.

You can read more about LibreOffice here:

LibreOffice Project Page

For the uninitiated, LibreOffice provides the following:

Writer: A word processor
Calc: A spreadsheet editor
Impress: A presentation app
Draw: A vector-drawing program
Base: A database program
Math: A math-formula editor

So, LibreOffice is pretty handy, with lots of tools available. Best of all, it’s free as in beer and liberty.

About Updating LibreOffice:

If you want a more current version of LibreOffice, it’s not all that taxing. Here’s why you might want a more updated version of LibreOffice:

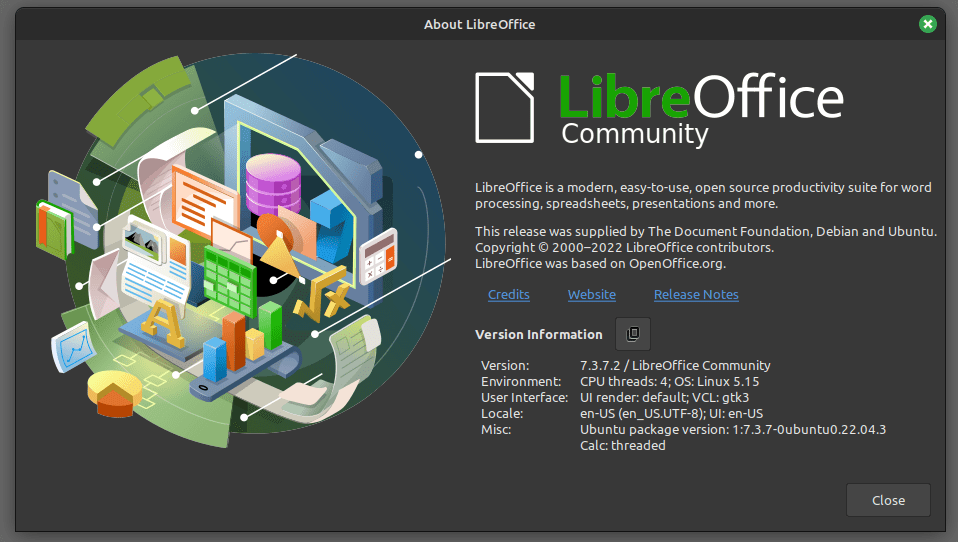
This is the version currently installed in Linux Mint:

current version of LibreOffice installed in Linux Mint
There’s probably nothing wrong with using an older version of LibreOffice.

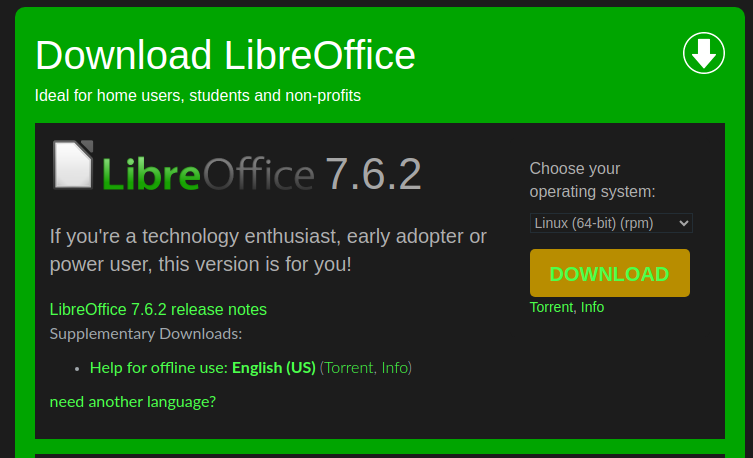
This is the current version of LibreOffice that’s available on their site:

this is the current version of LibreOffice that's available on the project page
This is the version you could have if you wanted to. If you want to…

So, you can have a newer version of LibreOffice because the PPA we’ll be using is meant to provide just that. The PPA provides you with a newer version of LibreOffice than what’s already installed. 

Do You Need This Updated LibreOffice:

No, no you probably don’t. Not only can this cause issues with the application’s stability, but it may also introduce new bugs. This comes with a caveat or two.

If you’re dealing with a show-stopping LibreOffice bug and it’s fixed in the more recent versions, that’s a good reason to move to the cutting-edge versions of LibreOffice. It’s also a good thing for those who are just curious about the latest features in LibreOffice. If you’re interested in helping out and reporting bugs, this too would be a good reason to go through this process.

When you add the PPA, there’s this warning:

Most of the packages in this PPA have only experienced minor testing — in fact it is the place to enable a wider audience to test packages before they are published into the distro proper. In general, this PPA is _not_ for the average user to install without a closer look (if it would be, its packages would be in the main repositories). OTOH, it is _way_ _better_ to use packages from this PPA than using the *.deb files that The Document Foundation provides upstream, which are intentionally build against a very old baseline for maximum compatibility. So, _if_ you want to be on the bleeding edge, do it here, not with upstream *.debs.

Read that carefully. Make sure that you understand the risks involved. Do not do this without realizing the potential consequences. This can break things. This almost certainly will break things.

Those things will be limited to LibreOffice. You don’t have to worry about it breaking your whole system. There’s little risk of that happening, so don’t worry about that. But, you will be using the latest and greatest versions of LibreOffice.

For the overwhelming majority of people, using the default version of LibreOffice in Linux Mint is going to be the path of least resistance. While this article does specify Linux Mint, this is also true for the other distros out there. If you ride the bleeding edge too long, you will get cut.

The Current Version Of LibreOffice In Linux Mint:

As I said way back at the start of this article, you’re going to need a terminal for this. Once you have that terminal open, the rest is pretty easy. You just need to commit to it. So, press CTRL + ALT + T to open your terminal and let’s get this show on the road.

First, we’re going to add the PPA. That’s easy.

That’s going to output a bunch of text. At the end of it, it will tell you what to do. Specifically, it will say Press Enter to continue or Ctrl+C to cancel and you’ll just press the ENTER button to continue adding the PPA to your list of repositories.

The next step is to update the database of software that’s available to install via your repositories, including the ones you’ve added manually like this one. That’s a command everyone should know by now.

Seeing as you’re there, and to ensure that you have the latest available packages installed before the next step, run this command:

Now, if there’s a newer package of LibreOffice in the default repositories, that command will also update that. However, that will not install the latest and greatest LibreOffice in Linux Mint. 

No, no… You have one more step to install the most up-to-date (available) version of LibreOffice in Linux Mint. To do that, just run the following command in that same terminal window.

That will get you the latest version of LibreOffice that’s currently available in the official LibreOffice repositories. It’s about as bleeding edge as you can get. It may not give you the absolute latest, as it sometimes takes a little while to add the new software to the repositories, but it’ll be a much newer version than the version that was installed by default.

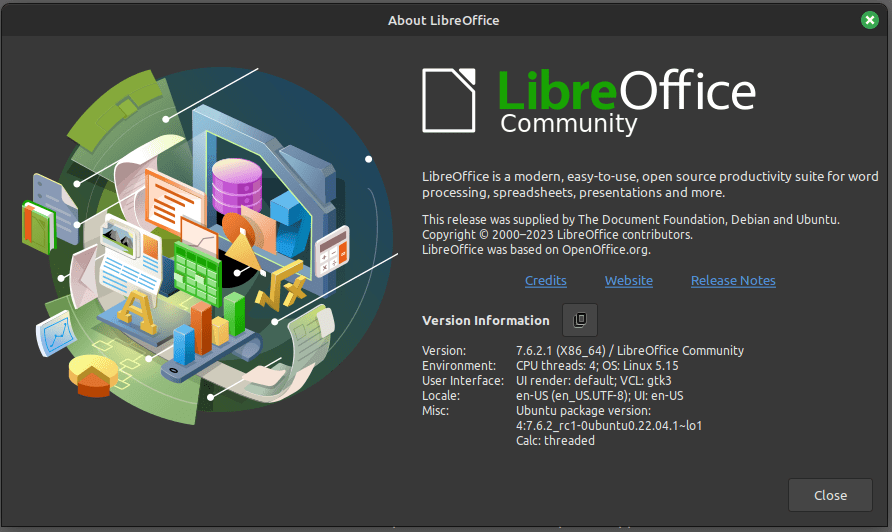
Your result might look something like this:

The results of installing the most current version of LibreOffice on Linux Mint
There you have it, the latest available version of LibreOffice installed in Linux Mint.

Is this something you want to do? Do you need the latest and greatest version of LibreOffice? Are you ready to deal with the potential bugs and are you ready to help the community by reporting any bugs you find? If you’re just a curious sort of person, this might be something fun to try. Otherwise, you might just want to leave well enough alone and be happy with the version that has been tested and deemed ready for full release.

Closure:

Well, this article turned out longer than I expected it to. That’s okay. I’m sure you can handle it. It has pictures! That might help! Well, they probably won’t help but you only need the text. The pictures are just decorative and mildly informative. They’ll be out of date in less than a week.

You should give this serious consideration before you decide to do this. I’ll do an article in the future that will tell you how to undo this should you decide you want to back out of it. That’ll be a nice article and should be easy enough for anyone to follow. After all, if they made it this far they can probably make it the rest of the way.

Thanks for reading! If you want to help, or if the site has helped you, you can donate, register to help, write an article, or buy inexpensive hosting to start your site. If you scroll down, you can sign up for the newsletter, vote for the article, and comment.

How To: Delete A Swapfile In Linux

Today’s article will be a bit more advanced than some as I try to explain how to delete a swapfile in Linux. If I do my job right, it’ll be easy enough for a newbie to follow. However, I’m not going to suggest newbies mess around with removing swapfiles – but they certainly can.

It should probably be noted that some folks will call this a “swapfile” and others will add a space to call it a “swap file”. I’m not sure which is correct, so I’m sticking with “swapfile” for consistency sake. After all, about two years ago, I wrote an article about how you can enable a swapfile.

How To: Create And Enable A Swapfile

This article might be a bit complicated. The directions themselves are pretty simple. Distilling the concept of ‘swap’ down to an 800-word article is the difficult part. 

What Is A Swapfile:

What is swap? Well, it’s not really a place where the kernel sticks stuff when there’s no more free RAM. People seem to think that’s what swap is, and it’s not. Even on systems with lots of RAM, the kernel will use swap when it is available.

It’s quite a bit more complicated than that, though it can sort of be related to that. It would be prudent to suggest that you read this thread first, concentrating on the first post in the thread:

To swap or not to swap, that is the question.

I’d further suggest reading this article from the folks at linux.com:

All about Linux swap space

There’s more to it than the article goes into, but pay attention to this bit of text quoted below:

Second, a significant number of the pages used by an application during its startup phase may only be used for initialization and then never used again. The system can swap out those pages and free the memory for other applications or even for the disk cache.

In the early years, we used a special partition for our swap. These days, there probably isn’t much need for a special partition. Most of us that still use swap will be using a swapfile. This is essentially the same thing, but it is a file instead of a special partition on your storage drive.

Your distro may have created a swapfile during the installation process. You may have created your swapfile along the way. Well, this article is going to tell you how to delete a swapfile, just in case you changed your mind.

Delete A Swapfile In Linux:

Yeah, this sort of thing pretty much requires using the terminal. I don’t know of a way to do this graphically, though there’s probably a way that I don’t know about. So, press CTRL + ALT + T to open your terminal and we’ll head straight into the article.

With your terminal now open, let’s first make sure that you have swap to begin with. To do that, you can run this command:

Technically, you don’t need the -m flag, but it’s easier to read in my opinion. The output might look something like this:

As you can see, the system has 16 GB of RAM and 2 GB of swapfile space. Of that 2 GB of swapfile, 737 MB is being used. There’s lots of free RAM, but swap is still being used. Like I said, it’s not just a place where the kernel stuffs things when there’s no more free RAM.

So, now that we’ve learned there’s a swapfile, you can run this command:

The output from that might look something like this:

The bit we’re looking for is /swapfile because that’s the literal name of the swapfile. You could have called it anything while setting it up, so it’s important to get the name correct for the next command.

Now, we want to delete your swapfile. That’s a very easy command. It looks like this command:

In my example, if I wanted to delete a swapfile on my system, the command would look exactly like this:

To confirm that the file is deleted and no longer being used, just run this command all over again:

It might seem a little complicated at first and I hope I explained it well. Using swap (or not) can be a complicated subject, but it’s not all that taxing to delete a swapfile in Linux. If you can follow the above directions, you should be good to go.

Closure:

As I’ve mentioned before, I leave swap enabled because the kernel uses it. The kernel uses swap even on systems with a lot of free RAM. I figure the kernel is smarter than I am, so I leave it enabled.

The second link in this article is well worth reading. Deciding to use swap or not is a very personal thing. If you have plenty of RAM, you can get away with not using any swap at all. Of course, if your system is fast enough and you’re using an SSD, having a swap isn’t going to add much latency to your system – if any at all.

This is something you get to decide. You can decide what is right for you and your computing needs. If you want a swapfile, you can easily add one. If you want to delete a swapfile that was created during the installation, you can do that as well. This is Linux and your configuration options are nearly endless. You decide what’s best for you. You decide how you run your Linux because it is your Linux. And that is awesome.

Thanks for reading! If you want to help, or if the site has helped you, you can donate, register to help, write an article, or buy inexpensive hosting to start your site. If you scroll down, you can sign up for the newsletter, vote for the article, and comment.

Linux Tips
Creative Commons License
This work is licensed under a Creative Commons Attribution 4.0 International License.