Some Useful Ways To Use The Touch Command In Linux

In today’s article, we’re going to learn some useful ways to use the touch command. It’s not a complete listing of options, it’s just the commands that I think you’re most likely to find useful when using said touch command. This won’t be all that difficult to process, even for a new Linux user.

It pains me to not give this a witty, clickbait title. Though, it does remind me of a story. I think I’ll share it…

So, I was on the Interstate. At the time, my weekend was partially filled up by playing in a Top-40 band. That explains why I had pop radio on the FM radio we all used back then. I was driving along and on came this song for the first time, or at least my first time hearing it.

Yes, the Divinyls song, I Touch Myself. I laughed so hard that I had to pull off to the breakdown lane. I didn’t even notice the cop pull up until he flashed his lights and used his cruiser’s bullhorn thing to tell me that it was an emergency lane and to move on. He didn’t even check if I had an emergency, he just told me to move on. Maybe he too was listening to pop radio at the time?

So, I just want you to know how hard it was for me to *not* use a ‘witty’ article title. You’re welcome. As I often say, I’m pretty much just a giant 5 year old.

Anyhow, like I said in the beginning, this is going to be some useful ways to use the touch command in Linux. Read on!

The Touch Command:

The touch command is a terminal only thing, so you’ll need an open terminal to follow this article. If you don’t know how to open the terminal, you can do so with your keyboard – just press CTRL + ALT + T and your default terminal should open.

As I said, this isn’t going to be a complete listing of touch commands, it’s just the most useful – or those I think you’ll find the most useful. If you want a complete list, just run man touch in your terminal and all shall be revealed.

So, you’re mostly going to use the touch command to create files. You can create files with touch by using the following:

Or create multiple files with:

I suspect many of you know about that, but there’s more to touch! Quite a bit more, actually. It’s a handy commend for other things, like mucking about with timestamps.

Want to create a file – but not make the file if the filename already exists (handy for scripting)? You can do that. The command would be:

Want to change a file’s modification and access time? You can do that with the -a flag, which will change both to the current date and time:

If you want to change just the modification time, use the -m flag.

Now, you can also specify a specific access and modification time, so that you’re not just setting it to the current date and time. It’s not too complicated. It looks like this:

That’s YEAR, MONTH, DAY, HOUR, MINUTE, and SECOND. So, a fairly universal time and date format, something you may know from other commands.

You can also just tell touch to use the timestamp from another file. That’s done with:

In the above case, the command will set the timestamp of <file_1> to that of <file_2>. Pretty handy, huh? 

Again, there’s more to the touch command. To learn more, just type man touch into your terminal and you’ll see the various other options. These are just a few of the options that I’ve used, those that I think are the most useful. It’s a great way to expose newer users to some of the nifty terminal commands available in their Linux systems.

Closure:

And there you  have it. You now have an article that helps you learn how to use the touch command in Linux. It’s a handy command and it does more than just make files. We’ve actually used the touch command in exercises before, so it’s nice to see what other options are available. Also, as tempting as it was, I didn’t use any puns or innuendo in the article. You’re welcome!

Thanks for reading! If you want to help, or if the site has helped you, you can donate, register to help, write an article, or buy inexpensive hosting to start your own site. If you scroll down, you can sign up for the newsletter, vote for the article, and comment.
How To: Check For Bad Sectors On Your Disks

Today, we’re going to examine one way to check for bad sectors on your disks. Once again, it won’t be a particularly taxing article, but it’s something everyone should know how to do. This being Linux, I’m sure there are alternative tools.

Hard drives, from spinning platter to solid-state, are divided into sectors. Sometimes, these sectors go bad. The disk’s software manages this to some extent, and actually has more space available than listed so that it can make up for bad sectors as time passes.

But, you still get bad sectors. It’s just the nature of the game, and no disk drive is immune to this. All you can do is accept them and, in some cases, repair them.

See, there are two types of bad sectors. The first is a hard bad sector, which is hardware related and can’t be fixed. The second is a soft bad sector, which is a software issue and it can be fixed. I’ll someday write an article about how to fix soft bad sectors, but I won’t bother getting into that today.

With all that in mind, the tool we’ll be using is appropriately named ‘badblocks’, which describes itself thus:

badblocks – search a device for bad blocks

Badblocks has a variety of uses, so you can always get a head start on this article by reading the man page. 

So, with that already covered, let’s just jump into the article.

Check For Bad Sectors:

This article requires an open terminal, like many other articles on this site. If you don’t know how to open the terminal, you can do so with your keyboard – just press CTRL + ALT + T and your default terminal should open.

With your terminal now open, you should probably identify your drives with the following command:

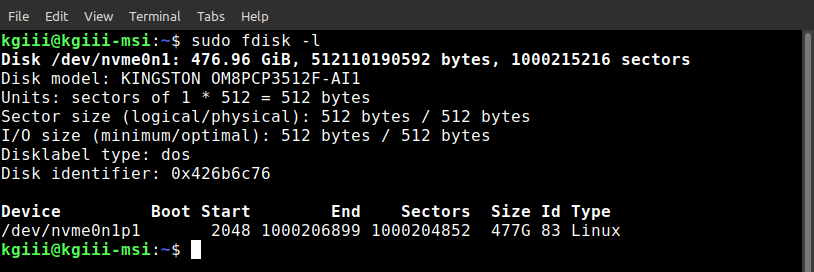
The output of this may look a bit like this:

output of fdisk -l
You can see your drive’s identification with the output of fdisk -l.

As you can see,  it’s listed as /dev/<device_ID>  and that’s the information you want to hold onto.

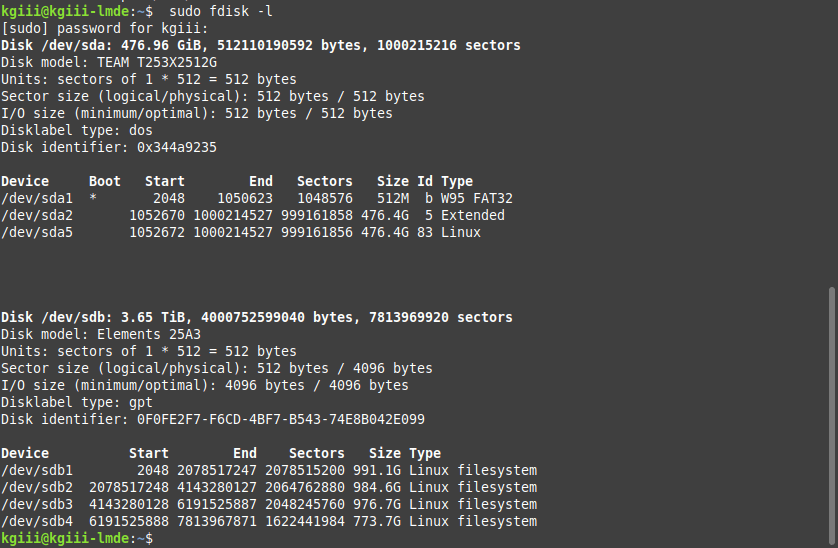
Sometimes, it’s a lot more complicated, and will look something like this:

output of fdisk -l
This is a bit more complicated than the first one – plus the drives are all ‘sd*’ in nature.

As you can see, they’re all start with ‘dev/sd*‘ and end up as /dev/<device_ID>. The system I ran badblocks on is quite a bit more complicated than the output from the laptop I used in the first instance.

Now, you want to scan your individual device to check the for bad sectors. That’s actually just a simple command. You can use:

The -v ensures the output is verbose and sent to the screen. You can also write that data to a text file for reference. To do that, you just use a command similar to this:

Then, you’ll have a badblock.txt file you can refer to, showing you information about any bad blocks. I wanted to show you the output from a disk with bad blocks, but I don’t appear to have any to show you. I tried quite a few, but it was a no-go. Ah well… You’ll figure it out easily enough. It’s not even a little hard to check for bad sectors!

Closure:

Yup… You have another article. This time you learned how to check for bad sectors, a pretty handy tool – especially if you’re finding corrupt files on your disks. If you are facing corrupt files, this would be the first step I’d suggest taking.

Anyhow, the show does go on and you got a new article. I am more or less feeling just fine now, just some lethargy and not a whole lot of energy. Sweet!

Thanks for reading! If you want to help, or if the site has helped you, you can donate, register to help, write an article, or buy inexpensive hosting to start your own site. If you scroll down, you can sign up for the newsletter, vote for the article, and comment.
How To: Check Disk Usage With ‘df’

In today’s article, we’re going to do exactly what the title suggests; we’re going to check disk usage with ‘df’. This means we’ll be checking disk usage in the terminal. Seeing as ‘df’ is included with every distro on the planet (I’m pretty sure) it means this won’t be all that complicated.

I am still a bit under the weather, but the show must go on! I’ve gone this long without missing a publication date, so I might just as well keep the  streak up. 

As the title suggests, we’ll be using ‘df’ to check disk usage. This will already be installed as one of the default tools, so you won’t need to install it. That’ll save some time! If you’re curious, the ‘df’ tool describes itself as:

df – report file system disk space usage

If you want to get a head start, you can check the help page. To do that, you’ll want to run:

If you’re like to check the version, the command is:

So, with that in mind, let’s just jump into the article.

Check Disk Usage With ‘df’:

Obviously, this is yet another article where we’re learning about doing things in the terminal. That means you’ll need an open terminal. If you don’t know how to open the terminal, you can do so with your keyboard – just press CTRL + ALT + T and your default terminal should open.

With your terminal now open, you can just run the command by itself:

In some cases, it will throw an error and not be able to read everything. That’s usually easily resolved. Just run the command as a privileged user. So that would look like:

Now, you can use that output to do a bunch of math, or just pay attention to the percentages. Or, if you’re wanting, you can use the -h flag and get the output in human-readable format. That looks like:

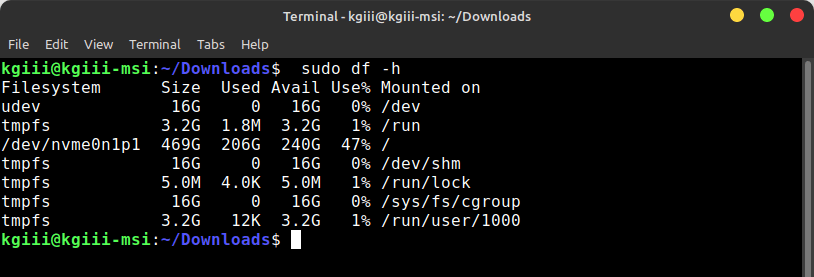
The output of which might look a little something like this:

the output of sudo df -h
See? No errors and it is nice and readable! You can’t go wrong with that!

As you can see in the picture, I’m only using less than half of my available disk space. I don’t need to worry about running out of space any time soon, but if it gets low I can always check disk usage with ‘df’. Also, it doesn’t matter what directory you’re in when you run the command. As you can see, it runs just fine while in the Downloads directory.

I also wrote an article about using GUI methods to visualize disk space usage. You might prefer one of those methods, but you can always just use the terminal to check disk space.

Closure:

It seemed like a good idea to do a quick article tonight. I’m watching IMSA’s last race of the season and feeling poorly, so hopefully I get some sleep at a reasonable hour. Still, as I mentioned, the show must go on. The site has had a new article every other day for quite a while. I might as well keep up the schedule.

Thanks for reading! If you want to help, or if the site has helped you, you can donate, register to help, write an article, or buy inexpensive hosting to start your own site. If you scroll down, you can sign up for the newsletter, vote for the article, and comment.

Let’s Learn To Remove A Directory

Today’s article is going to teach you how to remove a directory. This being Linux and rmdir, you can only remove empty directories. That’s okay, that’s still what we’re going to use. I’m pretty sure I’ve explained how to remove files before and, if not, that’s a pretty simple task.

This article is going to be light on details and pretty short. I popped positive on one COVID test and negative on another. I could take a third test, but I really just feel crappy and not all that bad. Still, it’s an excuse to have a nice and easy article! I like those sometimes! My proofreading may be sub-par.

Like I said, we’ll be using ‘rmdir’ and that only works on EMPTY directories. I can’t stress this enough! If there’s a file in the directory, any file, it will not delete the directory. 

Umm…

I do not know the design reason for making ‘rmdir’ (a standard tool in every Linux) only remove empty directories – but I suspect it’s a protection method. It’s protecting itself from you – meaning you must go in and confirm that it is empty and that there are no files remaining that you’d like to keep. After that, you can delete the directory.

That stands to reason and, frankly, it’s the only reason I can think of. If anyone knows the real reason, assuming I am wrong, please feel free to let me know in a comment. I’m quite curious. Ah well… Onto the article!

Remove A Directory:

This article requires an open terminal, like many other articles on this site. If you don’t know how to open the terminal, you can do so with your keyboard – just press CTRL + ALT + T and your default terminal should open.

Now, with your terminal open, let’s use ‘rmdir‘ and learn how to remove a directory. In its basic form, the command is:

This works if it’s a path you want to specify:

If you want, you can use the -v switch and get a verbose output, telling you what is being deleted. This is probably for the best. So, it’d look like:

But wait, there’s more! What if you wanted to remove all of that, you want to remove /path /path/to and /path/to/dir? Well, you can do that:

Of course, if you want confirmation of what’s being deleted, try:

Assuming all those directories are empty, the command will complete itself and remove all the directories in that path. Those are basically all the rmdir commands you’re likely to need, but you can check man rmdir for more information.

Closure:

See? Nice and easy. See? You even get an article when I’m dying from the plague! Don’t worry, I’m sure I’ll be just fine. Statistics are my friend at times like this, so my worry level is exactly 0%. The odds of it incapacitating me are negligible and I’m a pretty big fan of math.

I’m vaxxed to the max and even boosted – which only lessens your chance. I’ll be fine. After all, only the good die young! (I am not young, now that I think about it!) I’ll quarantine at home and hope for the best, while monitoring for degradation.

Thanks for reading! If you want to help, or if the site has helped you, you can donate, register to help, write an article, or buy inexpensive hosting to start your own site. If you scroll down, you can sign up for the newsletter, vote for the article, and comment.

How To: Go To A Specific Line In Nano

In today’s article, we’re going to learn how you can go to a specific line in Nano. It’ll be an easy article, perhaps even a fairly brief article. There are a just a couple of ways to cover, so it won’t take all that much time or space.

Often, when things like scripts throw an error, they’ll tell you on which line number the error happened. There are often hundreds or thousands of lines in complicated files and navigating to the correct line number is tedious, prone to error.

You can be pressing the down arrow for quite a while! So, why not note the line number where the error occurred and open the file at that specific line? It’s perfectly good sense! It’s such good sense that I figured I’d write an article about it.

You all know that I’m a Nano fan. You can read the ‘big’ Nano article here. If that’s not enough, this link is to a search for Nano across the entire site. There are nearly 30 articles that use Nano in them. I really am quite a fan.

Why am I a fan? Well, the first link will probably tell you that, but I like it because it’s simple. Nano’s starting to be fairly universal. It’s light and that’s why I like it – it’s only meant for quick text file edits.

Nano’s not really the right tool for writing a book, nor would I want to use it to write large scripts or for programming. For what it is, it’s great. If it’s not great, odds are good that you’re not using it as the tool it is. Sure, it’ll work for other things, but it excels at being what it is – a quick text editor in the terminal.

Go To A Specific Line In Nano:

Nano is a terminal-based tool. So, you obviously need to have an open terminal. If you don’t know how to open the terminal, you can do so with your keyboard – just press CTRL + ALT + T and your default terminal should open. Tada! (That’s mostly copy/paste from previous articles, but I do sometimes mix it up a little!)

With  your terminal open, let’s show you how to go to a specific line in Nano. It’s pretty easy, and we’re going to use a file most users will have. If you don’t have a ~/.bash_history file, you can use any plain text file you want.

I suppose we should first make sure that you have Nano installed. To check, you can just look for the version. That’s done with:

Your output should look something like:

checking the nano version
As you can see, Nano is happily installed and ready for use.

If Nano isn’t installed, and you’re using any mainstream distro, it’s certainly in your default repositories. You can install it like you would any other piece of software in the repositories. 

Now, there are two ways to open and go to a specific line in Nano. The first is probably the easiest. Using our ~/.bash_history as an example, the command looks like this:

Where you see the +25 flag, that’s the place where you specify the line number to start with when  you open Nano. You can use any number you want, provided there are that many lines in the file you’re intending to edit.

The next way is also easy. Using your keyboard, press CTRL + Shift + . Nano will then present you with the chance to enter in a specific line. It looks like a lot like this:

open a specific line in nano
See? Follow the arrow and that’s where it prompts you to enter a line number. ‘Snot hard at all!

So, now you have two ways to go to a specific line in Nano. I told you that it was going to be easy! Nano is awesome.

Closure:

There’s another article! It’s on one of my favorite subjects – Nano. Now you’ve learned how to go to a specific line in Nano, which is a pretty handy trick to have in your toolbox. It can save you all sorts of time, and not just time scrolling. It means you aren’t paying attention to the rest of the fluff and you can concentrate better, or so it seems to me. For what it is, Nano is my favorite plain text editor and it’s remarkably useful at times.

Thanks for reading! If you want to help, or if the site has helped you, you can donate, register to help, write an article, or buy inexpensive hosting to start your own site. If you scroll down, you can sign up for the newsletter, vote for the article, and comment.

Linux Tips
Creative Commons License
This work is licensed under a Creative Commons Attribution 4.0 International License.