How To: Start A Quick Python Server

Today’s article is going to show you how to transfer files between computers by using a quick Python server. It’s remarkably easy! It’s a temporary server (usually) and lasts only as long as you need it to.

Why would you do this? Well, you can transfer files from one computer to another. It also functions as an HTTP server which makes it easy to test things like simple web pages quickly and easily.

Are there better options? Quite probably. If you want to transfer a single file, then SCP is a good way to go about it. If you want to transfer multiple files, you could setup SFTP. If you want to test web pages, you can likely just write the files locally and then open them up with the browser of your choice.

You have options! And, thankfully, Linux provides all sorts of options – including setting up a quick Python server. As I said, it’s actually pretty easy.

A Quick Python Server:

This article requires an open terminal, like many other articles on this site. If you don’t know how to open the terminal, you can do so with your keyboard – just press CTRL + ALT + T and your default terminal should open.

The first command I want you to run will let us know what version of Python you have installed. Many distros have (at present) moved onto version 3, but some still have Python 2 installed. So, for that information you just run:

Now, if you have Python v. 2.x, you would use this command:

If you’re using Python v. 3.x then the command you’d use is:

(If you’re curious, the -m is telling Python which module to open.)

Anyhow,  you can now connect to your server with the following command:

Read how to find your IP address. Instead of an IP address, you can also use your hostname.

Anyhow, you  now have a server running on port 8000. If you want to, you can also change the port number. This is the same for both commands. In both cases, just append your chosen port number to the command. Like this:
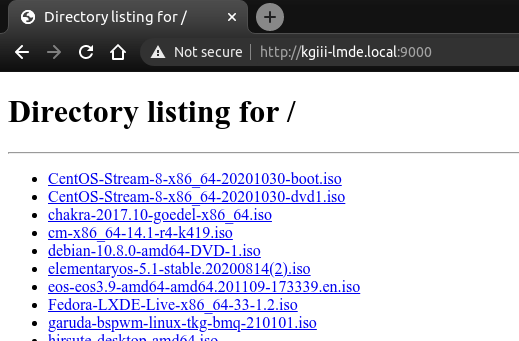
It’d look a little like this:

See? It's a different port number.
Note the changed port number. You should probably avoid reserved ports.

When you’re done with the quick Python server, you can just close it by pressing CTRL + C. If you’re planning on running it long term, you can always run the command with nohup. If applicable, you may also need to open the port in your firewall.

Like I said, it’s a quick and easy server in Python. You definitely wouldn’t want to use this as a public facing server, but it’s fine for quick tasks. Feel free to leave a comment letting folks know how you use this in  your day-to-day tasks.

Closure:

There you have it, another article said and done! The site is going well and the schedule seems to be working well enough. It’s a bit demanding to write one every other day, but that’s what I said I’d try to do. So far, so good!

Thanks for reading! If you want to help, or if the site has helped you, you can donate, register to help, write an article, or buy inexpensive hosting to start your own site. If you scroll down, you can sign up for the newsletter, vote for the article, and comment.

Disable Printing And CUPS.

I don’t print much of anything these days, and haven’t for a long time, and on older hardware I’d disable printing by disabling CUPS. I’ve also found printing enabled on server installs. That doesn’t seem like a good default to me, but I’m definitely not an expert. 

If you don’t need to print, you don’t need the CUPS services running. Today, we’ll discuss disabling it. We could mask the services, like we did in the article about disabling sleep/hibernation. Instead of doing that, we’ll use this as an opportunity to show how to disable a service. That seems like a reasonable choice.

If you don’t know, Linux printing is (usually) controlled by CUPS. CUPS is developed by our friends at Apple. CUPS has actually been around since the late 90s and has pretty much become the default printing system. If you check the man page, it defines itself like:

cups – a standards-based, open source printing system

And the description:

CUPS is the software you use to print from applications like word  processors, email readers, photo editors, and web browsers. It converts the page descriptions produced by your application (put a paragraph here, draw a line there, and so forth) into something your printer can understand and then sends the information to the printer for printing.

If you don’t print from your system, you don’t need the service running. Back when I cared about optimization, this would be something I’d disable. I’m not sure that it ever did much good at making things run faster, but it definitely made me feel like I was doing something!

Disable Printing/CUPS:

Like many other articles on this site, we need an open terminal. You can open a terminal with your keyboard – just press CTRL + ALT + T. That should do it!

Now, with your terminal open, we just need to enter a few commands. Just in case, we should first make sure to stop any of the printing services. To do that, you run the following:

If you did it right, you’ll get no feedback. We also need to stop ‘browsed’ (the daemon that broadcasts/receives broadcasts from remote printers) with:

Again, nothing should show up on your screen. You’re also done stopping any of the printing services and the next step will be to disable those services. It’s pretty easy – you just replace the stop with disable. It looks like this:

And again for the daemon:

That should do it, actually. You should now no longer be able to print from your device. This could even be an additional security setting for times when you don’t want basic users to be able to print sensitive information while still keeping a printer up on the network. If the system can’t print, you don’t have to worry about them acquiring the print credentials. For those who’ve covered the costs of a ‘print room’, you might even see some benefits on the bottom line!

Closure:

See? That was a nice and easy article. It’s not even all that long! Heck, the stuff around the commands is more complicated than the commands themselves! Now that I think about it, that kinda describes a bunch of these articles. I can’t write essays every day! Besides, who would read them?!?

Thanks for reading! If you want to help, or if the site has helped you, you can donate, register to help, write an article, or buy inexpensive hosting to start your own site. If you scroll down, you can sign up for the newsletter, vote for the article, and comment.

Let’s Play Around With ‘apt-cache’

Today, we’re going to learn about apt-cache. Obviously, this information is only useful for distros that use the apt package manager. You’ll find that apt, and apt-cache, are package management tools – useful for managing (installing, removing, and updating) the software on your computer.

To know about apt-cache, we should probably know about apt. I think the man page describes apt well enough with this:

apt provides a high-level commandline interface for the package management system.

And apt-cache defines itself as:

apt-cache – query the APT cache

While it further describes it as:

apt-cache performs a variety of operations on APT’s package cache.

As you can see, they’re necessary and valuable tools for the management of software on your Linux box. Not all distros use apt, but it’s generally used by the distros in the Debian family. Those are distros like Ubuntu, the official Ubuntu flavors like Lubuntu, Kubuntu, and Ubuntu Mate, as well as distros like Linux Mint. 

So, it’s used by quite a few distros and, importantly, many of those distros are the favorites for people who use Linux on the desktop. I’ll also note that apt works equally fine in a server environment, without a desktop. It’s widely used, widely supported, and easy to find assistance when you have questions.

Today, we’ll just be covering ‘apt-cache’ and some of the basic usage. It’s not a very deep article, nor does it need to be. While there are a ton of apt-cache options, chances are that you’ll only need to use a few of them. So, this shouldn’t take too long out of your day, or will make a good resource when you need to remember something.

Using apt-cache:

This article requires an open terminal. Just press CTRL + ALT + T and your default terminal should open.

For this article, our example will be inxi. We’ll assume you’ve already installed it, or are already familiar with it. If you don’t have it installed, now would be a good time to do so – as it’s a very handy tool. Where you see ‘inxi’ you can use any other package name you want. 

An easy command, if you want to display a bunch of generic information about a package, is the following:

That will show you a bunch of information about a package, installed or not. It requires the complete package name. In the next command, that’s not really required.

With the search flag, you could type in ‘inx’ and it will find inxi, among other things. You can use that command with the ‘–full’ switch, and get a ton of useful information:

You don’t even have to use an application name with the search – you can search for keywords and find applications that way! If you wanted a text editor, you can use:

You might be surprised at the number of results you’ll get with that command. There’s probably some text editors you’ve never heard of before, and they’re right there among those results! Installing them is just a command away!

We can also check the policy, showing things such as which version is installed, which version is available, and the repository name. It’s just as easy as the rest.

The output of that command is pretty handy. It’s a short output that tells you which version you have and which version you have installed. It’ll also tell you which repositories hold the software, often more than one, and what the priorities are for those repos.

Bonus apt-cache Features:

Among these great features, you can easily see both the dependencies and the reverse dependencies. Dependencies are the extra software that needs to be installed for the package in question to function and reverse dependencies are those packages that require the installation of the named package to be fully functional.

To find the dependencies:

The reverse dependencies:

There you have it! Those are the most common ways you’re going to use apt-cache. If you want to know more, you can always check the man page with man apt-cache. Dependencies, both regular and reverse, are probably worthy of their own article at some point. Normally, your package manager will deal with those, but you sometimes come across situations where you need to resolve dependencies on your own.

Closure:

And, there’s one bonus round! There’s pretty much no good reason to run this, other than curiosity, but you can actually get some pretty cool stats about how many packages are available, how many are real packages, how many are virtual packages, and things like that. It’s a pretty simple command with a lot of output.

See? Another lovely way to use the terminal to gather information. Personally, I do pretty much all my software management in the terminal. I just find it easier, more informative, and faster. I’ve done it for so long that it’s legitimately faster for me to use the terminal than it is for me to do so in the GUI.

Anyhow, thanks for reading. This is yet another article in a growing list of articles! We’re well past the halfway point in the year-long project and so far we’ve yet to miss a single publication date!

It’s going to feel good to finally say that my obligations are over – and then to probably keep writing just to keep getting more and more of this stuff online on my own site. ‘Cause that’s the kind of thing I do… In theory, I’m retired. However, I keep obligating myself to do more and more things. Ah well… This site is at least productive and, judging by the numbers, beneficial to the community.

Thanks for reading! If you want to help, or if the site has helped you, you can donate, register to help, write an article, or buy inexpensive hosting to start your own site. If you scroll down, you can sign up for the newsletter, vote for the article, and comment.

Why I Use Linux

Today’s article will be short and simple, about why I use Linux. I’ve wanted to write it for a while, and it may end up being another one of those articles that gets updates over time. (Note: This article is from the defunct site, due to a death in the family.)

I tend to use Lubuntu and that’s my preferred desktop system – even after the change to LXQt. It’s visually simple and familiar. It’s light on resources, even though I have plenty.

I don’t use Linux because I hate Microsoft. You’ll never see me call them a derogatory name. I don’t have any major anger towards Microsoft or their products.

I don’t even care if the product I’m using is opensource. Being closed-source doesn’t bother me. I care that the application works and lets me do the things for which I installed it.

I am using a closed-source browser as I type this. Like Linux, it just works for me. It gets out of my way and lets me accomplish my computing goals.

That’s what I really like about Lubuntu. It just gets out of my way. Once it is configured, I don’t have to keep tinkering with it. I don’t have to continually pay attention to the operating system – it just keeps working and I just keep updating it.

I love the simplicity and efficacy of the terminal. When I boot my computer, a terminal emulator is one of the first things I open. I often have two or three of them open at once.

I never have any hardware issues that I can’t resolve. Sure, it may be a bit difficult to find your wireless driver – but once you do then you needn’t worry about it again. In the mean time, tether your phone and connect that way. Then again, I always have an adapter that works well enough for me to get the drivers for any built-in hardware.

I don’t see the process as any different than Windows. You have to put some effort in to make it work. But, once it’s installed, all of my updates are done at the same time and with just a single command. The concept of a package manager is fantastic and you get a wide variety to choose from.

I like both the sense of community and the actual community. If I really want to put the effort in, I can find the person what wrote the driver for my wireless adapter. I don’t suppose that’s really true with any other operating system. With Linux, I can find the person(s) who put my OS together – and, in fact, I do. I try talk with them at least once a week at the online team meeting. I recognize many of the names I see across the ‘net and I’ve known some of them for many years.

I suppose that I do like having access to the source code. I don’t tend to make (m)any changes, as my programming skills aren’t that great these days. Still, I do sometimes make a quick change, apply my own patch, and compile applications on my own.

I like that I have the freedom to have as much, or as little, operating system as I want. I can have a distro with everything installed or I can have a distro that barely has a terminal installed – and you’ve gotta compile that yourself. There are so many choices. There’s a Linux for everyone and, if you’re willing to learn, there are seemingly infinite combinations. I like being able to pick my desktop environment, favorite terminal emulator, favorite window manager, etc…

I like that it’s always changing. I legitimately like systemd, for example. I like learning Netplan. I like learning the new features. I like understanding what’s going on under the hood – or having access to people that can actually explain it. I also like that no matter how hard I try, I will never truly understand everything. There’s always something new to learn. There’s always something new to ‘geek out’ with.

I guess, with the above, you could say that I like the constant innovation. Sure, sometimes Linux is trying to ‘keep up’ with the other mainstream operating systems – and sometimes it goes out on the edge and the community does things you simply can’t find elsewhere.

Linux isn’t perfect. There are bugs aplenty and flaws we’d maybe not tolerate in an operating system we paid for. Sure, we overlook the warts and call it our own – but we really can call it our own. We can meaningfully contribute to a project, to a distro, to an organization, and to the community. There are so many ways that we can give back, and that is awesome.

Anyhow, I don’t want to make this too long. Feel free to write a sentence or two below, letting me know why you like Linux. If you’d like, instead of responding where you’d normally find me, respond here so that folks can see this in the future and see your contributions to the subject.

Thanks for reading! If you want to help, or if the site has helped you, you can donate, register to help, write an article, or buy inexpensive hosting to start your own site. If you scroll down, you can sign up for the newsletter, vote for the article, and comment.

Let’s Determine The Number of RAM Slots Without Opening The Case

Today’s article is going to show you how to determine the number of RAM slots without actually opening up your case. It’s actually a pretty easy task, consisting of just a single command. 

But, wait! There’s more! You may want to know than how many RAM slots you have, you may want to know a lot more about the RAM you have already installed, how many slots are filled, if your RAM has ECC (error correction), the speed, the quantity of RAM per stick, etc…

Well, you can do all that and you can do it all with just a single command. The command in question is dmidecode. While dmidecode isn’t guaranteed to be 100% accurate, it’s usually pretty close. It pulls its data from tables in the DMI (SMBIOS) and presents them to you. Hardware manufacturers aren’t always as nice to Linux users as they could be, so there’s some risk of bad information – or wrongly interpreted information.

While dmidecode has partially been covered previously, it defines itself as:

dmidecode – DMI table decoder

And dmidecode is a pretty handy tool. In a previous article we used it with some success, and we’ll be using it again today, this time to determine the number of RAM slots available to you. On a scale of 1 to 10, I’d say this is a solid 2 – meaning even a rank beginner can follow along.

Determine The Number of RAM Slots:

This article requires an open terminal. If you don’t know how to open the terminal, you can do so with your keyboard – just press CTRL + ALT + T and your default terminal should open.

With your terminal open, enter the following command:

The line that is important is, “Number of Devices”. On my laptop, the output looks like this:

using dmidecode to determine the number of RAM slots available
The answer is two. Two slots. Ah ah ah ah! Oh how I love to count things!

So, from that, we can determine the number of RAM slots is equal to two. If you want, you can then scroll down and it will show you what RAM is installed. You can see if you have the same number of devices as you have slots. You can even see the size, number of slots, location, vendor. You can use it to learn a great deal about your RAM. 

As I mentioned above, it’s not necessarily going to be 100% accurate. With bleeding edge of hardware, you’ll find it may be less accurate. If your hardware has been around for a bit, you can be pretty sure of the accuracy.

One of the things I notice is the “Maximum Capacity”. That may mean OEM suggested max capacity. I’ve sure seen more RAM than the claimed maximum. On the system, I see a max capacity of 8 GB of RAM. The box has 16 GB of RAM. I’ve seen it claim a maximum of 4 GB of RAM but had 16 GB of RAM in that box. 

Otherwise, it is usually pretty accurate. In the above, I suspect some OEMs are less than honest and would rather you not know that you can add as much RAM as you can. They’d rather you buy a more expensive device, so report the maximum RAM as less than it really supports. However, that’s just a guess and I have zero evidence to support it. It does seem pretty common, however.

Closure:

And there you have it, another article said and done. This one will help you determine the number of RAM slots that you have available. It’s a pretty easy article and a good tool to have in your toolbox. 

As you may have surmised, the antibiotics are kicking in. I’m feeling quite a bit better. Hopefully the articles reflect that. For the past few, I’ve kinda been phoning it in. My goal is to get ahead again. I can probably do that over the coming weekend. 

… Also, anyone reading this out of sequence probably has no idea what half of these closure comments are about. Then again, how many of those folks keep reading after the important bits? Probably not a whole lot. I could write darned near gibberish down here and nobody would be the wiser.

Thanks for reading! If you want to help, or if the site has helped you, you can donate, register to help, write an article, or buy inexpensive hosting to start your own site. If you scroll down, you can sign up for the newsletter, vote for the article, and comment.

Linux Tips
Creative Commons License
This work is licensed under a Creative Commons Attribution 4.0 International License.