Guest Article: Kickstart Vol. I

This is an article about Kickstart written by guest author, dos2unix from the Linux.org Forum. It’s the first of a few articles from them, so let’s give them a warm welcome and enjoy their article!

Kickstart Vol. I

Kickstart is really Redhat/CentOS/Fedora-centric. There are some attempts for parts of this work on Ubuntu and SuSE, but so far there is really little support for this. Kickstart does a lot of the mundane work for you. It sets up the filesystems for you, you control this size and format of them. It creates user accounts for you, sets up your network for you, and installs the packages you want to be installed (or not installed). You can even run a shell script automatically when everything is done.

Now if you only have one computer, and you only install the OS once a year, this isn’t going to save you much time. However if you have quite a few computers, for example a data-center with dozens or hundreds of servers. Or even a few test systems that have to be rebuilt every day or every few days. Then this can save you a lot of time.

The Kickstart computer itself doesn’t have to be anything fancy. In fact, it doesn’t even have to run one of Redhat type OS’s listed above. It can be Debian, Ubuntu, or whatever you like. It’s best if it has two LAN (Ethernet) interfaces. Most computers cannot be Kickstarted over WiFi yet. You can use a single network interface, but it makes things a little more difficult. If you have a lot of computers to Kickstart, I recommend that you get a small un-managed switch. 5 or 8 ports should be plenty, unless you’re at a data-center.I have worked in data-centers, but now I work at a place that writes software, and we test it over and over again, so I have to “rebuild” the OS sometimes several times a day.

Obviously you’ll need a computer to do this. If possible you’ll want a second computer to test on. One that will be the computer that’s being “Kickstarted”. You’ll need about 20 GB of free space on your Kickstart server to install .ISO images of the OS(es) you want to install.

Your Kickstart server will need three items installed. There are multiple ways to do this. We will discuss a couple of the most common ones. Perhaps a follow-up article will offer more options if there is enough interest.

First you need a web server like Apache httpd, or NGINX, you could even use the simple Python web-server, it doesn’t matter that much.

Second you’ll need a DHCP server, again you could use either BIND or dnsmasq, we will discuss both ways. Finally you’ll need a tftp server. If you use dnsmasq,it has a tftp server of sorts built-in.

It’s beyond the scope of this article to teach you how to install these items, it is assumed you already know how to install software.Note that this will have to be on a different network that your normal home/work/datacenter network.

You don’t want Kickstart erasing, wiping out, and re-installing the OS’s on your every day driver. This is why I recommend one with two interfaces. Otherwise, you’ll have to re-configure your network to download packages, install updates,and add more packages if necessary, and then re-configure it back to your Kickstart network. That gets old in a hurry, trust me.

I’m using Fedora as my Kickstart server. I currently have configurations to install Redhat 8, Redhat 9, CentOS 8, Fedora 33, Fedora 34, and Fedora 35. I install all of these on 3 different computer hardware types. You don’t have to install the same OS that your Kickstart server is running. For this first example, I’m going to use NGINX as my web server, dhcpd (BIND) as my DHCP server, and tftp-server, as well… My tftp server. My Kickstart has two LAN interfaces, it doesn’t really matter too much how you have the first interface configured.

Again, it’s beyond the scope of this article to tell you how to configure your network interfaces, it is assumed you already know how to do this. You’ll want a static IP on your second interface.A gateway isn’t required, for this article, we can just 192.168.7.227, try to pick something obscure that no one else will use in the environment you are in. I will go ahead a use a /24 subnet or 255.255.255.0 for those who aren’t familiar with CIDR subnet masks.

Remember this IP address, it will be used in quite a configuration files. Again you can use any IP you like,but remember what it is, because you’ll need it several times.

So for Fedora, it’s a simple dnf install -y nginx dhcpd-server tftp-server, other OS’es may vary.

Once they are installed we will need to configure them.

The first one here is NGINX. On most Linux’s I have used, the nginx.conf file is located in /etc/nginx/nginx.conf. You have a “server section” in this file.It’ll say server with a { after it. Replace the contents of your server section with the content below. This assumes your web content will be at /usr/share/nginx/html you can adjust this accordingly. This will be where your extracted .iso images will live. So make sure you have space here (or do a soft link to another directory that has space). You can use SSL/HTTPS, but again that’s beyond the scope of this article.

I also recommend adding these two lines, below your access_log section. The other lines will likely already be there.

access_log /var/log/nginx/access.log main;

Now enable and start your web server. For Fedora it’s 
systemctl enable nginx
systemctl start nginx

Now we need to configure your DHCP server. For BIND (dhcpd) the conf file is usually located at /etc/dhcp/dhcpd.conf (not to be confused with dhcpd6.conf )

Just mv the dhcpd.conf to something like dhcpd.conf-original or whatever you like, just make sure it doesn’t end with “.conf”. Now make a new files and copy the following to it.

I’m using the entire 192.168.7.x subnet here. The IP address of my Kickstart server is 192.168.7.227.Edit this file and replace the values of your server/network accordingly. The range tells my DHCP server to only give out IP addresses between 10 and 120.

Now you may be wondering about that last line, what is the “next-server” and why does it have the same IP address as my Kickstart/DHCP server? The “next server” after I receive a DHCP address is the tftp server, it’s located at the same IP address. You could run it on a different server, but most people run it on the same server.

Again just like NGINX, let us enable and start the service.
systemctl enable dhcpdsystemctl start dhcpd

For the tftp server, you really don’t have to do much, by default tftp wants tftpboot to be at /var/lib , so…

Note this is a listening socket, not really a server per se.If you want to make sure that your tftp server if pointing to /var/lib/tftpboot you can run..
systemctl cat tftp.service

You should see a line like this somewhere:

ExecStart=/usr/sbin/in.tftpd -s /var/lib/tftpboot

I would recommend not changing this, as several configuration files will like in this directory.

Closure:

Honestly, I edited the above the best that I could – given that I know nothing about the subject. I appreciate the articles, but it means trusting dos2unix – and I’m perfectly willing to do that. If you have any questions, you can post them here or you can post them on the linux.org forum where I share this article (as that’s where dos2unix lives).

Either way, stay tuned – as this is just the first part of a series of articles handily written on this subject. I, for one, am going to probably use the break to get a few articles ahead so that the new year starts off right.

Thanks for reading! If you want to help, or if the site has helped you, you can donate, register to help, write an article, or buy inexpensive hosting to start your own site. If you scroll down, you can sign up for the newsletter, vote for the article, and comment.
How To: Install The Regular “non-Snap” Version of Chrome Browser In Ubuntu

Install Chrome browser on Ubuntu…

This article was authored while I was sick and pukin’. Well, I’d mostly stopped puking while writing.. Thanks to a fantastic @GGG_246 from Reddit (No thanks to you folks on Linux.org who normally catch this stuff!) the entire intro was meant for Chromium and not Chrome.

This is because I was moving it from the old site to the new one, splitting it into two articles. The old article covered both Chrome and Chromium. Also, I was sicker than I’m gonna describe…

So, here you go… This is how to install Chrome browser on Ubuntu. (I am still not quite back to normal. Ask me about my bowels!)

Install Chrome Browser:

Let’s just jump right into it. You know what Chrome Browser is, or you wouldn’t be here. It’s also not very complicated. Let’s bust open your default terminal emulator by pressing CTRL + ALT + T and enter the following:

That’s it in the terminal. You’re done. When you finish the installation and start Chrome it will let you set it as the default in the terminal or GUI (if you want), among other things. Even better, the installation adds its own repository and will now automatically update the Chrome browser when the rest of the system is updated.

chrome repository

The repository contains the beta version as well, as well as the unstable version. With the repository added, you can install any of them easily. Be aware that beta may have bugs and that unstable is a nightly build that’s also prone to bugs. Using either means you understand the risks – and also kinda comes with the responsibility of reporting bugs.

google chrome other versions
Just use ‘apt install’ and they’re there for the taking. Install as you wish!

And, that’s about it really. There’s not a whole lot to this article and it’s intentionally short. I’ll do a very similar article about Chromium, so be prepared for that!

Closure:

One more article is in the books. This one is short for a couple of reasons. One of those reasons is that I’m not feeling well. That and power outages make me wonder if I’ll actually manage to do this for the full year. I should get a bunch of articles ahead! I’m eventually going to miss an article or two and I should probably prepare for that.

Thanks for reading! If you want to help, or if the site has helped you, you can donate, register to help, write an article, or buy inexpensive hosting to start your own site. If you scroll down, you can sign up for the newsletter, vote for the article, and comment.
balenaEtcher: A Tool To Turn Linux .ISO Files Into Bootable USB Drives

balenaEtcher is a free software tool used to write .ISO files to USBs so that you can boot from them and install Linux. balenaEtcher is just one of many tools to do this, but it is both simple and effective. That makes it fit for purpose and is why it is getting its own article.

You’re going to need a blank USB drive, like a thumb drive. Well, it needn’t be blank but it should be. It needs to be large enough to meet the requirements of your distro – usually 4 GB is adequate. Larger is fine.

You’re also going to need the correct .ISO from the distro you’re trying to install. I have no way of knowing what that is, so here’s an article about picking the distro that’s right for you. You should verify the integrity of the .iso to eliminate it as a source of problems.

You’re also going to need to know how to boot to USB. That link will take you to an article that covers that, and includes DVD. It covers booting to something other than your default drive.

Finally, you’re going to need balenaEtcher. Head to this page and scroll down. If you scroll down, you’ll see many download options. It’s available for everything from Linux to MacOS.

Download the correct version for the operating system you’re currently using. If you download the AppImage, be sure to make it executable before trying to run it. Either way, you’ll need to download balenaEtcher (maybe install it) and then run it. That’ll vary depending on your OS, but they even have .deb and .rpm files available.

All set?

Let’s Use balenaEtcher:

With all those pieces in place, balenaEtcher is fairly self-explanatory. I’m going to assume you got it to work properly. If you can’t get it installed or running from the AppImage, just leave a comment and I’ll talk you through it for your system. You can also ask on Linux.org.

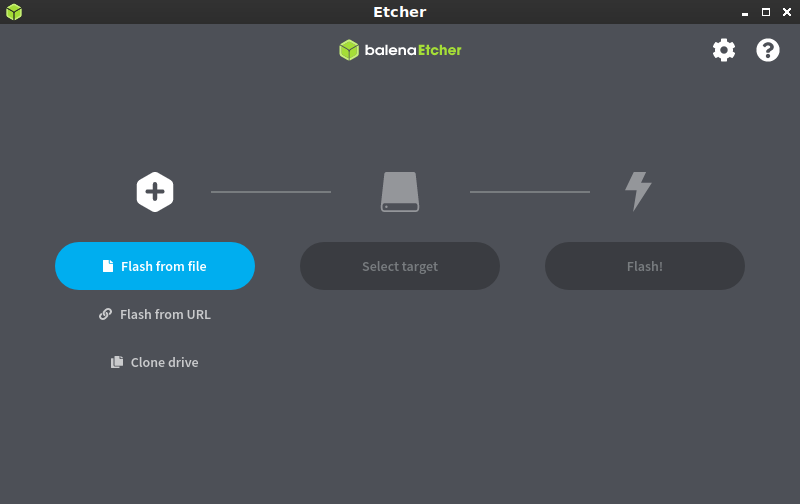
It’ll look something like this when you first open it.

balenaEtcher pick a file
In this case, you’ll pick “Flash from file”.

Then, you’ll click ‘Flash from file’ and doing so will let you navigate to and select the .iso you want to use. Do so, being sure to get it correct.

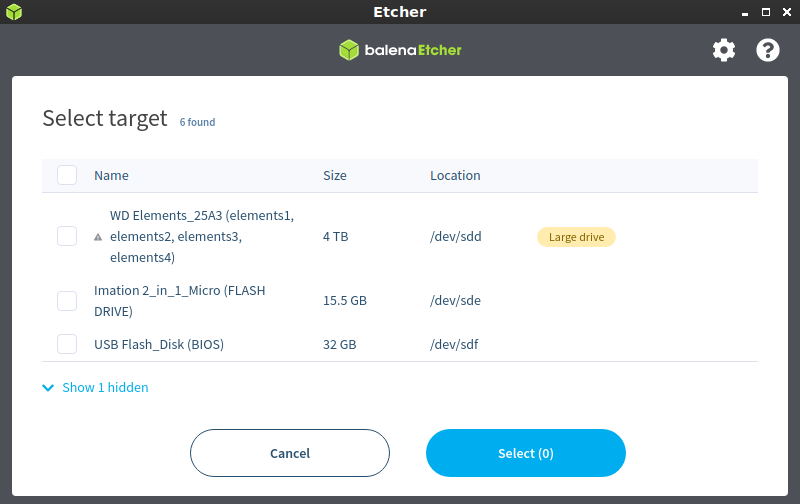
Next, you’ll select the target. The target in this case means the USB drive that you want to write the .iso to. So, that will be the smaller flash drive in most cases and will look something like this:

balenaEtcher in action
Select the right flash drive. Be very careful at this stage! This step can go horribly wrong!

There’s just one step remaining! You need to click the Flash button and wait for it to do its job writing the .ISO to the USB drive. It looks like this:

balenaEtcher in action
Click the ‘flash’ option and wait patiently while it does its job.

That could take a little while, though not all that long if you’re using USB 3.0. On USB 2.0 it takes a bit, so be prepared to wait – but not terribly long. 

When this is all done, just close the program and your new USB device should be ready. You should be able to boot your computer, select the USB drive as the boot device, and then install Linux. Most of the time, it goes just swimmingly. If it doesn’t, ask for help.

Again, don’t forget to verify the integrity of the downloaded .ISO before you do any of this. The process for doing that varies, and the distro will tell you how on their download page. Have fun installing Linux!

I’ll probably eventually take the screenshots of me installing Linux in a virtual machine, but I haven’t done that article yet. It seems like a good future article to write.

Closure:

Well, there’s another article. This is just a nice, quick article. It’s handy for when you need to know how to use balenaEtcher, or when you need to tell someone else how to use it. It’s one of the articles I’d expect to see people linking to on a regular basis. “Hey, this is how you use Etcher!”

Thanks for reading! If you want to help, or if the site has helped you, you can donate, register to help, write an article, or buy inexpensive hosting to start your own site. If you scroll down, you can sign up for the newsletter, vote for the article, and comment.
How To: (More or Less) Learn if Your Hardware Will Work With Linux

One of the most frequently asked questions from new people is them wondering if their hardware will work with Linux. This article will help you find out if your hardware will work with Linux.

That’s right, this article aims to tackle a frequently asked question – but there’s some limitations and wiggle-room. That’s why the title of the article contains (More or Less). It’s not 100% accurate.

The usual, and most basic way to find out if your hardware will work with Linux is to simply download the .iso you intend to use, boot to it, and test it. If it works in a live environment, it probably will work when you install it. If you needed to add additional boot parameters (like nomodeset) to run the live instance, you’re probably going to need to do the same thing when you install Linux.

That works well enough, but it doesn’t tell you anything about long-term problems. It doesn’t tell you if there’s going to be an IRQ issue many hours after booting, it doesn’t tell you if there will be some obscure ACPI errors, and it doesn’t tell you exactly how well your hardware will work with Linux.

You can do better than that. With a little effort, you can learn all about your hardware and how well your hardware will work with Linux. It’s pretty painless and easy.

Learn If Your Hardware Work With Linux:

So, the first thing you need to do is download the .iso and write it to USB or to DVD. You can also do this after the fact, with an already-installed Linux. This article assumes you’ve got a running Linux and you’re connected to the Internet. 

It also assumes that you have a terminal window open. If you don’t have one open, you can probably open one by using your keyboard. Just press CTRL + ALT + T and up should open your default terminal emulator. Yes, this should work just fine even in a live environment.

The tool we want for this is ‘hw-probe’, put out by the good people behind linux-hardware.org. It is almost certainly in your default repositories and can be installed in the usual manner. For example, if you’re using a distro with apt, then it’d be installed with:

You’ll have to adjust the installation command for the distro you’re using. You may also need to use a root password, which will vary based on the distro.

You can also find it in Snap, AppImage, and Flatpak versions here.

Once you have it installed, you will want to run the following command (and know that you will be sharing this data with the linux-hardware.org project):

That will take a little while to run, but not terribly long. It will output some text similar to this:

The important bit is the “Probe URL”. For this particular run, you’ll see the URL is: https://linux-hardware.org/?probe=23182c745b

If you follow my example URL, you’ll see that everything more or less works – but that some of the hardware has some known problems. You can click through those to learn about what sort of problems you’ll have getting your hardware to work with Linux.

NOTE: Just because there are known problems doesn’t mean that the hardware doesn’t work. You need to click through and read the results to learn what sort of problems you’re potentially going to face. In some cases, the problems only exist with certain kernels (for example) and are resolved with newer kernels. Again, you’ll need to read through and verify the data. The data is pretty accurate, but the human element means it is not infallible. 

As you can now surmise, this isn’t 100% accurate. Quite often, there will be known problems but your hardware will work with Linux just fine – but maybe not at peak functionality due to an inferior driver. Be on the lookout for things like that.

What it does do is it gives you some more fine-grained information so that you can make a more informed decisions. It’s a guide, not a rule-book. At the end of the day, if Linux is up and working on your live instance, it’s probably going to work just fine when it has been installed.

Closure:

And there you have it. Another article in the books. This one helps you find out if your hardware works with Linux. If you have any ideas for articles, be sure to let me know. Don’t forget to share this article with your friends!

If you want, you can unblock ads, donate, sign up to contribute, write an article, or sign up for the newsletter below. (I should move that to the top. I’ll do that when I’ve given it enough time to see if folks respond.) Thanks for reading and there will be another article in a couple of days!

How To: Generate a List of Installed Applications in Linux

Before making this site, I had a similar article that explained how to list installed applications in Linux, but it was only relevant to those that used distros with ‘dpkg’. This expanded article will explain how to generate a list of installed applications for multiple distros, in order to be more complete.

There are any number of reasons why you might want a list like this. Maybe it’s for compliance reasons, needing to know everything installed on the machine. Maybe it’s for making a manifest to establish a baseline for future installs. You could also just be curious, need a list for support questions, or want a list for backup purposes.

Whatever your reason, you can generate a list of installed applications fairly easily. You can also do a couple of other neat things that I’ll explain below.

Generate a List of Installed Applications:

For all of these commands, you’ll want a terminal. You can probably open your default terminal by using your keyboard to press CTRL + ALT + T. If that doesn’t work, you can just open it from a menu or whatever shortcut you’ve set up for yourself. (I’m looking at you, you people with strange window managers!)

The command you’ll use will vary depending on your distro. I’ve got a few of them covered below. In some cases, you may need elevated permissions, so a ‘sudo’ in the front of the commands should do the trick for you.

Debian (& dpkg using distros):

If you’re using Ubuntu, or a distro with snaps, you can list those with:

If you’re using flatpak applications with any distro:

Arch (& Mandriva, etc.):

RHEL (& Fedora, etc.):

OpenSUSE (& derivatives):

Those are the major distros. There are smaller distros, independent distros, and they’ll have their own package management systems and ways to make a list of installed applications.

Bonus:

You can actually do a few things with this listing. Two immediately come to mind and I’ll share them.

First, you can count them. At the end of each of these commands, you can pipe it and count the lines. It may not be a 100% accurate number, but it will be pretty close. (Some of the commands output more than just a list of installed applications.)

That’ll give you an output similar to:

You can also write the list of installed applications to a text file, to save for archiving or whatever. I like to make a list now and then and check against it when I do a new installation. Your reasons are your own, but here’s how:

The .txt isn’t mandatory and you can write the file to anywhere you want, assuming you have the correct permissions. It’s your list, you can do anything you want with it!

Closure:

And, there you have it. You can now make a list of all applications that you’ve installed. You can even count the list, and you can write the list to a file for storage. If you want, you can generate a list of installed applications on one computer, generate a list of all applications on a second computer, and then use ‘diff’ to see what the differences between them are. There’s all sorts of things you can do with this list.

As always, thanks for reading. Your reading and feedback help me stay motivated. My goal is to keep up this publication rate for a year, though we’ll see where we are when that year ends. I have enough notes for that, and more. 

If you’d like to contribute, you can unblock ads, you can sign up for the newsletter, you can write an article, you can donate, and you can register for the site to regularly contribute. You can also comment, vote for articles you do like, and share this site/page with others via social media! You can even buy inexpensive Linux hosting! Alternatively, you can even just enjoy the articles. It’s all good!

Linux Tips
Creative Commons License
This work is licensed under a Creative Commons Attribution 4.0 International License.