There are a variety of ways to check your CPU temps, and this one will be covering this with lm_sensors. It’s a handy application and it’s often installed by default. Moreover, it’ll be available for pretty much every distro out there.
This time around, we’ll be using the above-mentioned lm-sensors. Wikipedia describes lm_sensors as thus:
lm_sensors (Linux-monitoring sensors) is a free open-source software-tool for Linux that provides tools and drivers for monitoring temperatures, voltage, humidity, and fans. It can also detect chassis intrusions.
It then says that a citation is needed. Thank you, Wikipedia. That’s helpful.
With so little to go on, we can check the man page. Alas, man lm_sensors has no entry. You’ll actually need to use the less obvious man sensors. That description isn’t much better, but it beats a blank.
sensors is used to show the current readings of all sensor chips. sensors -s is used to set all limits as specified in the configuration file. sensors –bus-list is used to generate bus statements suitable for the configuration file.
This will, of course, also tell you more about using lm_sensors, though there really aren’t a whole lot of options. It outputs what it outputs and you’ll like it. You’ll potentially get more information than just the CPU temps, but this article is about how to check CPU temps.
Check CPU Temps:
This rest of this article should be short and straightforward. Like normal, open up your default terminal emulator by pressing
Debian/Ubuntu/etc:
1 | sudo apt install lm-sensors |
Suse/OpenSUSE:
1 | sudo zypper in sensors |
Fedora/RHEL/Rocky:
1 | sudo dnf install lm_sensors |
Arch/Manjaro/etc:
1 | sudo pacman -S lm_sensors |
So far so good, yes? Well, now we need sensors to find our hardware and that’s another command in the terminal. Specifically, it’s this:
1 | sudo sensors-detect |
That’s going to run and it’s interactive. You will have to type “YES” over and over again. You’ll eventually need to hit the
With lm_sensors loaded properly, let’s check CPU temps! It’s a really simple command – and it’s just:
1 | sensors |
If you are an American that is easily frightened by the metric system, you can just add the -f switch for Fahrenheit, like so:
1 | sensors -f |
Your output should look something like this:
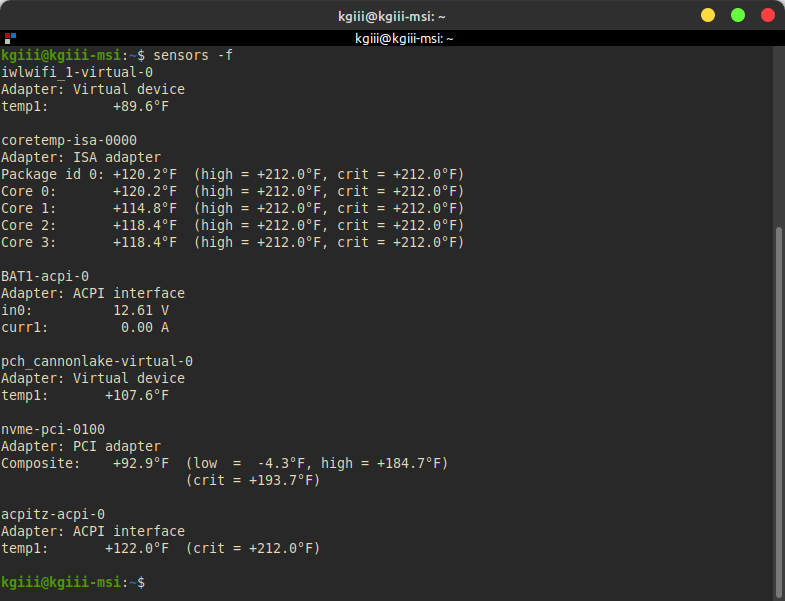
It should be noted that there’s more to the output than the CPU temps. This is not always the case. Your hardware may not have sensors that report back the operating conditions – but your CPU will almost always report that data so that the OS can do things like throttle-down for energy saving purposes. Be sure to run man sensors to see the rest of the options.
Closure:
Congratulations! You can now easily tell how hot (or cold) your CPU is running. You should also look up your CPU’s temperature thresholds. This way you’ll be able to tell if your CPU is running hotter than it should be running. Doing this can save your hardware or give it greater longevity.
Thanks for reading! If you want to help, or if the site has helped you, you can donate, register to help, write an article, or buy inexpensive hosting to start your own site. If you scroll down, you can sign up for the newsletter, vote for the article, and comment.