Control Your WiFi With ‘rfkill’ And More

In today’s article, we’re going to learn how to control your WiFi with ‘rfkill’ and we’ll be learning a bit more than that. I think you’ll find ‘rfkill’ to be a nifty and useful terminal-based command to learn. Is this article appropriate for a beginner? Maybe? Maybe not? I’ll do my best to make it approachable for anyone at any level.

By the way, I’ve decided to intersperse the articles about simple commands like ‘lsusb’. I don’t want to bore my more advanced readers – and I don’t want to bore myself. I’ve decided to make the time necessary, even though I’m pretty busy. I’ll be busy for a little more than a week. (Ask me in private, if you want.)

Anyhow, you should learn about ‘rfkill’, as it’s a pretty handy tool for controlling your wireless. If you look at the name, there should be some indication that it’s actually more than just WiFi. You can use ‘rfkill’ to manage Bluetooth, for example. Bluetooth is also wireless communication. As such, you can use ‘rfkill’ to manage that as well.

So, what is ‘rfkill’? Let’s see how the man page defines it:

rfkill – tool for enabling and disabling wireless devices

See? It says what you’d expect, assuming you read the previous paragraph. The title only mentions WiFi, but that’s really due to space and convenience. You can use ‘rfkill’ to manage both WiFi and Bluetooth. Pretty handy, huh?

Well then, let’s just get the party started…

Control Your WiFi with ‘rfkill’:

Sure enough, you use ‘rfkill’ in the terminal. On Linux-Tips.us, we do a whole lot of stuff in the terminal. So, open your terminal now. If you don’t know how to open your terminal, just press CTRL + ALT + T and your terminal should just pop open.

With your terminal now open, let’s first gather some information:

The output should look a little bit like this, or a lot like this:

gathering information with rfkill
The output should be fairly easy to understand for my delightful readers! I have faith in you!

The information you’re after “ID,TYPE-DESC,SOFT,HARD” is easy to understand. 

The first column is the ID number and the second column is a description of the device. The third column is if there’s a ‘soft block’ on the device, and the fourth column is if there’s a ‘hard block’ on the device.

If you see a ‘soft block’, that’s when there’s some software that disabled the device. A ‘hard block’ is when there’s a hardware block on the device. If it is soft blocked, you’ll need a software solution to turn it on – like ‘rfkill’.

Additionally, when you see a ‘hard block’, it means there’s probably a physical switch (often an Fn + F* key combination, perhaps labeled something like ‘Airplane Mode’) that is keeping the device powered off. You need to physically enable the device to make it work.

Importantly, the ‘rfkill’ application can do nothing about a hard block. But, it can do something about a soft block. If you want to unblock WiFi, try this:

Using my computer’s output, to unblock the WiFi the command would be:

You can also unblock with the description. To unblock the WiFi with the description looks like:

Of course,  you can also do the opposite. Instead of ‘unblock’ you would use ‘block’. That means the opposite of the above command would be:

If you want, you can also just ‘toggle’ the devices. When you toggle it, it turns off if it was on – and it turns on if it was off. You do that with the ID. If I wanted to toggle the wireless, the command would look like:

That will turn my WiFi off (if it was on) or it will turn my WiFi on (if it was currently turned off). See? It’s pretty simple!

Well, I hope I’ve made it simple. If it’s not simple, I hope it’s at least approachable. Like always, feel free to drop a question as a comment. If I don’t have an answer, I’ll try to direct you to someone who does.

Also, don’t be afraid of the man page. There’s a lot more to ‘rfkill’ than I’ve covered in this article. We’ve mostly just scratched the surface. To check the man page:

That’ll give you all the information you want. Plus, I’m sure others have authored pages that will go into more depth. We tend to not do too much of that here. I just want you to be up and running, not Linux gurus. If you want to be a Linux guru, you’ll need a whole lot more than just this site!

Closure:

Well, I’m glad you made it through today’s article. I tried to keep it nice and simple, simply showing you a way to control your WiFi with ‘rfkill’. But, there’s more to it, including Bluetooth. I like to think I’ve made this approachable for even a new user, but maybe not…

Again, feel free to comment about this. Is it easy enough for a new person? How about a new person coming from a Google search? Is it easy enough for a novice, someone completely new to computers? (Probably not, but let me know what you think. Thanks!)

Thanks for reading! If you want to help, or if the site has helped you, you can donate, register to help, write an article, or buy inexpensive hosting to start your own site. If you scroll down, you can sign up for the newsletter, vote for the article, and comment.
How To: Access Tor While Using T-Mobile

Today’s article is going to be a fairly trivial article, one aimed at specific people, where you’ll learn how to access Tor while using T-Mobile. This article might be easy enough for a new user, so there’s that. Even if you’re not using T-Mobile, if your access to Tor is blocked, this article might get you sorted;

Where to begin?

Well, Tor stands for ‘The Onion Project’, which is a way to browse the internet in a more anonymous fashion. If you’re unfamiliar with Tor, it’s easiest if you just read the Tor history page.

Basically speaking, the Tor browser is a more secure way to access the Onion network. It’s a way to stay fairly anonymous online, but nothing is completely secure – so keep that in mind. You use the Tor browser (based on Firefox) to browse dark web sites with .onion domain names and have a good chance at anonymity if you stay within the .onion network.

I’ve lately used a phone as a mobile hotspot. The provider is T-Mobile. For reasons known only to them, T-Mobile blocks Tor, preventing it from connecting. At the same time…

There are some underground ‘hacker’ forums that I like to monitor. As T-Mobile is blocking access to that site, I had to figure out how to access Tor while using T-Mobile. It took a few tries, but I have now figured it out. I write this article to save you some time and me some memory…

Access Tor While Using T-Mobile:

First, you’re going to need the Tor browser (though you could manually mess around with connecting and then use another browser). You can download the Tor project browser here. If you’re unfamiliar and using Linux, you don’t actually install the Tor browser (unless you want to), you just extract it and use the shortcuts the archive includes. However, the Tor browser project is where I’d go and I’d adhere to their defaults.

Now, try as hard as you want to connect…

T-Mobile isn’t going to allow you to connect and access Tor. If you follow these directions, you probably violate T-Mobile’s ToS, you can work around it. In my case, I used NordVPN – but any free proxy that lets you set the connection manually will let you do the same. To be clear, I am using NordVPN as a proxy.

Open the hamburger menu. Select the Support option. When you open Settings, the Tor settings section should be the first section  you see. That’s good, it will save a lot of time. All you need to do is configure your VPN to work like a proxy. That’s pretty easy. So is finding a free proxy service.

I tried the bridge options and none of those worked. So, instead I decided to use the VPN option. Sure enough, that worked! So, find a free proxy (or VPN) that you can configure manually, You should check your paid VPN settings as they should let you manually configure it like a proxy. You can also try any one of the zillion free proxy lists out there.

Try this:

change the settings and use your VPN like a proxy.
Check your VPN provider for a ‘proxy’ setting and use that.

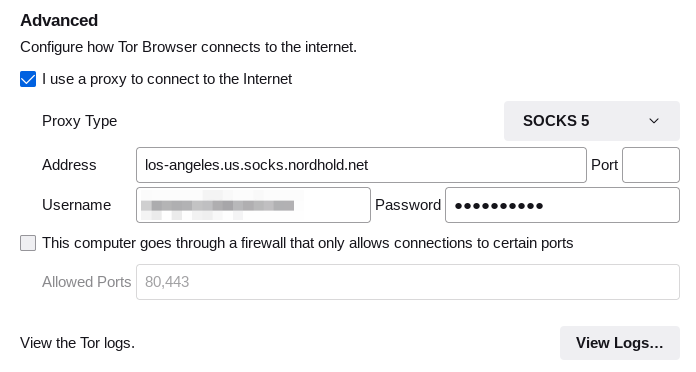
Be sure to set the proxy type correctly. If your VPN is even a little modern, SOCKS 5 is likely to be what you want. You should end up with something that looks like this:

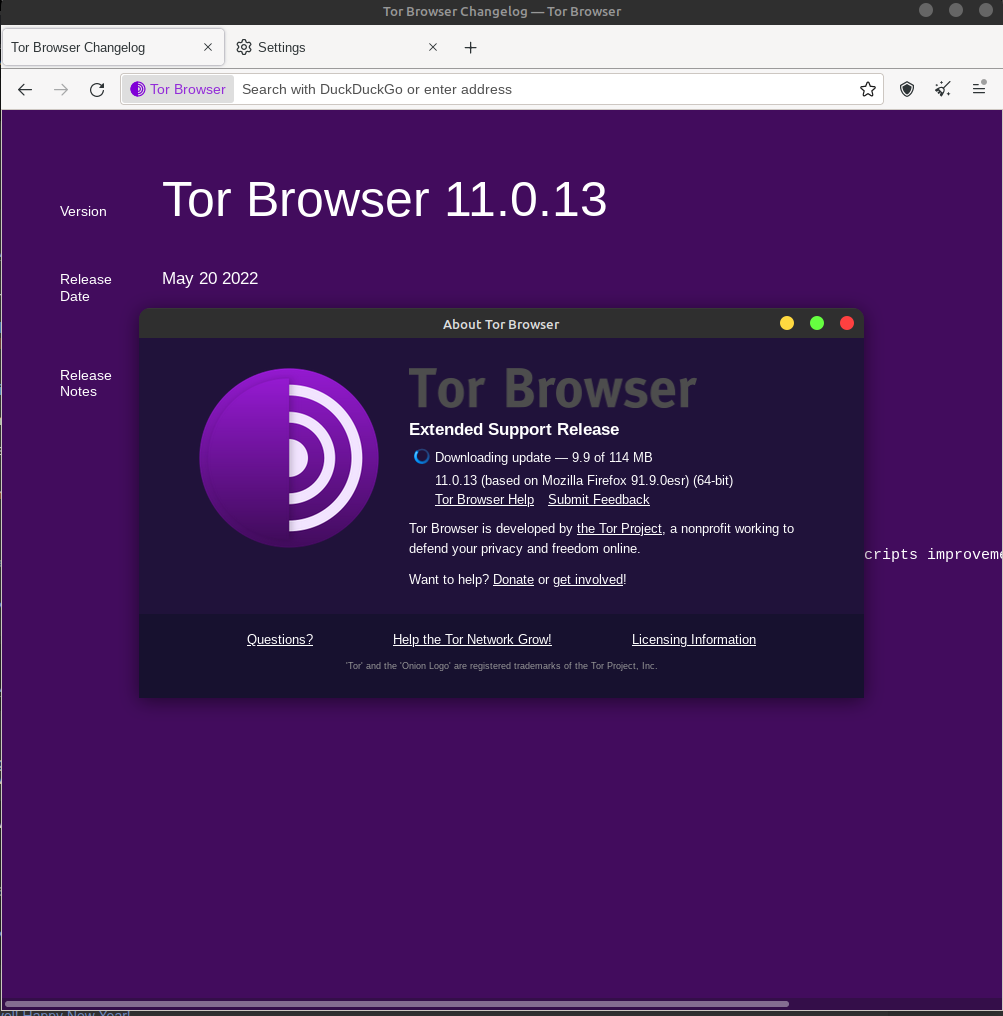
Tor browser connected with T-Mobile
You can indeed use Tor with T-Mobile. You can access Tor while using T-Mobile.

Also, you may need to reload Tor or grab a new identity, and then just be patient. Wait a minute to access Tor while using T-Mobile, as it can be a little slow. Adding the proxy means another layer, so it can take a little while longer. Plus, Tor has never been known for speed.

Closure:

There you have it, but you’ll only find this useful if you are wanting to access Tor on T-Mobile. This should work the same regardless of what OS your using. This article should work for Windows users, actually. If you want to access Tor while using T-Mobile, just use a proxy.

Thanks for reading! If you want to help, or if the site has helped you, you can donate, register to help, write an article, or buy inexpensive hosting to start your own site. If you scroll down, you can sign up for the newsletter, vote for the article, and comment.

Disable WiFi From The Terminal

In today’s article, we’re going to learn how to disable WiFi from the terminal. It’s going to be a simple enough article, with just a few commands to learn. Read on, my dear readers! There’s information to share!

This is certainly a tool that new Linux users could use, you just need to remember to turn WiFi back on when/if you need wireless access again. So, read on, my dear readers, as we venture into a bit of controlling networking with the Linux terminal.

This will will show you how to completely disable WiFi, rendering you unable to connect to any wireless network. There are those folks who will see this as a security measure, as they distrust wireless connections. There are others who may view this as a battery saving measure, as you no longer will have the wireless radio polling for connections or anything like that.

The tool we’ll be using for this is ‘nmcli’. You can do a lot with this command, but the man page describes ‘nmcli’ as this:

nmcli – command-line tool for controlling NetworkManager

And, if you dig a bit deeper, you’ll see that there’s a man page for ‘NetworkManager’. This is described as:

NetworkManager – network management daemon

So, as you can see, we’re gonna be dealing with the network. That’s what I told you in the title and the introductory paragraph! See? We take this seriously! So very, very seriously!

Disable WiFi From The Terminal:

Yup. You read that right. It’s another article that requires an open terminal, so you should open a terminal now. If you don’t know how to open the terminal, you can do so with your keyboard – just press CTRL + ALT + T and your default terminal should open.

With your terminal now open, let’s learn how to disable WiFi from the terminal itself. So, to disable WiFi, your command would look like:

Next, of course, we’ll learn to turn it back on again. That command looks like:

If you have other radios, such as a mobile/cellular network, you can actually enable and disable all the radios with just one command:

And to turn all the radios back on again:

And there you have it.. You can disable WiFi from the terminal. If you want to know more about ‘nmcli’ (and it’s a bit of a robust command), it’s just:

You can also check the ‘NetworkManager’ man page with:

Closure:

There it is! It’s another article! This one does what the title says it’s going to do – it shows you how to disable WiFi from the terminal. There’s more to ‘nmcli’ and ‘networkmanager’ so maybe we’ll have another article covering some other options? It could happen!

Thanks for reading! If you want to help, or if the site has helped you, you can donate, register to help, write an article, or buy inexpensive hosting to start your own site. If you scroll down, you can sign up for the newsletter, vote for the article, and comment.

Monitor Bandwidth With nload

Today’s article should be fairly quick and simple, as we learn to monitor bandwidth with nload. It’s a handy tool that’s generally available across the many distros and is something you might find useful in your daily Linux journey.

You may also recall this article:

‘vnStat’ A Tool For Monitoring Your Bandwidth Usage

Well, today we’ll be learning how to monitor bandwidth with nload. You’ll find that nload has some visual similarities with vnStat – but nload doesn’t do logging. It’s a way to monitor your bandwidth in real time and, of course, in the terminal!

We do lots of fun stuff in the terminal! I didn’t actually expect so many articles to be terminal-based when I first started the site. Maybe I just hate taking screenshots?!?

Anyhow, this article will be published on a Sunday. It’s a weekend article, so it’s we can have a little fun with it. I’ll even keep it relatively short. You’re welcome!

So then, let’s just jump into the article…

Monitor Bandwidth With nload:

This article requires an open terminal, like many other articles on this site. If you don’t know how to open the terminal, you can do so with your keyboard – just press CTRL + ALT + T and your default terminal should open.

With your terminal now open, let’s go ahead and install nload. It should be in your default repositories, so it’d be installed with something like:

Fedora:

Debian/Ubuntu:

Etc… Fill in the above for your distro. You’ll find that nload defines itself as:

nload – displays the current network usage

With nload installed, you can simply start it with:

That will load all of your network adapters and you use your arrow keys to navigate between the network adapters. It should automatically find all your network adapters, so you don’t need to configure it to do so.

If you want to see the nload options available, press F2 where you’ll find you have some options available, including how long it takes for the application to find the averages.

If you want to monitor the bandwidth of just a single adapter, that command is actually really simple – it’s just:

For example, and using an an oft used Linux adapter name:

That’s about it, other than learning how to close the application. That may not be obvious to everyone, you can use Q or you can press CTRL + C to close out nload.

Closure:

And that is it, really. The article doesn’t really need more details to show you how to monitor bandwidth with nload. It’s quite a simple program and the output is entirely intuitive for even a rank Linux beginner. Enjoy your weekend!

Thanks for reading! If you want to help, or if the site has helped you, you can donate, register to help, write an article, or buy inexpensive hosting to start your own site. If you scroll down, you can sign up for the newsletter, vote for the article, and comment.

Sync Mega.nz On Ubuntu 22.04

In today’s article, we’re going to learn how to sync Mega.nz on Ubuntu 22.04. It’s an easy enough article, one even a new user can follow. Read on, my dear readers!

It’s a holiday when/where I write this, largely ’cause I wasn’t ahead of schedule, so a nice and easy article sounds like a good idea. Many of my readers are from the United States, so they’ll be in a turkey coma today. Besides, my right wrist is a bit angry today, so it’s a good excuse for a simple article!

This article was prompted by a question on a forum I frequent. The user was asking about cloud storage solutions that work with Linux. Many of them do, but Mega.nz seemed like a good idea. They support various versions of Linux, but we’re going to concentrate on learning how to sync Mega.nz on Ubuntu 22.04.

You’re going to need an account with Mega.nz. Click that link and sign up. They’ll give you 20 GB of free cloud storage and they encrypt everything you store with them. The URL may redirect to a .io address, but it’s the same company.

The folks at Mega.nz say that not even they can recover your data, so you’ll want to backup your key and never forget your password. But, I’ve used them for a long time and had no problem with their services.

As near as I can tell, they’re telling the truth about the encryption. So, you get 20 GB of storage space for free (among a bunch of other features) but you also get some pretty rock solid privacy. That’s why I’m writing the article about Mega.nz and not some other cloud storage provider.

Sync Mega.nz On Ubuntu 22.04:

This article requires an open terminal, like many other articles on this site. If you don’t know how to open the terminal, you can do so with your keyboard – just press CTRL + ALT + T and your default terminal should open.

With your terminal now open, you want to use wget to grab the .deb file needed to install Mega.nz’s sync application. We’ll start by moving to the ~/Downloads directory before initiating the download, and the command will look like:

Then, we’re going to install the Mega.nz sync application right there in the terminal. We’re not going to mess around with a GUI application like GDebi. So, that command would look like:

And that’d be all you need to do – from the installation side. The application will appear in your application menu and you can configure it from there. That’s all going to be straightforward and the help pages at Mega.nz will see you through to the end – but my readers are smart enough to not actually need the help pages.

Closure:

That’s it! That’s all there is to it. You install the Mega.nz sync application, set up folders to sync, let the application run in the background (or only when you start it), and you can now sync Mega.nz on Ubuntu 22.04! I told you that it wasn’t going to be all that hard.

It’s even easy to sign up for an account on Mega.nz. Best of all, it’s 20 GB of encrypted cloud storage for free. On top of that, you can EASILY adjust this article to fit with a number of distros and a number of releases. It’s not hard and I’m sure you can figure it out.

Thanks for reading! If you want to help, or if the site has helped you, you can donate, register to help, write an article, or buy inexpensive hosting to start your own site. If you scroll down, you can sign up for the newsletter, vote for the article, and comment.

Subscribe To Our Newsletter
Get notified when new articles are published! It's free and I won't send you any spam.
Linux Tips
Creative Commons License
This work is licensed under a Creative Commons Attribution 4.0 International License.