Today’s article is going to be a fairly trivial article, one aimed at specific people, where you’ll learn how to access Tor while using T-Mobile. This article might be easy enough for a new user, so there’s that. Even if you’re not using T-Mobile, if your access to Tor is blocked, this article might get you sorted;
Where to begin?
Well, Tor stands for ‘The Onion Project’, which is a way to browse the internet in a more anonymous fashion. If you’re unfamiliar with Tor, it’s easiest if you just read the Tor history page.
Basically speaking, the Tor browser is a more secure way to access the Onion network. It’s a way to stay fairly anonymous online, but nothing is completely secure – so keep that in mind. You use the Tor browser (based on Firefox) to browse dark web sites with .onion domain names and have a good chance at anonymity if you stay within the .onion network.
I’ve lately used a phone as a mobile hotspot. The provider is T-Mobile. For reasons known only to them, T-Mobile blocks Tor, preventing it from connecting. At the same time…
There are some underground ‘hacker’ forums that I like to monitor. As T-Mobile is blocking access to that site, I had to figure out how to access Tor while using T-Mobile. It took a few tries, but I have now figured it out. I write this article to save you some time and me some memory…
Access Tor While Using T-Mobile:
First, you’re going to need the Tor browser (though you could manually mess around with connecting and then use another browser). You can download the Tor project browser here. If you’re unfamiliar and using Linux, you don’t actually install the Tor browser (unless you want to), you just extract it and use the shortcuts the archive includes. However, the Tor browser project is where I’d go and I’d adhere to their defaults.
Now, try as hard as you want to connect…
T-Mobile isn’t going to allow you to connect and access Tor. If you follow these directions, you probably violate T-Mobile’s ToS, you can work around it. In my case, I used NordVPN – but any free proxy that lets you set the connection manually will let you do the same. To be clear, I am using NordVPN as a proxy.
Open the hamburger menu. Select the Support option. When you open Settings, the Tor settings section should be the first section you see. That’s good, it will save a lot of time. All you need to do is configure your VPN to work like a proxy. That’s pretty easy. So is finding a free proxy service.
I tried the bridge options and none of those worked. So, instead I decided to use the VPN option. Sure enough, that worked! So, find a free proxy (or VPN) that you can configure manually, You should check your paid VPN settings as they should let you manually configure it like a proxy. You can also try any one of the zillion free proxy lists out there.
Try this:
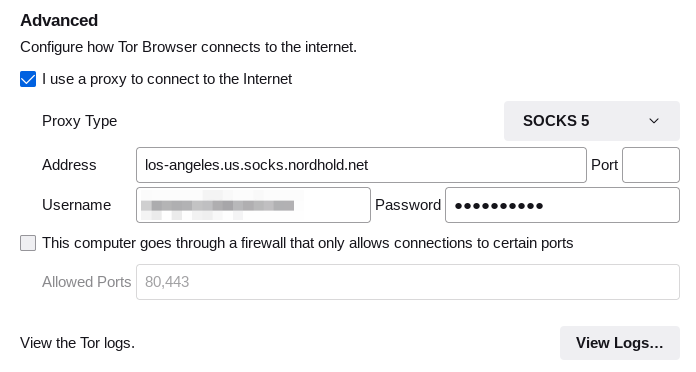
Be sure to set the proxy type correctly. If your VPN is even a little modern, SOCKS 5 is likely to be what you want. You should end up with something that looks like this:
Also, you may need to reload Tor or grab a new identity, and then just be patient. Wait a minute to access Tor while using T-Mobile, as it can be a little slow. Adding the proxy means another layer, so it can take a little while longer. Plus, Tor has never been known for speed.
Closure:
There you have it, but you’ll only find this useful if you are wanting to access Tor on T-Mobile. This should work the same regardless of what OS your using. This article should work for Windows users, actually. If you want to access Tor while using T-Mobile, just use a proxy.
Thanks for reading! If you want to help, or if the site has helped you, you can donate, register to help, write an article, or buy inexpensive hosting to start your own site. If you scroll down, you can sign up for the newsletter, vote for the article, and comment.