Today’s article shouldn’t be too long, but covers something important, which is how to access recovery mode on Ubuntu. If your Linux system has problems, you may need to access the recovery mode in order to fix it. This shouldn’t be a very long article, and I don’t think it’s all that complicated. Others may view this as complicated, but it seems pretty basic to me.
It isn’t all that complicated a process, but it’s something you should memorize, just in case you have no other way to access a search engine to learn this information. This is one of those skills you really ought to know by rote. It is one of those things about Linux that you probably should have memorized.
What is Recovery Mode?
When you boot to recovery mode, you’ll be given a choice of booting to any of your currently installed kernels. The system then boots with the minimal amount of resources and mounts the root partition as read only.
You might be interested in a recent article on the subject of multiple kernels:
Show Installed Kernels In Ubuntu
Recovery mode lets you access the system to troubleshoot problems. It probably isn’t a necessary step for most issues, but it’s a necessary step that you will want to take if your desktop isn’t otherwise loading. If you’re unable to get to the GUI desktop, you should try recovery mode.
You can also try previous kernels by doing this. Recovery mode is just one option you’ll have from the GRUB menu. You get to pick your other kernels and even enter a text mode to work on your system via the CLI. For most folks that have had the kind of difficulties that stop the GUI from loading, trying recovery mode is a good step to take.
This may very well work in other operating systems. I’m being specific to Ubuntu because that’s what I have pictures for. Well, technically I’m using Lubuntu in a VM to get the pictures, but this should work for all sorts of distros. Do me a favor and leave a comment if you know this works in other distros. It’s way too late in the day and I don’t have time to check.
Access Recovery Mode On Ubuntu:
Well, you don’t need a terminal for this exercise, but you do need to reboot your computer. I suppose we can do this from a terminal, if you really want. You can just as easily use the GUI, or you can close things down gracefully and then run the following command in the terminal:
1 | sudo reboot |
BEFORE YOU DO THAT…
We need to know if you are using EUFI/EFI boot or if you’re using the legacy BIOS mode to boot your computer. Fortunately, I’ve already covered this!
How To: Tell If You Are You Using UEFI or BIOS
Now, when your computer reboots, it’s going to perform a quick POST (Power On Self Test). That’s the point when you can decide to just let it boot or decide to enter a temporary boot menu. These shouldn’t be confused. If you’re interested in accessing your temporary boot menu, read this article:
How do I ‘Boot to USB’? (Or CD/DVD, if Such is Available)
As soon as POST ends and the OS starts to load, there’s a very brief window of time when you can press a key and access the GRUB menu. Trust me, this works. You may have to try multiple times before you get the hang of it, but this 100% works.
If you have a working keyboard, this works. You just need to time it right. You can try pressing and holding the right key as soon as you reboot, or you can try tapping the key over and over again. Should you have issues getting it right, check your settings for “Fast Boot” and temporarily disable that to give you more time.
If you’re using UEFI, the key you’ll press is the
If you’re using BIOS, the key you’ll press is the
Assuming you’ve done this right, you’re now at the GRUB menu…
The GRUB Menu:
GRUB stands for “Grand Unified Bootloader” and is what you’ll be seeing (and using) on a stock Ubuntu configuration. There are other bootloaders out there, but we’re assuming you’ve not changed from the default.
If you’ve done the above steps properly, you’ll see a GRUB screen. If you haven’t done this correctly, you’ll see the splash screen as the operating system starts to load. When you see the splash screen, you might as well just reboot so that you can try this all over again.
The first screen you’ll see will look like this:
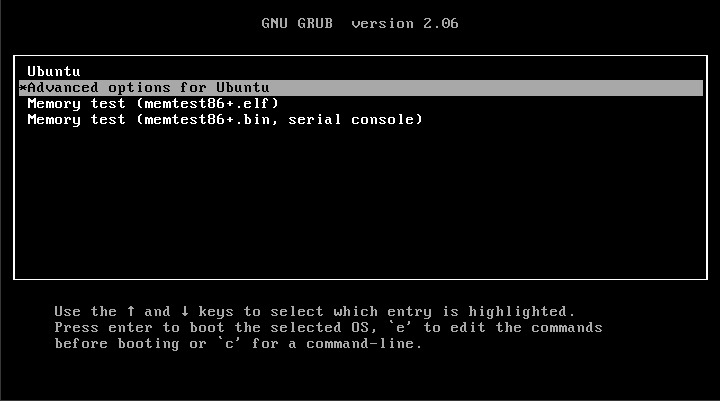
As indicated, you want to select the advanced options for Ubuntu. Of course, that won’t be the case if you’re using a different distro. You’ll want to pick the advanced options for that distro.
Finally, you need to select the correct option to access the recovery mode on Ubuntu. It’s really obvious, but here’s a handy picture:
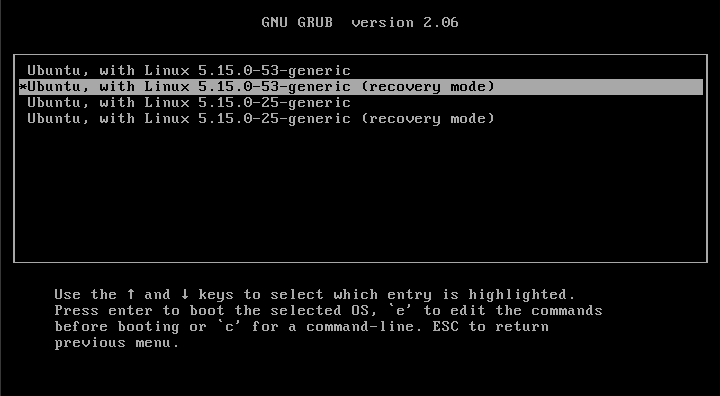
Once you’ve done that, and with any luck, your computer will boot to the recovery mode, and you’ll have learned how to access recovery mode on Ubuntu. You can see the option to boot to an older kernel is there as well. That’s another useful tool to have in your Linux toolbox.
Closure:
Well, if everything goes perfect (and it seldom does), you won’t need to access recovery mode on Ubuntu. It’s just not something you’ll need to do. But, if things don’t go perfect – and we tend to tweak, modify, and break things as Linux users, you do have a recovery mode, and it’s not too hard to access it. Of course, what you do once you’ve entered recovery mode is up to you and will depend on your problems, but you now know how to access it.
Thanks for reading! If you want to help, or if the site has helped you, you can donate, register to help, write an article, or buy inexpensive hosting to start your site. If you scroll down, you can sign up for the newsletter, vote for the article, and comment.

