Let’s Use rkhunter To Look For Rootkits

In this article, we’ll go hunting for rootkits with a tool known as ‘rkhunter‘. It’s relatively easy to use rkhunter and this article will show you how. Don’t worry, it’s not all that complicated. You can do it.

Recommended reading: What You Need to Know About Linux Rootkits

So, what is a rootkit? Well, for the purposes of this exercise, a rootkit is malware that hides itself while allowing privileged access to the system. In other words, it’s the kit that allows an unauthorized person to use the system with root privileges. The word ‘malware‘ refers to software that would do you or your system harm.

A rootkit is one of many types of malware, like viruses and trojans, and Linux isn’t entirely immune to such. If you give an application privileges, it can and will use those privileges. That’s true for software you want and software you don’t want.

Malware exists for Linux! Know what you’re installing before you install it, and get your software from legitimate sources! Linux has some security advantages, and your actions can easily nullify those advantages. If you give something the permissions necessary to make it executable, it can be executed – even if it’s malware.

The rkhunter application is a software tool that will help you check your system for rootkits and some other exploits. It doesn’t help you remove them, it only helps you identify them. 

If you’re curious, rkhunter describes itself as:

rkhunter is a shell script which carries out various checks on the local system to try and detect known rootkits and malware. It also performs checks to see if commands have been modified, if the system startup files have been modified, and various checks on the network interfaces, including checks for listening applications.

Let’s put it to use!

Hunt Rootkits With ‘rkhunter’:

In order to use rkhunter, you have to install it. It’s possibly in your default repos and your package manager is ready to install it. If not, you can grab a copy from their repository and build it. Those using Debian or the likes, can just install it with:

You can adjust that for your distro to see if it’s available. If it’s a mainstream distro, it’s probably available. Once installed, you start the scan with:

This command (there are others, jcheck man rkhunter) will be interactive. You need to sit there to press ENTER once in a while. It’s quick and monitoring it means you’ll see any warnings.

Once it has finished running it will tell you about any warnings. A warning doesn’t necessarily mean an infection!

After checking the warnings, see the log for more information. Read the log every time – that’s where most of the output is stored. Read the log with:

Now it’s up to you. You need to process that information. You may see output such as this:

That doesn’t mean I have 8 rootkits, it means I need to check the logs further to see what it’s calling a potential rootkit. In this case, one of the signs of a rootkit is a process that takes up a lot of RAM. Well, my browser is taking up a bunch of RAM and that’s one of the things it is warning me about.

When I say it’s up to you, it’s really up to you. You have to read the report and the logs to understand what is going on. DO NOT PANIC! The warnings can look scary – but they’re often just warnings. Read the logs thoroughly and understand what you’re reading before you do anything drastic!

Closure:

And there you have it! Another article in the books and this one about security. If you think you have a rootkit, feel free to leave a comment, but rkhunter tends to be a little trigger-happy with the warnings.

Thanks for reading! If you want to help, or if the site has helped you, you can donate, register to help, write an article, or buy inexpensive hosting to start your own site. If you scroll down, you can sign up for the newsletter, vote for the article, and comment.
Let’s Have a Limited Look at Linux’s cURL Application

This article is going to be a limited look at cURL, a Linux application used in the terminal to transfer data. cURL is a very extensive program and we’ll just be scratching the surface. You’ll see why we’re just scratching the surface soon enough. It’s a very comprehensive application.

So, what is cURL? It’s an application that you use in your terminal to transfer data. However, as said, it’s an insanely complicated program. We’re just barely going to scratch the surface. Let’s start with the definition.

First, ‘man curl’ defines itself nice and easily:

curl – transfer a URL

However, if you keep reading to find the description, you’ll find this gem:

curl is a tool to transfer data from or to a server, using one of the supported protocols (DICT, FILE, FTP, FTPS, GOPHER, HTTP, HTTPS, IMAP, IMAPS, LDAP, LDAPS, POP3, POP3S, RTMP, RTSP, SCP, SFTP, SMB, SMBS, SMTP, SMTPS, TELNET and TFTP). The command is designed to work without user interaction.

curl offers a busload of useful tricks like proxy support, user authentication, FTP upload, HTTP post, SSL connections, cookies, file transfer resume, Metalink, and more. As you will see below, the number of features will make your head spin!

Yeah… 

In fact, while we’re here, why don’t you have a look at the man page for cURL. Really, click that link! I think that may be one of the longest man pages out there. cURL was originally released in 1997 and appears to have picked up everything along the way.

We’ll just be going over installing it and a couple of ways you can get started using it. To learn more, read the man page!

Using cURL:

There’s some chance that it didn’t come installed with your distro’s basic installation, so let’s first cover some ways of installing it. It’s sure to be in your default repositories for any major distro, and will almost certainly be trivial to install.

Open your terminal by pressing CTRL + ALT + T and use the correct following command to install it:

Debian/Ubuntu/Derivatives:

OpenSUSE/Derivatives:

RHEL/Fedora/Derivatives:

Arch/Derivatives:

If your distro isn’t listed above, read the documentation for your distro’s package manager. If it’s not available, you can always build it from source. The project’s homepage can be found here.

With cURL now installed, and your terminal still open, you can test it easily enough. First, try this command:

That should give you a nice message. It’ll appear in your terminal and that’s it. When you close the terminal window, the message will be gone. So, what if you want to download it? For that, you use the -O switch. Let’s try something:

That will make ‘sample.txt’ download to that directory. It’s not entirely unlike wget in those regards. If you want to change the name of the fetched file, you use the -o switch and the new name. So, the above code would look like this:

That will save sample.txt as example.txt and both of those commands will show you the transfer’s progress. This specific file isn’t large enough for that to really matter, but it’s noteworthy that it does so for future transfers.

Those are just a couple of ways to use cURL, and that’s it. It’s seriously powerful and flexible. You can read the man page and learn more about it, as it is a tool we should all have in our toolboxes. It’s useful in many situations and is worth spending some time to learn more about it. 

Closure:

There’s another article in the books! As mentioned, it’s just a very limited look at cURL. To do a full tutorial would take days and days worth of articles and I’m much happier just exposing new users to the basic functionality. Even if you already have it installed and know how to use it, be sure to curl the sample.txt!

Thanks for reading! If you want to help, or if the site has helped you, you can donate, register to help, write an article, or buy inexpensive hosting to start your own site. If you scroll down, you can sign up for the newsletter, vote for the article, and comment.

How To: Use Wayland in a Live Ubuntu Instance

This article is based on an AskUbuntu question I answered a while back. The user wanted to know how to use Wayland in a live instance of Ubuntu. They wanted to test some Wayland stuff and this was how they wanted to do it.

I personally would have gone a different route, but that’s fine. There are likely other people who have this same question, so it seems prudent to put the answer up here, as others will likely want to use Wayland in a live environment.

It actually turned out to be pretty easy, so this isn’t going to be a very long article. If you follow the directions carefully, you should be able to use Wayland while running Ubuntu live.

Use Wayland in Ubuntu Live:

The first thing you need to do is boot into the live instance of Ubuntu, and then you change the way you login. You don’t want to automatically login for this exercise.

Click in the bottom right and ‘Show Applications.’ Once there, you can enter the word ‘users’, click on the settings app offered, and then disable automatic login.

Next, you have change the password. You’re forced to deal with Ubuntu’s need for a complex password. The password you pick must be at least 12 characters long, not a dictionary word, and have a mix of numbers and letters. 

Next, you want to edit “/etc/gdm3/custom.conf” and comment out the line that disables Wayland. To do this, we’ll open a terminal by pressing CTRL + ALT + T. That opens the terminal where you’ll enter:

Find the line:

Change it to (comment it out):

Make sure to save it. Just press CTRL + X, then Y, and then ENTER and nano will save it.

Restart gdm3 with:

If that doesn’t automatically log you out, log out manually.

Now start the process to log back in, but after you click the user, there’s an icon in the lower right. It’s a gear icon. Click that gear icon and choose  “Ubuntu on Wayland”. Then enter your password and press ENTER.

If everything worked, you’re now logged in with Wayland.

Now, if you want to verify that you’re using Wayland…

Press CTRL + ALT + T
to open the terminal and enter:

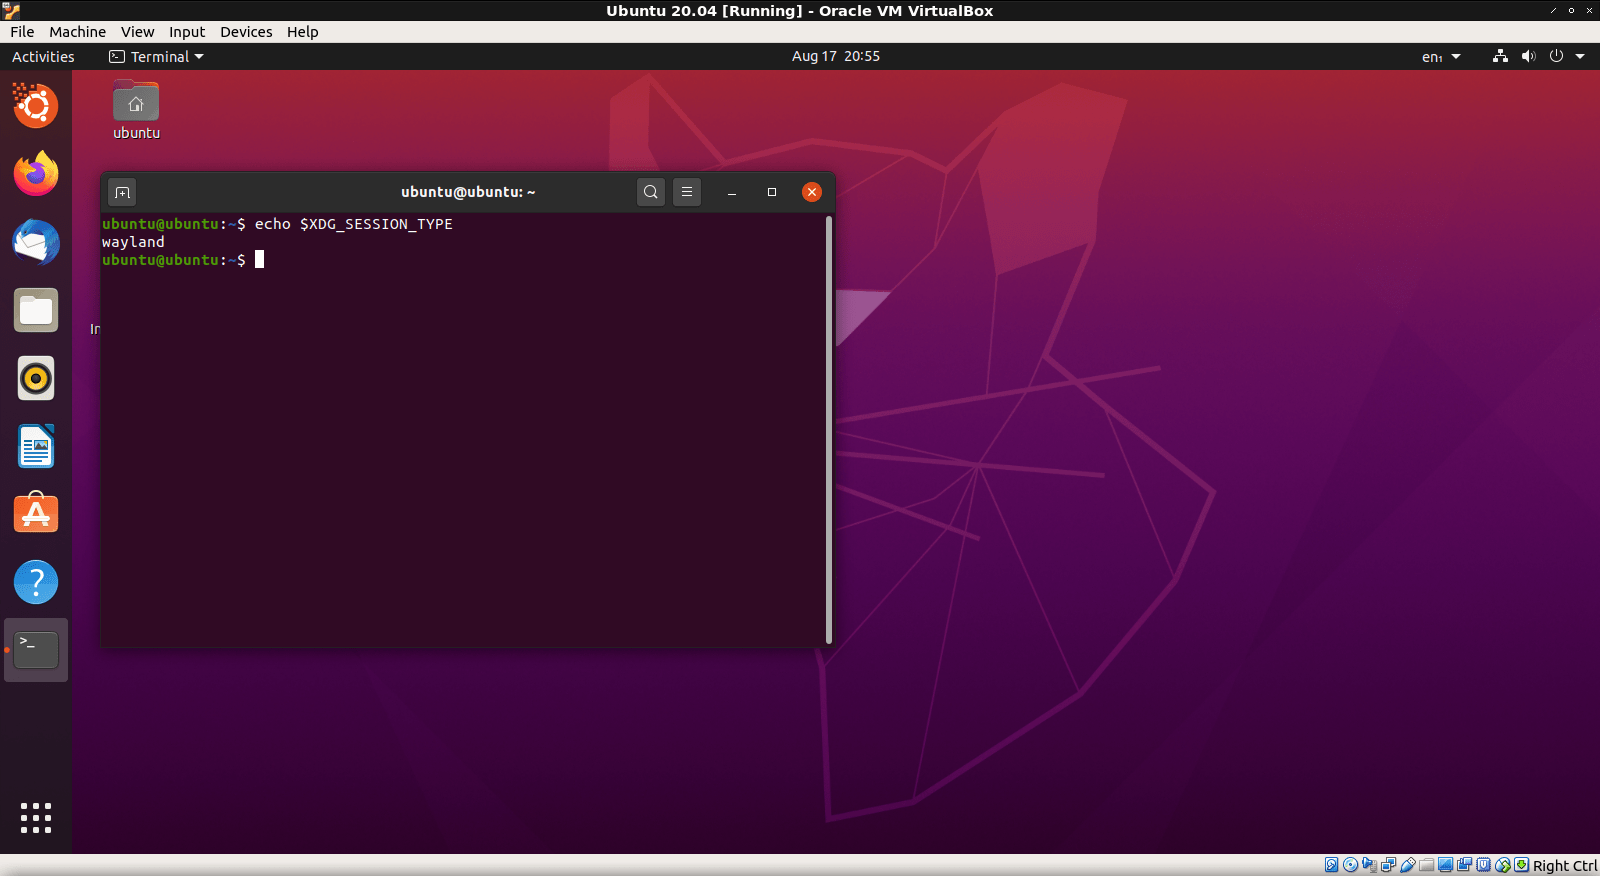
If you have done everything correctly, it looks like this:

live ubuntu running wayland
See? That’s how you use Wayland in a live Ubuntu instance. And now you know…

So, there you have it for those that want it. If you want to use Wayland then you can. You can do that in a live environment if you want. It’s Linux. You can do most anything, if you put enough work in.

Closure:

And there you have it. Another article is in the books. This one helps you use Wayland and helps you use it in a live Ubuntu instance. I suspect you could use this as a basis for other distros, but I’ve never actually tested that theory out. If you have tried it, let me know in a comment. Thanks!

Thanks for reading! If you want to help, or if the site has helped you, you can donate, register to help, write an article, or buy inexpensive hosting to start your own site. If you scroll down, you can sign up for the newsletter, vote for the article, and comment.

How To: Stop, Pause, and Resume Processes Running in Your Terminal

As you learn Linux, you’ll possibly find yourself using the terminal more often. You’ll run processes in the terminal because you need to or because you prefer to. This is how you stop, pause, and resume those processes running in your terminal.

There are any number of reasons why you’d need to do this. I’ll give you an example in the main part of the article, but there are all sorts of reasons to know and use this information. There are a few generic reasons to do so, of course.

First, you’d want to stop processes because you don’t just want them to keep running forever. That’s the easy one, though they’re all easy. Speaking of which, this article should be pretty short and easy.

Second, you’d possibly want to not stop but rather pause a running process because you expect to return to it. This is different than stopping the process. It’s very much like pausing a movie.

Third, obviously, will be resuming the above mentioned process. If you’ve paused a running process then it only makes sense to know how to resume said process. If you don’t intend to resume it, it doesn’t make much sense to pause it.

This article will explain how to do all three of these operations!

Stop, Pause & Resume Terminal Processes:

So, we’re going to need both a practice exercise and an open terminal. Let’s start by getting the terminal open by using your keyboard and pressing CTRL + ALT + T.

That should open your default terminal. Assuming it does open your terminal, I want you to run the following command:

Once started that command will keep running over and over again. I assume you don’t need to keep pinging forever, so you can stop it with CTRL + C. That’s it. Once you issue that command, the process will stop.

What if you don’t want to stop it – you just want to pause it for a little while? Well, run the ping command again and this time use CTRL + Z. When you issue that key combination, the running process will pause and be pushed into the background.

If you want to resume running that process in the terminal, in that same terminal, you just use the following command:

Unlike the first two, it’s text that you enter into the terminal before you press enter. There’s no CTRL + anything that you use. You just literally type ‘fg’ (think foreground) and press enter. That brings the paused process back into the foreground and resumes running it.

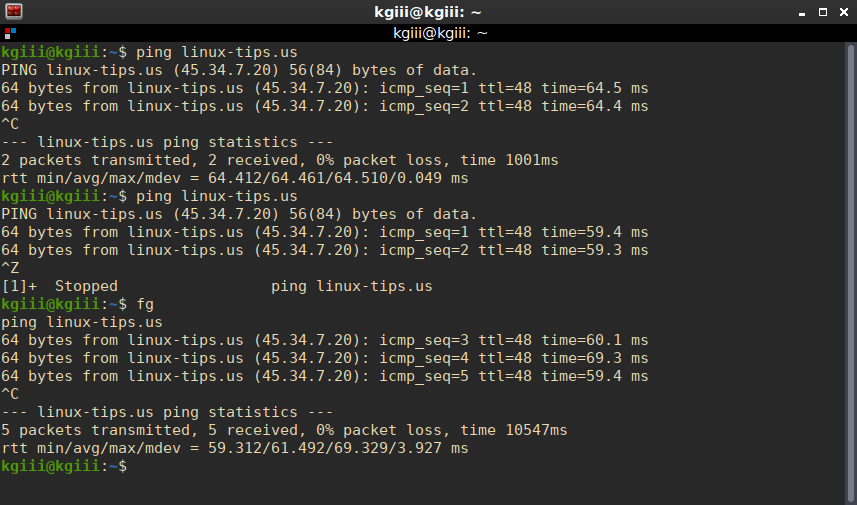
The above commands, when run in succession, should look a little something like this:

terminal
It should look a little something like that. Those are the commands from above.

You can do this with all sorts of applications that run in the terminal. You can stop, pause, or resume, as needed by moving the running process into the background and then bringing it back into the foreground.

If you look carefully at the above image, you’ll see that it counted five packets as being transferred. This indicates that the process doesn’t keep running in the background. It’s truly paused. Typing ‘fg’ and pressing return brought the process back to the foreground, where it continued pinging this site.

Closure:

There you have it. It’s another article in the books! This one tells you how to start, pause, and resume processes running in a terminal. Hopefully, you can find some use for it. If you have any ideas for articles, feel free to leave a comment. My publication schedule seems to be working, so you can expect another article every other day.

Thanks for reading! Your readership and feedback helps keep me motivated! If you want to help, or if the site has helped you, you can donate, register to help, write an article, or buy inexpensive hosting to start your own site. If you scroll down, you can sign up for the newsletter, vote for the article, and comment.

Let’s Learn How To Change The Default Terminal

There are many reasons why you may want to change your default terminal emulator. It’s actually nice easy to change the default terminal. This article explains how and anyone should be able to do it, even a beginner!

First, it’s often called a terminal emulator because it allows you to emulate the terminal in a graphical environment. There are other ways to refer to it, but just calling it the terminal is usually enough for all but the most pedantic. We’ll mostly just call it the terminal from here on out.

The people who put your distro together also picked the default terminal. It’s usually a basic terminal, and often just a terminal that has been around for a long time. That’s not a bad thing, but there may be better terminals than the default. There are terminals with all sorts of features, from multi-window terminals to terminals that support drag-and-drop!

Perhaps you might like XFCE-terminal, or you may prefer Terminator? Maybe you’d like Guake or TildeThe choices for new terminals are vast, and Wikipedia has a ton of them listed.

You can find even more by using your favorite search engine and searching for Linux terminals. Someone is always writing a new terminal and you can pick a new one to be your default terminal any time you want. There’s bound to be one out there ticks all your boxes.

If you want to open your default terminal, you can usually use your keyboard. Just press CTRL + ALT + T and it should open your terminal. If you don’t like the default, you can make any other terminal your default.

Change the Default Terminal:

For the purpose of this exercise, we’ll start with assuming you’re using Ubuntu and that you want to install Terminator and then set Terminator as the new default. However, aside from the initial installation command, it should work for other distros just fine. In fact, the installation command will work for most any distro that uses the apt package manager.

So, seeing as you opened the terminal up above, we’ll just skip right ahead to installing our example, Terminator:

Go ahead and let it finish the installation after you enter your password and agree to install it. Terminator should be in your default repositories and easily installed. This is true even if you’re not using Ubuntu or an Ubuntu derivative.

Once you’ve done that, you will need to set Terminator as the new default. To do that, run this command:

That should bring up some information that looks a little like this:

change default terminal emulator

From there you just pick the number of the terminal emulator you’d like to be the new default and press enter. That’s it. That’s all you should need to do.

You can test this by simply using your keyboard to open the default terminal like you did in the first section of this article. Once you’ve made the change, it should take effect immediately and the new default terminal should open up when you next open the terminal with the keyboard. You’ll still have the old links to the original default, but you can move those around at your leisure.

Closure:

And there you have it. That’s how you change your default terminal emulator. It’s not terribly difficult but it’s a quick and easy step you can take to make your Linux a little more customized, a little more something of your own. If you have any ideas for articles, feel free to leave a comment suggesting them. We’ll see what we can do!

Thanks for reading! It’s truly appreciated and there have been a lot of readers lately. If you want to help, or if the site has helped you, you can donate, register to help, write an article, or buy inexpensive hosting to start your own site. If you scroll down, you can sign up for the newsletter, vote for the article, and comment.

Linux Tips
Creative Commons License
This work is licensed under a Creative Commons Attribution 4.0 International License.