How To: Restart SSH

Today’s article will be a very short and easy article, where we learn how to restart SSH. This involves restarting the SSH service. It may not even require a second section, it’s that easy. No, it probably will, just to keep things uniform. So, to learn how to restart SSH read on!

This one is drawn from my own frustration. I recently have had to deal with this a couple of times and I’m not sure why. I’ll root through the logs to figure it out at some point, but the obvious issue here is that I had issues with SSH stopping. More specifically, the SSH daemon/service stopped running.

In my case, I was able to just use another remote connection to the device. I suppose I could have just walked across the house, but it was easier to just use TeamViewer.

Oddly, I’ve had TeamViewer cause problems before. I even have an article detailing how to restart TeamViewer from the terminal (via SSH, I suppose).

So, rather than rebooting the system, I just connected via an alternative method and restarted SSH. It’s easily done.

Restart SSH:

You’ll first need some way of connecting to the device with the stopped SSH service. In the opening section, I mentioned doing so with TeamViewer. It pays to have a backup method to connect to your servers, so you could use VNC or something else that works for you.

If you physically go to the device, or remotely connect to the device, you’ll need a terminal to work with. So, open a terminal. Depending on how you’re connected, you might have to find the terminal in the menu as not all keyboard shortcuts will be passed to the remote computer.

So, once you have a terminal open on the remote computer, try this command:

If that doesn’t work, try this command:

One of those should work for you. Make note of which one works and you, if you think you’ll be doing it often. You can also ‘stop‘ and ‘start‘ services, easily enough, but just a restart should do the trick.

Closure:

See? I told you that it’d be quick and easy. I could use a quick and easy article right now, and this subject just happens to be something I’m currently thinking of. So, you get this as an article, an article about how you restart SSH. Simple and easy…

Thanks for reading! If you want to help, or if the site has helped you, you can donate, register to help, write an article, or buy inexpensive hosting to start your own site. If you scroll down, you can sign up for the newsletter, vote for the article, and comment.
How To: Install Proprietary Drivers In Ubuntu

Today is going to be a very quick and easy article, where we learn how to install proprietary drivers in Ubuntu – in the terminal, of course. It’s easy enough for a new user, as it’s just a single command. It’s also not all that well known and not documented in the man pages or anything, so I might as well cover it here.

There are all sorts of reasons why you might want to install proprietary drivers in Ubuntu. Some of your hardware may not work at all until you do. Some of your hardware will only have partial functionality until you do install the proprietary drivers.

Of course, if everything is working just fine, you might not even need to worry about the proprietary drivers in Ubuntu. If everything is fine, there’s no reason to worry too much. You know what they say, “If it ain’t broke, don’t fix it.” 

Of course, a subset of you will say, “If it ain’t broke, tweak it!”

Anyhow, this article only applies to Ubuntu and official Ubuntu flavors. It likely also applies to Ubuntu derivatives. A quick check seems to indicate that Mint is one of those derivatives that support this command. We’ll only cover it from the Ubuntu-specific direction. If it also works for you, that’s a benefit. If it doesn’t work for your distro, the maintainers likely took it out for a reason.

So then, let’s get to work installing proprietary drivers on Ubuntu…

How To Install Proprietary Drivers In Ubuntu:

As mentioned above, we’ll be doing this in the terminal. So, you’re going to need an open terminal for this exercise. You can just press CTRL + ALT + T and your default terminal should open.

With the terminal now open, we need to ensure you have the “Restricted” repository enabled. As you already have a terminal open, we might as well do that while in the terminal. So, type the following command:

Now, you need to update your database of software that’s available and we might as well make sure all other software is up to date. You do that with this command:

There you go. You’re now ready to install proprietary drivers in Ubuntu. So, while it’s a single command, it may require some preparation for some users. If you’ve run the above commands, we should be on the same page. So, with that, you just run the following command:

If there are any prompts, just go ahead and press the Y button. Everything should go smoothly and you may need to reboot after installing the proprietary drivers. When you’ve done that, you should be using the newly installed drivers instead of the open-source (or no) drivers. 

That’s all there is to it…

Closure:

There you have it! You have another article. I know I told you that it was just a single command and then shared more than one command, but it is just one command so long as you’ve got the Restricted repository enabled already (and I think most of us do). Either way, there’s a quick and easy way to install proprietary drivers in Ubuntu, in the terminal even. ‘Snot all that difficult after all!

Thanks for reading! If you want to help, or if the site has helped you, you can donate, register to help, write an article, or buy inexpensive hosting to start your site. If you scroll down, you can sign up for the newsletter, vote for the article, and comment.
Get Some System Information With Archey

Today’s article will be a fun one, where we figure out how to get some system information with Archey. It’s a mostly unnecessary article and Archey is definitely replicating work done elsewhere, but it’ll be fun!

Well, I think it’ll be fun…

I suppose you can decide that for yourself as you read the article. If you want to get some system information with Archey, read on (and maybe have fun)!

As regular readers might know, I’ve covered a variety of *fetch articles.

How To: Display System Information With screenFetch
Screenfetch vs. Neofetch, You Decide!
Show RAM Information With Ramfetch
Get Some Prettified CPU Information in Your Terminal With ‘CPUFETCH’

In fact, the ‘Screenfetch vs. Neofetch’ article is oddly one of the most searched articles on the site, at least from Google’s traffic.

Anyhow, Archey is like those (but written in Python, if that matters). If I understand correctly, it was Archey4 – a maintained fork of Archey. The original Archey project ceased development and now this project is just called Archey as it is no longer a fork but is the actual project.

I think I’m understanding that properly. If I’m not, hopefully, someone chimes in and lets me know the full story. Often my articles are visited by project leaders, so maybe that’ll happen in this instance and someone will set the story straight.

Either way, it doesn’t matter much – but it does explain why I’m simply referring to the project as ‘Archey’. If you check the man page, you’ll learn that Archey describes itself like:

A simple system information tool written in Python

Got it? Good! Let’s get started getting some system information with Archey!

Let’s Get System Information With Archey:

So, the first thing you’re going to need is a copy of Archey. That’s easily accomplished if you want .deb or .rpm. There are some odds that you’ll find it’s already in your repositories (like Arch or BSD). You can also use “pip” (Python packages from PyPI) to install Archey. There’s even a ‘homebrew’ version for Mac users.

Otherwise, if none of those will work for you, you might find you need the source code to build and install Archey.

This link should take you to the current release:

https://github.com/HorlogeSkynet/archey4/releases/latest

From there you can install Archey. Due to the huge variety of installation methods, I’m just going to tell you to follow the directions to install Archey. If you can’t get it installed, you can always ask for help and someone will hopefully get you sorted.

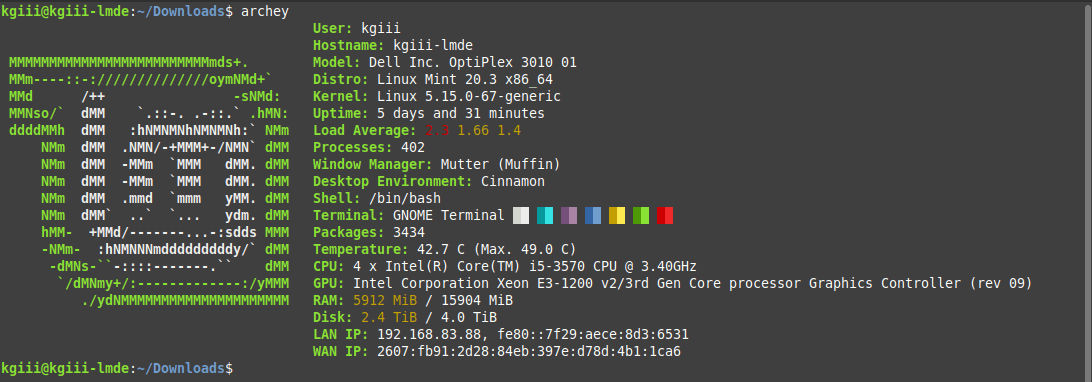
Once you have Archy installed, you can start getting system information with Archey. You just run the archey command and it’ll spit out something like this:

Achey displays system information.
I don’t think you’ll need me to explain. The screenshot should be adequate.

As you can see, Archey’s output is fairly normal. It likely reminds you of things we’ve already covered in earlier articles. That’s okay – it should remind you of things like Screenfetch and Neofetch.

Just like some of the other previously covered *fetch applications, you can take a screenshot automatically. After all, the goal of these applications is to give you some information that si easily captured as a screenshot so that you can show it off to your forum buddies.

However, possibly because I have Flameshot installed (which seems to have taken over the ‘screenshot’ command that Archey uses), I am unable to actually verify the screenshot bit. I dutifully took the screenshot with Shutter. But, the -s flag should work for other people. I tried a few times with Archey but got conflicting errors. Someone smarter than I probably have this sorted out.

I’m not going to go uninstalling stuff just to demonstrate it. If it doesn’t work for you, file a bug at the above-linked GitHub site. Also, you have some additional options with Archey. There’s nothing too fancy, but be sure to check the man page (by using man archey) to learn more about the application.

Closure:

There you have it, you have another article. This article covers how to get system information with Archey. It’s an easy and, likely, familiar task. If you’ve followed along, you’ve learned all sorts of ways to get system information.

Do you really need Archey? No, probably not… I figured I’d cover it because my site shows up in some Archey queries. If people are looking for it, it might as well be here. That’s my line of thinking, at any rate.

Thanks for reading! If you want to help, or if the site has helped you, you can donate, register to help, write an article, or buy inexpensive hosting to start your own site. If you scroll down, you can sign up for the newsletter, vote for the article, and comment.

How To: Find A Site’s Nameservers

Today’s article will be a fun and easy one if you already understand nameservers, as I will be explaining how to find a site’s nameservers. If you don’t understand nameservers, it may be a bit more difficult. But, I’ll do my best to make it approachable. So, to learn how to find a site’s nameservers read on!

Okay, so what are nameservers?

Hmm… Let’s try to explain it in the most simple way possible… 

DNS is like a phone book. You look in the book to see which number (IP address) to connect to. However, just like in the real world (though less common with cell phones) a given telephone number may belong to multiple people.

Nameservers help to organize those DNS records. Using the nameservers is sort of like calling a phone exchange and then entering a party’s extension number to go directly to that person.

Does that make sense? No? Well, that’s the best you’re getting. I suck at analogies unless they’re automotive-related and I can’t come up with one that makes sense. I’m pretty sure the above was how it was first explained to me, or something like that. Ah well…

It should be pointed out that I used ‘dig’ in the previous article. We’ll be using that again. This time, we’ll be using dig to find a site’s nameservers instead of the site’s IP address. We might as well learn about it now, while the dig command is fresh in our memories!

Find A Site’s Nameservers:

This article requires an open terminal, like many other articles on this site. If you don’t know how to open the terminal, you can do so with your keyboard – just press CTRL + ALT + T and your default terminal should open.

With your terminal now open, the syntax for finding a site’s nameservers is as follows:

Or, if you prefer a shorter output, you have:

Like the previously used dig command, you can actually put the flags at the end (if that’s something you feel like doing). It works just fine like:

If we use this site as an example, the outcome of the latter command should look something like this:

using dig to find a site's nameservers
And there you see them, this site’s nameservers as shown by dig. Pretty easy, huh?

As you can see, nameservers look just like domain names. You’ll also note that those (shouldn’t) don’t change, unlike the site’s IP address. As we’re using a CDN, there are a number of possible IP addresses. The nameservers will be the same no matter what part of the globe you connect from.

Of course, there’s more to the dig command. We’ve just touched on a couple of uses. Check the man page with man dig to find out what other options are available.

Closure:

Well, there you have another article. Once again, we’ve used dig in this article. I figured we might as well have another dig article while I was thinking about it, and this time we used dig to find a site’s nameservers. Hopefully, this will be useful for you at some point in your Linux journey. As I deal with a bunch of websites, it’s important for me to know my nameservers and to know when they’ve propagated (something for another article).

Thanks for reading! If you want to help, or if the site has helped you, you can donate, register to help, write an article, or buy inexpensive hosting to start your own site. If you scroll down, you can sign up for the newsletter, vote for the article, and comment.

How To: Find A Website’s IP Address

Today’s article should be interesting, as we learn how to find a website’s IP address. There’s more than one way to do this sort of thing, so I’ll just be showing you the one way to do so. I want to keep it relatively short and simple. So, to find out how to find a website’s IP address, read on!

I have a reason to keep this one short and simple. I’m in the midst of a blizzard and am likely to lose my connection at some point this evening. That’s okay, I love the cold and snow. As for me and my house, I’ve got solar and wind. I won’t want for anything. I’ve been out playing in the snow already. I’ll go back out shortly.

So, let’s say you want to know the IP address of your favorite website. That’s easy enough to learn. Though it may surprise you that your favorite website might have multiple IP addresses. That’d often be because many websites have multiple nameservers pointing at them for a bit of redundancy.

We’ll be using the ‘dig’ tool. This is likely installed by default. You shouldn’t need to install anything. The dig command defines itself as:

dig – DNS lookup utility

That’s what we’ll be using to find a website’s IP address, as it’s a fine tool for doing so. With that said, let’s just jump into the article…

Find A Website’s IP Address:

If you’re a regular reader, you know that it’s probably time to open a terminal. Like many articles, this one requires an open terminal, as that’s where you use the dig command. Just press CTRL + ALT + T and your default terminal should open.

With your terminal open, we’ll use Linux Tips as our example:

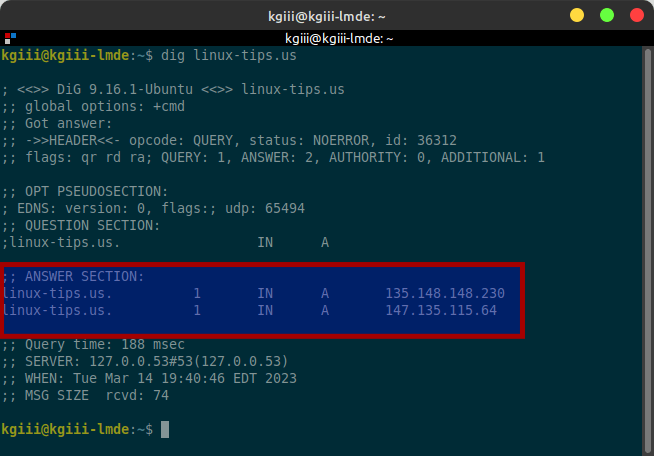
The output of which should look like this:

using dig to find a website's ip address
You’d be looking for the answer section, as indicated in the graphic. Pretty easy, huh?

As you can see, the answer section is what you’re looking for. The IP addresses are on the right. As you can see, this site has two IP addresses – both of which belong to my CDN (if you’re curious).

You can save some time and space… Well, some space. I suppose it may take you a second or so longer to type out the extra characters. But, give it a try with the +short flag (placed in a weird spot).

The output from that command is a bit easier and more concise:

using +short is a neater output to find a website's ip address.
That’s a bit easier and contains just the information you’re looking for. You can just use that.

You can use either or both, depending on what you’re after. I suppose it’s technically a bit longer when you type in the last command, but your output is just the information you’ve been looking for.

By the way, dig +short linux-tips.us will work, I just learned it the other way, so that’s how it is situated in my notes. If you’re feeling weird about placing the flag at the end of the command, just place it where flags normally go. Also, don’t forget to check the man page with man dig for more information about the dig command.

Closure:

And there you have it, you have another article! This time we’ve covered how to find a website’s IP address. If the site has a dedicated IP address, you can use that IP address to connect to the site, as opposed to using the domain name. So, there’s that…

Thanks for reading! If you want to help, or if the site has helped you, you can donate, register to help, write an article, or buy inexpensive hosting to start your site. If you scroll down, you can sign up for the newsletter, vote for the article, and comment.

Linux Tips
Creative Commons License
This work is licensed under a Creative Commons Attribution 4.0 International License.