Monitor Your Wi-Fi In Linux

If you use a wireless connection on your computer, or wi-fi for short, you might want to monitor your wi-fi. This is a simple task in the terminal and won’t take too long to learn. So, if you’ve ever wanted to monitor your wi-fi, this is the article for you!

There’s more to your wireless connection than just the throughput. There are things like link quality and signal strength that might interest you. It doesn’t stop there, there are all sorts of other bits of information you can learn if you decide to monitor your wi-fi in Linux.

I’ve written a few similar articles, each using a different technology. If you’re interested in those articles, click one of the following links:

Visualize Your Network Traffic With ‘darkstat’
‘vnStat’ A Tool For Monitoring Your Bandwidth Usage
Monitor Bandwidth In Real Time
Monitor Bandwidth With nload

Those are all about monitoring bandwidth and your network connection speed. They’re all fit for purpose, but this article covers wavemon, which is quite different and more specifically about monitoring your wi-fi connection as a whole. This isn’t very complicated or anything. You’ve got this!

This will be done in the terminal, so you might as well prepare yourself for that. So many of my articles do indeed require an open terminal.

wavemon:

The tool we’ll be using is known as wavemon. Like most of these articles, it’s another tool that’s fit for purpose. We want to monitor the waves, radio waves that is. This is one of the tools for the job. In fact, you’ll find the man page describes wavemon like so:

wavemon – a wireless network monitor

To install wavemon, we’ll need an open terminal. You can frequently just press CTRL + ALT + T to open your default terminal emulator. Give that a go. If it doesn’t work you can find the shortcut in your application menu.

With your terminal now open, we need to install wavemon.

Debian/Ubuntu/etc:

RHEL/CentOS:

Arch/Manjaro/etc:

Fedora:

I think I have all of those correct. If not, please leave a comment down below so that I can fix it. If you’d like to add the code to install wavemon on other distros, please leave a comment below. I’m pretty good at getting back to commentators and tend to be quick at fixing articles.

Anyhow, wavemon is the tool you’ll want to use to monitor your wi-fi!

Monitor Your Wi-Fi In Linux:

Leave your terminal open from the installation phase.

This section of the article will be nice and quick. You don’t need to do anything else besides run the command. You don’t even need elevated permissions (such as sudo) for this.

With your terminal open, just enter the following command:

You’ll get a handy output (it may help to resize your terminal for this one) that’s full of information. An example of that output would be this:
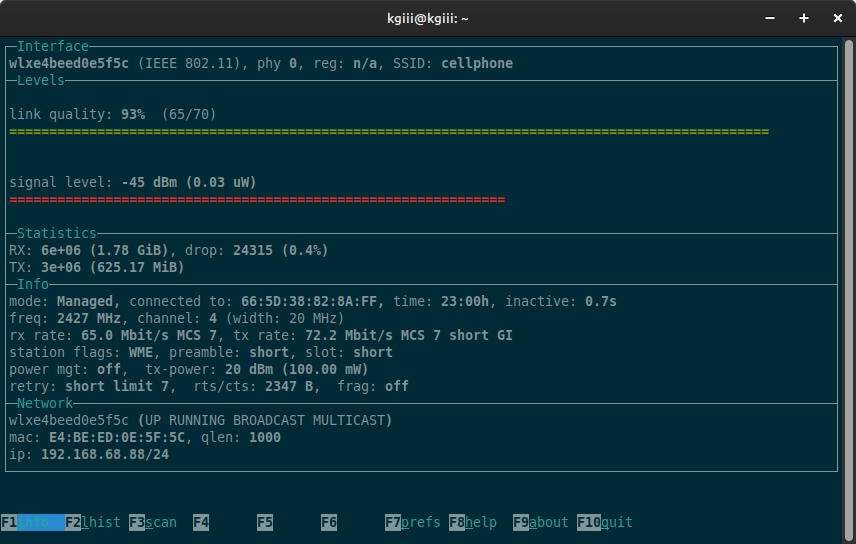
using wavemon to monitor wi-fi in the Linux terminal.
It’s fairly easy to understand the output from the wavemon command.

I can’t get F1 to do anything, but F2shows a histograph.

If you do start wavemon with sudo, you can scan for wireless networks with the F3 button.

You can change some settings with F7 if you want.

The F10 button should quit the program. 

If that doesn’t work, CTRL + C will exit wavemon.

But, you can see how much data you’ve received (during this session) and how much data you’ve sent (during this session). It’s all pretty basic stuff and wavemon is a nice and easy way to monitor your wi-fi in Linux.

Closure:

Well, that’s one way to monitor your wi-fi in Linux. If you use a wireless connection and want more information about that connection, wavemon is an acceptable tool for the job. There are certainly other tools out there and this is just one of them. It’s an easy tool to use and I find it’s familiar enough for anyone to understand with relative ease.

I did say that this would be a fairly easy article. It is indeed a fairly easy article! This is one of those things you can learn in just a few minutes. You never know when this information will come in handy. Then again, you might just be curious and want to know this information. You can customize it a bit but I didn’t need to do so.

Thanks for reading! If you want to help, or if the site has helped you, you can donate, register to help, write an article, or buy inexpensive hosting to start your site. If you scroll down, you can sign up for the newsletter, vote for the article, and comment.
Automate Updates In Linux Mint

Today’s article will be a fairly simple one and is limited to Linux Mint users as we learn how to automate updates in Linux Mint. That seems like a good idea to me. Ideally, this will continue working without any intervention, but we’ll see…

So, I’m not sure how long this has been an option. I only noticed it fairly recently. If you’re not already aware, you can automate updates in Linux Mint. It’s a pretty simple task and won’t require much more than a mouse – or maybe a terminal and then a mouse.

This can be a touchy subject. I’m firmly in the camp of immediately installing all updates. I want my system to be as secure as possible, which means applying the updates as soon as they are available. So far, this mostly appears to work.

Updates often come right before public disclosure and proof-of-concept samples. While it’s true that an update can bork your system, that’s easily fixed and such a rare thing that I don’t even consider it as a reasonable reason not to apply updates.

I also consider it my duty, my obligation, to keep my systems secure. An insecure system doesn’t just impact you. An unsecured computer can be used as a proxy, a command center, a spam relay, or a node in a DDoS attack, among other things. As a good netizen, I keep my systems updated.

So, why not automate that stuff when I can? 

Automate Updates In Linux Mint:

In your system tray, down on the right, look to see if you have an icon that looks like a shield. If you do not see the icon, press CTRL + ALT + T and type in mintupdate. Both of those things will open the Update Manager in Linux Mint.

At some point along this path, you’ll be asked to enter your password. Do so.

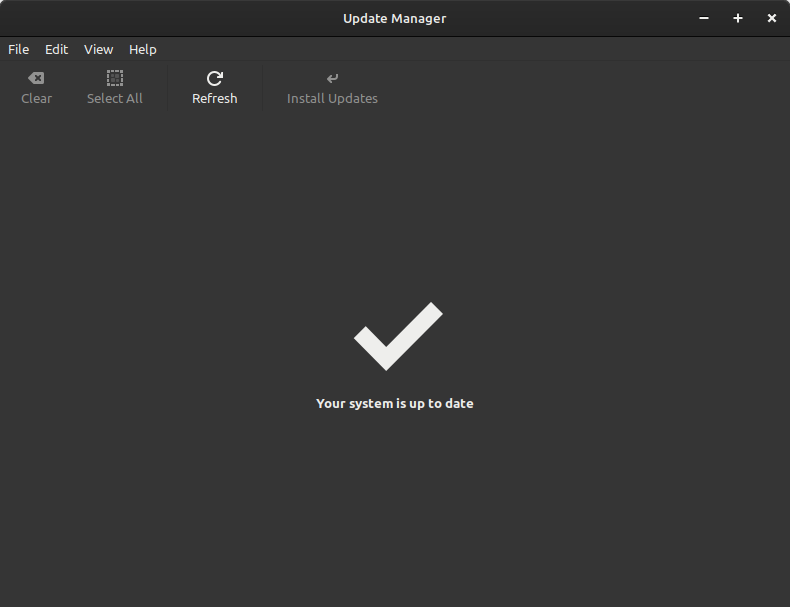
That will open this window:

to automate updates in Linux Mint, start with opening up the update manager
Your theme may mean this has different colors or whatnot, but it should look like this.

Next, you’ll click on ‘Edit’.

You need to click on the Edit button to move to the next step of automating updates in Linus Mint
This is a pretty easy step. Heck, they’re all easy steps! You’ve got this! I’m sure of it!

You next want to open Preferences and click on Automation.

You'll need to edit the preferences to automate Linux Mint Updates.
Just in case you’re confused, I added an arrow for you! (My CDN is going to hate me.)

When you’ve done all of this, you’ll face a new screen.

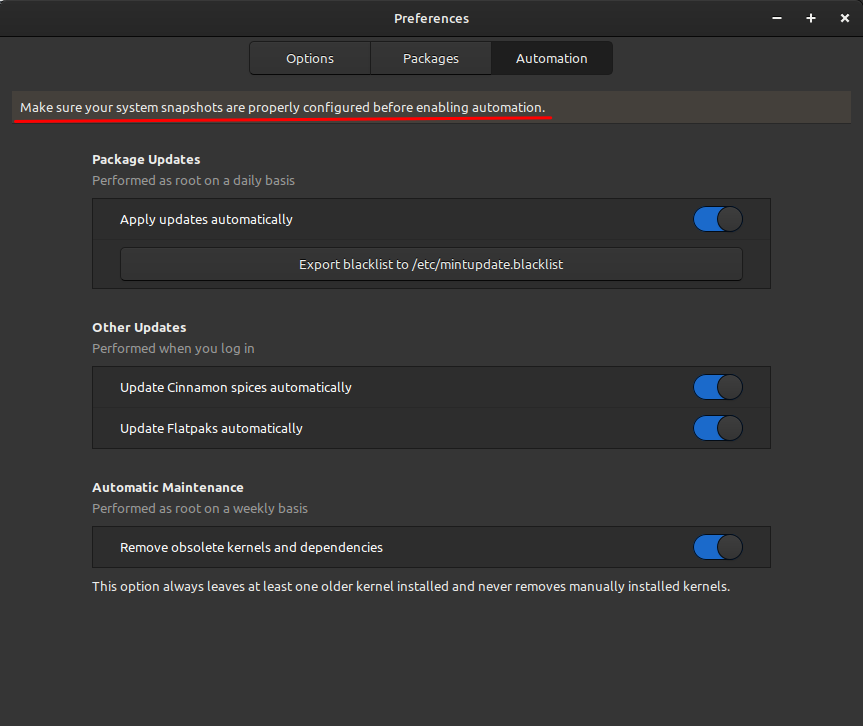
This new screen is where you edit your automation settings. This new screen is where you enable automatic updates in Linux Mint. It looks like this when I’ve configured it to my liking:

Enabling automatic updates in Linux Mint via the Update Manager preferences.
You can configure those however you like, but I enable all of them. You do you, I guess.

Make sure you have a viable backup process.

As you can see, I’ve chosen all the things. I’ve chosen to automate all the updating that I can do. If anything, I wish I could increase the frequency. I suppose I could set up a cron job for this, but a handy GUI is fine for this task. This way will also update Spices and Flatpaks. So, there’s that.

I’ve had this setting enabled for a little while now and I’ve verified that it has been working as expected. If you want to automate updates in Linux Mint, you can do that – and it’s not even difficult.

Update:

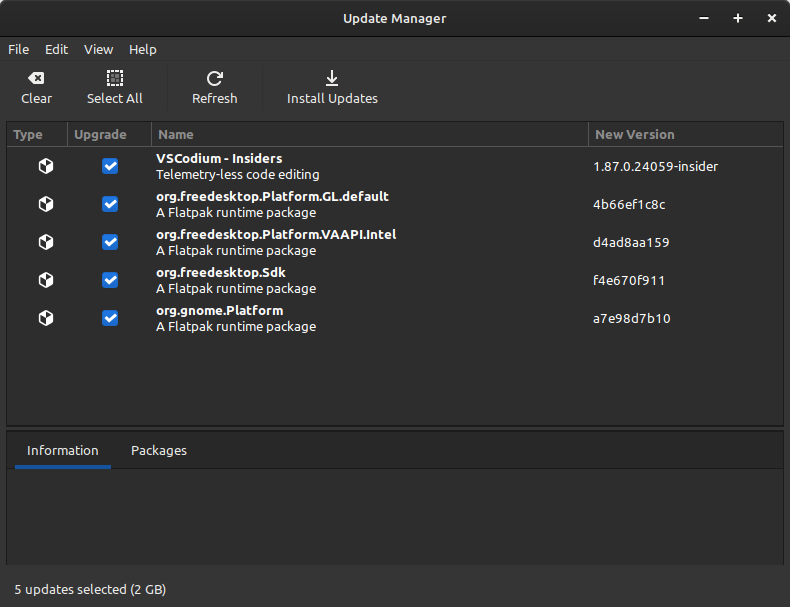
No, it doesn’t appear to update Flatpaks. I’ve given it a few tries and it does not.

flatpaks are not automatically updated
I’ve waited and waited a few times. You have to update Flatpaks manually. So, there’s that…

Closure:

I like automatic updates. I use that sort of feature online with my various websites. Scheduled updates performing themselves is a good thing to me. You may be more cautious, but I throw caution to the wind. I haven’t had an update nuke my system beyond a 2-minute repair job in forever. I haven’t even had a 2-minute repair job in years. That’s good enough for me. You can make your own choices. Regardless of your choices, be sure to backup your system regularly.

Thanks for reading! If you want to help, or if the site has helped you, you can donate, register to help, write an article, or buy inexpensive hosting to start your site. If you scroll down, you can sign up for the newsletter, vote for the article, and comment.

Create A New User In Linux

If you’re familiar with Linux, you’ll already know that Linux is a multiuser system and today we’ll learn how to create a new user in Linux. This shouldn’t be a very complicated article. In some more advanced operations, you may be required to create a new user. This article will be about that.

If you aren’t already aware, you have a whole lot of users on your Linux system. You have more users than just your user account and certain things can be done by certain users. You can generally use an elevated account (or sudo) to overcome those user restrictions.

There may come a time when you want to share your device with another person. So, there’s another reason to create an additional user. If you’re managing a server with multiple users, there’s another reason to create a new user in Linux. There are any number of reasons why you’d like to create a new user and we’ll go over that process today.

We’ll just be using a couple of tools today. It’s not complicated.

useradd:

The main tool we’ll be using is the useradd command. This is a tool that’s certainly installed by default on any major distro. It’s a part of the basic building blocks we use to manage Linux, so this doesn’t require any installation. You can verify that you have useradd available with the following command:

The output should be:

If you check the man page, you’ll see this:

useradd – create a new user or update default new user information

So, as our goal is to create a new user, you can see that this is the correct tool for the job. I can’t think of a better tool for the job, as it should do everything behind the scenes as well.

passwd:

We’ll also be using the passwd command. This isn’t strictly necessary, but it’s in your best interest to set a user’s password. Once again, you won’t need to install anything and the following command will confirm that:

The output should match this output:

The text alone should let you know that this is a tool for setting passwords, but you can always refer to the man page to learn more. This is how passwd is described:

passwd – change user password

As I said, you don’t have to undergo this step but it’s in your best interests, from a security standpoint, to assign passwords to users who have any access to your system. And, as you can see, this is the right tool for the job of setting a user’s password.

Create A New User In Linux:

Of course, this is done in the terminal. As a general rule, you can press CTRL + ALT + T and your default terminal should open. That’s a fairly common shortcut that I mention often. You can also find a terminal in your application menu, pretty much regardless of which desktop environment you’re using and whichever Linux you’re using.

Creating The New User:

With your terminal now open, you’ll need to use elevated privileges, and the syntax is quite simple. To create a new user in Linux, the syntax follows:

This should be lowercase as Linux doesn’t like capital letters in usernames. So, for my username, the command would look like this:

You can confirm that you’ve added the user with the following command:

For example:

With your user firmly in place, you should set a password. Let’s do that next.

Set A Password For Your New User:

You’re almost always going to want a password for your new user. That’s easily done and also requires elevated permissions. You’ll need to continue using the terminal when you want to set a new password for the user.

The syntax for setting a password for your new user is as follows:

After you authenticate, the system will have you type in the password twice. It does this to ensure you’ve not made a mistake while typing, though it could be that you’ve made the same mistake twice.

So, be careful with this step. Otherwise, you have to find some way to reset the new user and the quickest way to do that would be to delete the user and start again.

Closure:

Yeah, I guess this counts as a short article. My most recent articles have been longer than this one. This one is about the length of my earliest articles, maybe slightly longer. The site has evolved!

Anyhow, you’ve learned how to create a new user in Linux. It shouldn’t matter which distro you’re using. The kernel you’re using shouldn’t impact this at all. It shouldn’t even matter what shell you’re using, this should simply work. If you want to create a new user, this is how you do it.

Thanks for reading! If you want to help, or if the site has helped you, you can donate, register to help, write an article, or buy inexpensive hosting to start your site. If you scroll down, you can sign up for the newsletter, vote for the article, and comment.
Monitor USB Bandwidth

Most of us use USB devices regularly, even using USB thumb drives to install Linux, and today we’ll learn how to monitor USB bandwidth. What we don’t tend to do is monitor the bandwidth of our USB devices. Today, we’ll be doing that and just that. It shouldn’t be a long article.

When I say bandwidth, you could also say throughput, I speak of the speeds at which data moves from one place to another. In this case, it’s the speeds supported by your USB devices.

When you move data from one place to another, it does so at various speeds. These days, you have better speeds with USB devices, now that we have USB 3.1 and USB C. Those are pretty speedy.

If you don’t know, USB stands for Universal Serial Bus and USB has been around since 1996. There are a number of standards for transferring things across the bus lines and USB is just one of them. USB is a ratified standard that gives us uninversal connections shared among manufacturers. There’s even USB4 that I’m entirely unfamiliar with.

I suppose I don’t really need to explain this. We all understand USB well enough, I’d think. Still, we may not know some of the details and we may have never thought about monitoring USB bandwidth. Well, that’s what we’re doing and we’ll be doing it in the terminal.

What will we be using?

usbtop:

We’ll be using a nifty application known as ‘usbtop’ for this exercise. While there’s a tiny bit more to it than we’ll cover, we’ll at least use it to monitor USB bandwidth. If the ‘top’ aspect looks familiar, it should. This usbtop is familiar in the sense of top, htop, or atop. All of which are applications I should cover but haven’t. If you’re already familiar with those, you’ll have the right sort of expectations.

The usbtop application runs in the Linux terminal. I know that it’s available for more than just the Ubuntu family, but I’ll be testing this in Linux Mint. That’s just the device I’m using at the moment, though I’d normally be using Lubuntu.

If you’re using Linux Mint (or Debian, Ubuntu, Lubuntu, or even ElementaryOS) you can install usbtop easily. I had to refer to the Arch AUR page for this article, so I’m sure this is available elsewhere – though I think it might be in AUR for Arch derivatives like Mandriva.

But, seeing as we’re using Linux Mint, you can install usbtop with this command:

(Don’t try running it just yet. It won’t work properly.)

Once installed, you can type man usbtop to read the manual but that doesn’t appear to do a darned thing. No, I do not know why. If you want, you can try something like gibberish – like usbtop -help which won’t actually work but will be kind enough to spit out the two options you have with this usbtop application.

Monitor USB Bandwidth:

Well, I’ll assume you were able to run the installation command above. It’s run in the terminal. If you go this far, you didn’t need help opening the terminal. See? You’re getting better with this Linux stuff already!

Now, it’s not going to run. Feel free to try it. If you try, it will spit out an error that looks remarkably similar to this:

No USB bus can be captured thanks to libpcap. Check your name filter and make sure relevent permissions are set !

Don’t blame me. I’m just the messenger. Instead, start with this command:

Now you can run the following command:

Yes, you want elevated permissions to run usbtop.

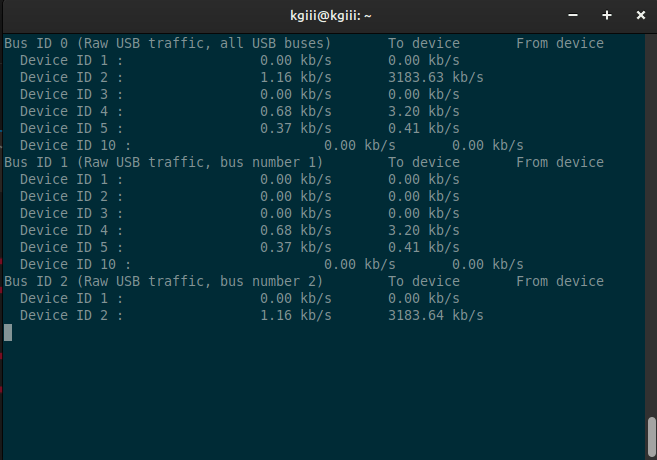
With usbtop now up and running, you can try transferring something to a USB drive, or something from one USB drive to another USB drive, or anything involving your USB drive. You can even start up a USB webcam and monitor the bandwidth that uses.

I took a crappy screenshot… You’re welcome!

monitor USB bandwidth with usbtop
See? It’s easy enough to monitor USB bandwidth with usbtop. It’s not too difficult to use.

If you want to exit that screen, press CTRL + C. For some reason, the Q doesn’t quit. Then again, what do you expect from a project that can’t even sort out their man page. So, it is what it is. Again, don’t blame me. I’m just the messenger!

Nah, it’s a perfectly usable application. It doesn’t do much. You can expect it to do what it says and just what it says. If you checked the fake help page above, you’ll see that you can monitor a single device and you can list the devices. Those can be monitored individually, but you might as well monitor USB bandwidth on all the devices at once. It’s not too confusing, I swear.

Closure:

Well, now you know how to monitor USB bandwidth. I’m sure the application is available for other distros, but I did not test that. If you do test that, feel free to leave comments so that other people can learn from your labor. It’s a community, so share the wealth of knowledge in a comment.

I promise, it won’t be used as a way to spam you. I’ve been almost 500 articles and I’ve never spammed anyone so far – even with hundreds of comments and a bunch of people signed up to the newsletter. I just don’t see me violating that trust. If I ever do have a commercial message, it’ll just get attached to the newsletter – like a sponsor or something like that.

Thanks for reading! If you want to help, or if the site has helped you, you can donate, register to help, write an article, or buy inexpensive hosting to start your site. If you scroll down, you can sign up for the newsletter, vote for the article, and comment.

How To: Show User Information In The Linux Terminal

There comes a time in many Linux journeys when you want to know how to show user information in the Linux terminal. Well, if you’ve been waiting for such an article, this article is for you. After all, knowing about the various users might be important information for you.

You may not realize this, but your Linux system has all sorts of users. They belong to varied groups, sometimes more than one group at a time. Unless you’re already familiar with this subject, you probably have more users than you realize. 

That’s perfectly okay. It’s entirely normal to have different users. Linux is a user-oriented operating system. Users have varied permissions and can perform different tasks based on those permissions. 

This actually shouldn’t be a complicated article. It’s just a couple of commands, though the command may not be well-known among the newer Linux users. New users should familiarize themselves with the concepts of a multi-user system and with groups.

Anyhow, you shouldn’t need to install anything. The tools we’ll be using should be installed by default. You will need an open terminal. So, you have been warned. After all, it was right there in the title!

lslogins:

The tool we’ll expose you to today is ‘lslogins‘, which should be installed by default. You can verify that lslogins is installed with this command:

And, if you check the man page (with man lslogins) you’ll see this:

lslogins – display information about known users in the system

So, sure enough, that looks like it’s the correct tool for the job. Our goal is to show user information in the Linux terminal. This looks like a good way to go about it.

Show User Information In The Linux Terminal:

Yes, we’re doing this in the terminal. You can frequently open your terminal by pressing CTRL + ALT + T. Otherwise, you’ll find a terminal emulator somewhere within your application menu. It’s likely to be in the admin section of said menu.

With your terminal open, you can start with the basics. That is, we’re going to show all the known users with the lslogins command. That syntax is so simple.

You’ve got a lot of users. You may not know it yet, but you do. Here’s an example output from my system:

Now, that’s all well and good.

But…

Let’s say you only want to show user information about one single user. That’s fine and you can do that in a variety of ways. You can also do it just as easily with the lslogins command, simply by using the -u flag. 

The syntax is as follows:

An example output might look like this:

And there’s the information about the root user. You can try with your username and get information about things like the groups you belong to and more. Go ahead and give it a shot, you won’t break anything. I promise you won’t break anything with this command!

Closure:

You never know when you’re going to want to show user information in the terminal. It is useful information, especially when debugging things like permission errors. You may find you need to add yourself to a group or things like that. So, store this command away in your mental bank and save it for when you need this information.

Thanks for reading! If you want to help, or if the site has helped you, you can donate, register to help, write an article, or buy inexpensive hosting to start your site. If you scroll down, you can sign up for the newsletter, vote for the article, and comment.
Linux Tips
Creative Commons License
This work is licensed under a Creative Commons Attribution 4.0 International License.