How To: Use Wayland in a Live Ubuntu Instance

This article is based on an AskUbuntu question I answered a while back. The user wanted to know how to use Wayland in a live instance of Ubuntu. They wanted to test some Wayland stuff and this was how they wanted to do it.

I personally would have gone a different route, but that’s fine. There are likely other people who have this same question, so it seems prudent to put the answer up here, as others will likely want to use Wayland in a live environment.

It actually turned out to be pretty easy, so this isn’t going to be a very long article. If you follow the directions carefully, you should be able to use Wayland while running Ubuntu live.

Use Wayland in Ubuntu Live:

The first thing you need to do is boot into the live instance of Ubuntu, and then you change the way you login. You don’t want to automatically login for this exercise.

Click in the bottom right and ‘Show Applications.’ Once there, you can enter the word ‘users’, click on the settings app offered, and then disable automatic login.

Next, you have change the password. You’re forced to deal with Ubuntu’s need for a complex password. The password you pick must be at least 12 characters long, not a dictionary word, and have a mix of numbers and letters. 

Next, you want to edit “/etc/gdm3/custom.conf” and comment out the line that disables Wayland. To do this, we’ll open a terminal by pressing CTRL + ALT + T. That opens the terminal where you’ll enter:

Find the line:

Change it to (comment it out):

Make sure to save it. Just press CTRL + X, then Y, and then ENTER and nano will save it.

Restart gdm3 with:

If that doesn’t automatically log you out, log out manually.

Now start the process to log back in, but after you click the user, there’s an icon in the lower right. It’s a gear icon. Click that gear icon and choose  “Ubuntu on Wayland”. Then enter your password and press ENTER.

If everything worked, you’re now logged in with Wayland.

Now, if you want to verify that you’re using Wayland…

Press CTRL + ALT + T
to open the terminal and enter:

If you have done everything correctly, it looks like this:
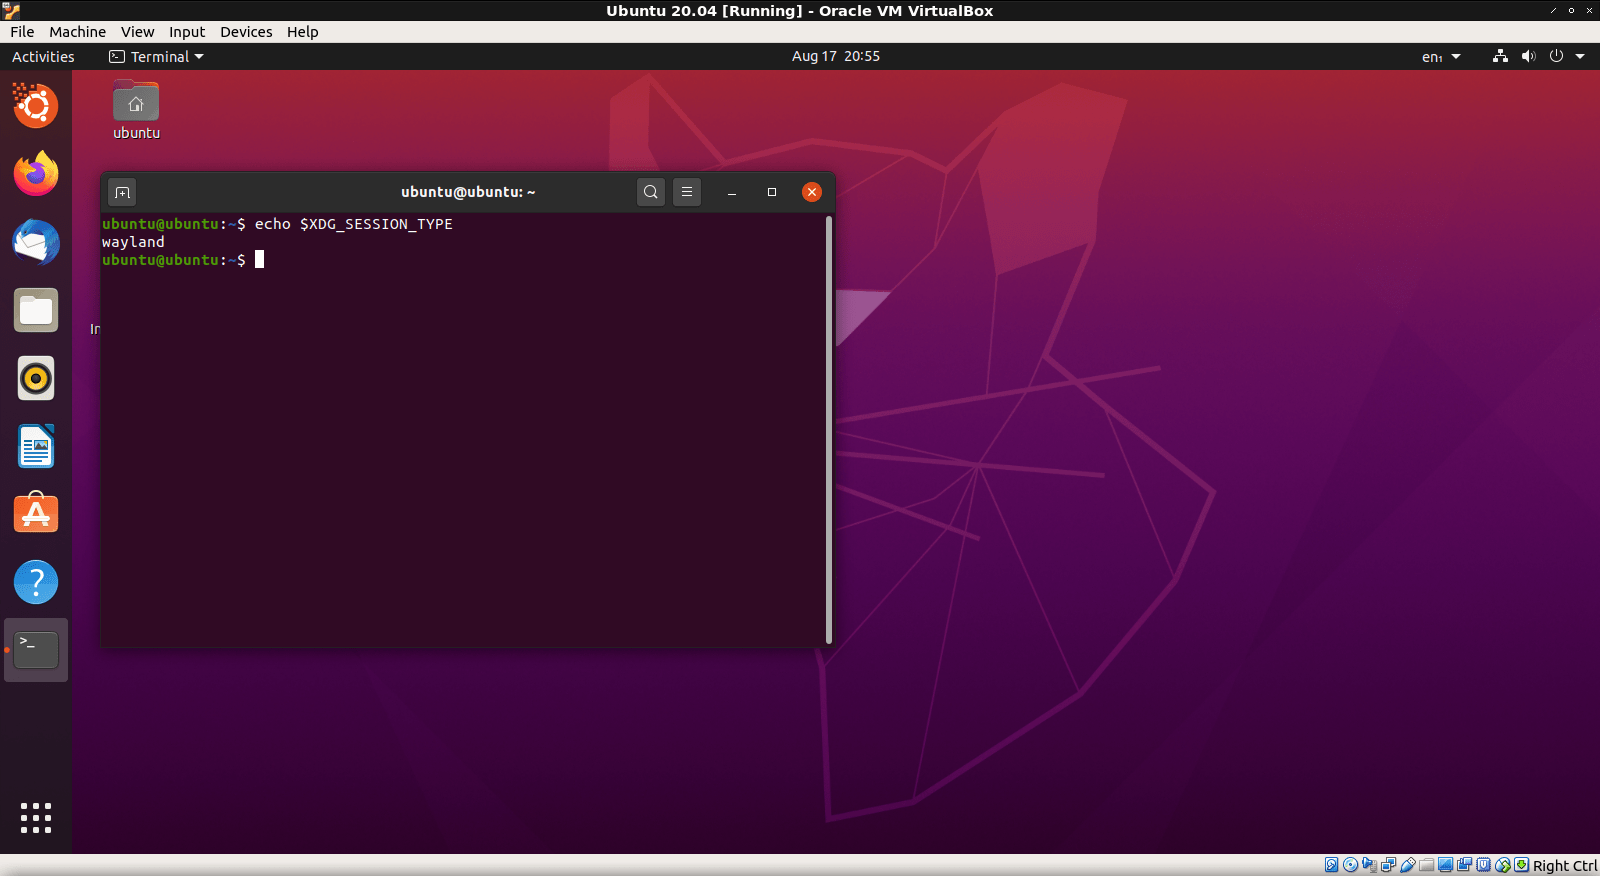
live ubuntu running wayland
See? That’s how you use Wayland in a live Ubuntu instance. And now you know…

So, there you have it for those that want it. If you want to use Wayland then you can. You can do that in a live environment if you want. It’s Linux. You can do most anything, if you put enough work in.

Closure:

And there you have it. Another article is in the books. This one helps you use Wayland and helps you use it in a live Ubuntu instance. I suspect you could use this as a basis for other distros, but I’ve never actually tested that theory out. If you have tried it, let me know in a comment. Thanks!

Thanks for reading! If you want to help, or if the site has helped you, you can donate, register to help, write an article, or buy inexpensive hosting to start your own site. If you scroll down, you can sign up for the newsletter, vote for the article, and comment.

Let’s Learn How To Change The Default Terminal

There are many reasons why you may want to change your default terminal emulator. It’s actually nice easy to change the default terminal. This article explains how and anyone should be able to do it, even a beginner!

First, it’s often called a terminal emulator because it allows you to emulate the terminal in a graphical environment. There are other ways to refer to it, but just calling it the terminal is usually enough for all but the most pedantic. We’ll mostly just call it the terminal from here on out.

The people who put your distro together also picked the default terminal. It’s usually a basic terminal, and often just a terminal that has been around for a long time. That’s not a bad thing, but there may be better terminals than the default. There are terminals with all sorts of features, from multi-window terminals to terminals that support drag-and-drop!

Perhaps you might like XFCE-terminal, or you may prefer Terminator? Maybe you’d like Guake or TildeThe choices for new terminals are vast, and Wikipedia has a ton of them listed.

You can find even more by using your favorite search engine and searching for Linux terminals. Someone is always writing a new terminal and you can pick a new one to be your default terminal any time you want. There’s bound to be one out there ticks all your boxes.

If you want to open your default terminal, you can usually use your keyboard. Just press CTRL + ALT + T and it should open your terminal. If you don’t like the default, you can make any other terminal your default.

Change the Default Terminal:

For the purpose of this exercise, we’ll start with assuming you’re using Ubuntu and that you want to install Terminator and then set Terminator as the new default. However, aside from the initial installation command, it should work for other distros just fine. In fact, the installation command will work for most any distro that uses the apt package manager.

So, seeing as you opened the terminal up above, we’ll just skip right ahead to installing our example, Terminator:

Go ahead and let it finish the installation after you enter your password and agree to install it. Terminator should be in your default repositories and easily installed. This is true even if you’re not using Ubuntu or an Ubuntu derivative.

Once you’ve done that, you will need to set Terminator as the new default. To do that, run this command:

That should bring up some information that looks a little like this:

change default terminal emulator

From there you just pick the number of the terminal emulator you’d like to be the new default and press enter. That’s it. That’s all you should need to do.

You can test this by simply using your keyboard to open the default terminal like you did in the first section of this article. Once you’ve made the change, it should take effect immediately and the new default terminal should open up when you next open the terminal with the keyboard. You’ll still have the old links to the original default, but you can move those around at your leisure.

Closure:

And there you have it. That’s how you change your default terminal emulator. It’s not terribly difficult but it’s a quick and easy step you can take to make your Linux a little more customized, a little more something of your own. If you have any ideas for articles, feel free to leave a comment suggesting them. We’ll see what we can do!

Thanks for reading! It’s truly appreciated and there have been a lot of readers lately. If you want to help, or if the site has helped you, you can donate, register to help, write an article, or buy inexpensive hosting to start your own site. If you scroll down, you can sign up for the newsletter, vote for the article, and comment.

Disable Ubuntu Snaps

People have a variety of reasons why they want to disable and remove Snap apps from Ubuntu. It’s relatively easy to disable Snaps and this article shows you how.

Let’s start with the basics. What is a Snap? It’s another form of packaging software and Canonical’s Snapcraft page describes it like this:

Snaps are app packages for desktop, cloud and IoT that are easy to install, secure, cross‐platform and dependency‐free. Snaps are discoverable and installable from the Snap Store, the app store for Linux with an audience of millions.

Canonical is the company that makes Ubuntu and if you’ve been using Linux for any length of time, you’ve probably heard of them and Snaps. The reality is that, if you want to use Ubuntu or official Ubuntu flavors, you might want to make your peace with them. They’re going to be everywhere.

Right now, you can find Snaps being more or less mandatory in current Ubuntu Core versions. If you want to use Livepatch to keep your running system protected then you’ll need to use snaps. The list of places Snaps are in use goes on, but more and more applications are being packaged exclusively as Snaps and that trend looks likely to continue.

To be frank, I can’t blame the developers. Package it once and it runs everywhere – or it can run everywhere. This saves time, presents a single point of contact, and helps to ensure uniformity across the myriad distros out there. It does away with things like ‘Dependency Hell’. It even makes it more secure.

In an ideal world, it’d be great!  Maybe you don’t live in that ideal world? Maybe you don’t want Snaps? I don’t need to know your reason. Let’s just disable them.

Removing/Disabling Snaps

Let’s start by cracking open your terminal. You’re gonna want to start there for this. It’s as easy as using your keyboard to press CTRL + ALT + T. Then, enter the following commands into your terminal, one by one and pressing ENTER after each one:

The first command will completely purge ‘snapd’ – the service that controls and installs Snaps. The next three commands remove any remnants of Snaps that you have on your system. The final command will reboot your system, so that everything is cleared out of memory and so that you start fresh and without Snaps.

And, there you go. You can disable Ubuntu snaps! You’re Snap free! Everything is now just as you wanted it. You no longer have any Snaps on your system, nor do you have to worry about installing them by mistake. 

At the same time, it may well be time for dedicated Ubuntu users to adjust and learn to use Snaps. They do have their benefits. They do things like auto-update, automatically revert to the previous version if it’s broken, and keep applications isolated from the rest of the system. For the most part, they just work, without you needing to worry about anything.

So, before you decide to completely remove Snaps from your system, you might just want to take a minute to make peace with them and learn to use them. Yeah, they take up more space, their permissions are wonky, and they’re still a work in progress. You’re probably going to end up using them eventually. The sooner you get used to managing them, the easier it’s probably going to be.

Anyhow, thanks for reading. I appreciate the readers and welcome you to contribute. There’s a whole host of ways you can do so, from joining to donating. You can even write articles without registering, share this article at your favorite sites, and you can sign up for the newsletter so that you know you’re getting these articles (and no spam) in your inbox.

Linux Tips
Creative Commons License
This work is licensed under a Creative Commons Attribution 4.0 International License.