This is another short article, as I continue exploring the format, and is simply about how to clear Linux Mint notifications. You can do so graphically, or you can do so with a keyboard.
I should be specific. This is for Linux Mint Cinnamon Edition.
When you get an email, when you have a notice from your email client, or have scheduled some system prompt, you might get a notification. These notifications show up in your system tray.
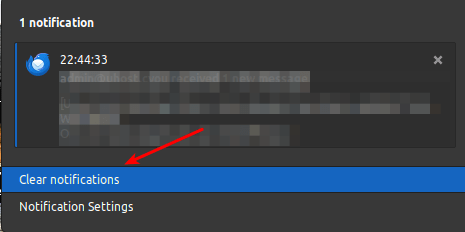
They look like this:
See? I even drew an arrow for you! In this case, there are three!
These notifications show up with regularity if you have a lot of email accounts that get constant notifications. They may show up for other reasons.
If you want to use a GUI, just click the notification icon and clear it. That’d look like this image below, and it’s nice and simple:
This is probably how most of you will clear notifications from Linux Mint.
On the other hand, if you’re pretty sure there are no notifications worth reading, you can always just clear them out with the keyboard.
Clear Linux Mint Notifications With The Keyboard:
If you want to clear Linux Mint notifications with the keyboard, it’s remarkably simple. It isn’t made clear, thus you get this short-form article.
To clear those notifications you simply press the following:
SHIFT + SUPER + C
Now, if you’re unsure, the ‘Super’ key is often labeled to be the ‘Windows Key’. It may say ‘WIN’ on it or it may have the Windows logo emblazoned on it. With your ‘standard’ US keyboard layout, it’s the key on the left between the CTRL and ALT keys.
This could, on Apple keyboards, also be labeled as the CMD key.
But, the ‘super key’ came first. It was an MIT (GO BEAVERS!) thing. If you don’t have anything better to do, read about the Super Key on Wikipedia. The WinKey and CMD key came later in life.
Anyhow, now you can clear Linux Mint Notifications with your keyboard!
Closure:
I’m not sure if I like this short format. I normally have quite a bit to say, even if it’s mundane. There’s a lot to be said about the tools we use. At the same time, there are plenty of meaningful tips that just don’t warrant writing a full article.
So far, exactly one person has opined on the matter and they claimed to like the short articles. A few days later, they also offered the opinion that they liked the longer articles. Given their comments, I’m going to have to assume they also like the regular articles and just like my articles. I’m okay with that, but it’s not exactly information I can act on other than to just keep doing what I’ve been doing.
Thanks for reading! If you want to help, or if the site has helped you, you can donate, register to help, write an article, or buy inexpensive hosting to start your site. If you scroll down, you can sign up for the newsletter, vote for the article, and comment.
Many tools do the same thing in Linux and this is just another way to check filesystem space use. This one isn’t all that special, it’s just another way. If you want to check your filesystem usage (basically, how much free space you have used on your storage devices) this article can help you with that.
This shouldn’t be a long article. I’ve written others on the topic. It’s safe to assume that you know what a filesystem is. It’s the system your hardware uses to store data if you don’t know. There are many types, from Ext3 to ExFAT. They are all filesystems used to store data.
It should go without saying that you can fill up your storage space and might want to know how much space you have available. Well, if you want to find that information, this is an article for you!
Those are just a few applications that will let you monitor your filesystem’s usage. I’m sure I’ve covered others.
This pydf is a Python script, but we’ll be using Lubunt and installing pydf just like we’d install any other application, albeit in the terminal. I will point out that pydf has a colored output, which is nice.
I can’t say that this pydf is available in other distros, but it’s available in Lubuntu. As Lubuntu is Ubuntu, that means it’s available in Ubuntu. It is also likely available in Debian. I think you’ll find that pydf is also available in the downstream distros like Linux Mint. I did provide a link above that will take you to the project page.
Check Filesystem Space Usage:
As I’ve done the work in Lubuntu, these directions will be for Lubuntu. You can adapt them easily. In Lubuntu, you can open the terminal by pressing CTRL + ALT + T on your keyboard. That will open the default terminal.
With your terminal now open, you can install pydf with the following command:
1
sudo apt install pydf
If you want to check the man page (say with
man pydf), you’ll find that there isn’t one. If you’d like to view the pydf’s help file, try this command:
1
pydf --help
Once you’ve done that, you’ll see that using pydf is quite simple. If you just want to run the program to check filesystem space use, then just run it in the terminal like so:
1
pydf
If you want the output in ‘human-readable’ format, you can add a
-h flag where bits are divided by 1024, or
-H which means bits are divided by 1000. The choice is up to you.
Likewise, if you want to see even the zero-byte filesystems (the special filesystems that you don’t work directly with), you’d run this command:
1
pydf -a
Additionally, there’s a
-l flag that limits the output to just the local filesystems. If I combine them for my preferred output, I get this:
As you can see, there are a bunch of loop devices which are Snaps, which is perfectly normal for many Ubuntu-based systems. You can also see that I’ve used slightly more than half of my drive space and clever observers would notice that the drive is an NVMe SSD.
Closure:
So, that was a quick and easy article about how you can check filesystem space use, specifically in Lubuntu but easily applied to other distros. There are many ways to accomplish this task in Linux, which means this is just one among many such tools. It shouldn’t take too long to learn how to use pydf if that’s the tool you want to use.
Thanks for reading! If you want to help, or if the site has helped you, you can donate, register to help, write an article, or buy inexpensive hosting to start your site. If you scroll down, you can sign up for the newsletter, vote for the article, and comment.
If you’re using a modern computer, you might be using an NVMe SSD and you might want to know your NVMe information. The standard and older tools may not be all that helpful, even though NVMe SSDs have been around for a while. This article will help you with that, should you want to get your NVMe SSD information.
Let me see if I can explain this…
You’ll often see “NVMe M.2 SSD”, which is a mouthful.
NVMe stands for Non-Volatile Memory Express which is just a specification.
M.2 is another specification for expansion cards.
The device that is used for NVMe is an SSD – Solid State Drive.
SSD, which has been around for quite a while now, differs from previous generations of storage in that it’s electronic and not magnetic.
We humans have a long history of trying to record things. We’ve used everything from words to pictures, from dots on paper to grooves on wire, from symbols to magnetic, and more…
For computers, a long time was in the magnetic storage age. From spinning drums holding mere bytes of data to complicated spinning platters that hold terabytes of data… We’ve made good use of the magnetic storage mediums over the years.
Solid-state drives don’t use magnets. Data is stored on memory chips that retain their memory (non-volatile) even if the power is disconnected. An SSD is quite common today.
Less common, but growing in popularity, is the NVMe M.2 SSD. This is a much smaller format than the early SSDs (which even came in the 3.5″ format, and surely some obscure formats that I’m overlooking). This is also on a faster bus lane, meaning the read and write speeds far exceed the storage medium before it – including the aforementioned larger SSDs that connect via IDE or (preferably) SATA.
The current consumer options are pretty great and an NVMe SSD is much faster than a regular SSD. The standard SATA SSD is quite common still, while the NVMe M.2 SSD is the latest and greatest.
With me so far?
Well, an NVMe M.2 SSD is a very different architecture and, as such, there are special tools to use. If you want to find the temperature of your NVMe SSD, the normal tools (like hdparm) may not yet work. Instead, there are other tools that you’d want to use.
In this article, we’ll be talking about a tool known as ‘nvme-cli’…
About nvme-cli:
You almost certainly don’t have nvme-cli installed by default. If you did, you’d be able to check the man page. Doing so would show that nvme-cli is described like this:
nvme – the NVMe storage command line interface utility (nvme-cli)
It should be important to know (and we’ll get to the installation step in just a minute) that you’ll be installing the package with one name but referring to, that is using, the application with another name.
For example, it’s
man nvme to access the man page.
NOTE: You will want to read the man page. There’s a whole lot of options and we’re just going to cover one basic command. We’ll learn stuff like the operating temperature of your NVMe. We won’t be worried about the various other options, of which there are many.
Find Your NVMe Information:
If you want to find your NVMe information in the terminal, you can do that. You’ll first need to install a tool known as nvme-cli. To do this, you’ll want an open terminal. You can usually open a terminal by just pressing CTRL + ALT + T.
With your terminal now open, you must first install nvme-cli. You’ll find that packages are available for many distros, as they should be as the format is becoming more and more popular.
Follow one of the basic installation methods below, specifically the one suitable for your distro’s package management system.
Debian/Ubuntu/etc:
1
sudo apt install nvme-cli
SUSE/OpenSUSE/etc:
1
sudo zypper install nvme-cli
Fedora/Asahi/etc:
1
sudo dnf install nvme-cli
RHEL/CentOS/etc (those with yum available still):
1
sudo yum install nvme-cli
Arch/Manjaro/etc:
1
sudo pacman -S nvme-cli
I’m pretty sure there’s an nvme-cli package available for all the major Linux distros. If not, I linked to the project page above and you can check there for a package or to compile nvme-cli from source.
Find Your NVMe’s Absolute Path:
You’re going to need the absolute path to where your drive is mounted. That’s a part of the command, so you’ll need that. Just to mix things up a little bit, we’ll use the ‘df’ command. You should have df installed automatically on any major distro. The man page will helpfully describe the df application like so:
df – report file system disk space usage
We don’t care about all that. We just care about the absolute path. This usually starts with /dev/ and ends with the device ID. In an NVMe’s case, it will usually include nvme in the title, which is quite helpful.
So, let’s get that information…
1
df -TH
You’ll get an output similar to this one:
1
2
3
4
5
6
7
8
$ df -TH
Filesystem Type Size Used Avail Use% Mounted on
tmpfs tmpfs 3.4G 1.9M 3.4G 1% /run
/dev/nvme0n1p1 ext4 503G 253G 225G 53% /
tmpfs tmpfs 17G 0 17G 0% /dev/shm
tmpfs tmpfs 5.3M 4.1k 5.3M 1% /run/lock
tmpfs tmpfs 17G 127k 17G 1% /tmp
tmpfs tmpfs 3.4G 74k 3.4G 1% /run/user/1000
It should be obvious that the absolute path for this would be /dev/nvme0n1p1 and that’s the data we’re going to need.
Now, to find your NVMe information, the syntax would be like so:
1
sudo nvme smart-log <path_to_drive>
Using the output from above, an example of that would be:
1
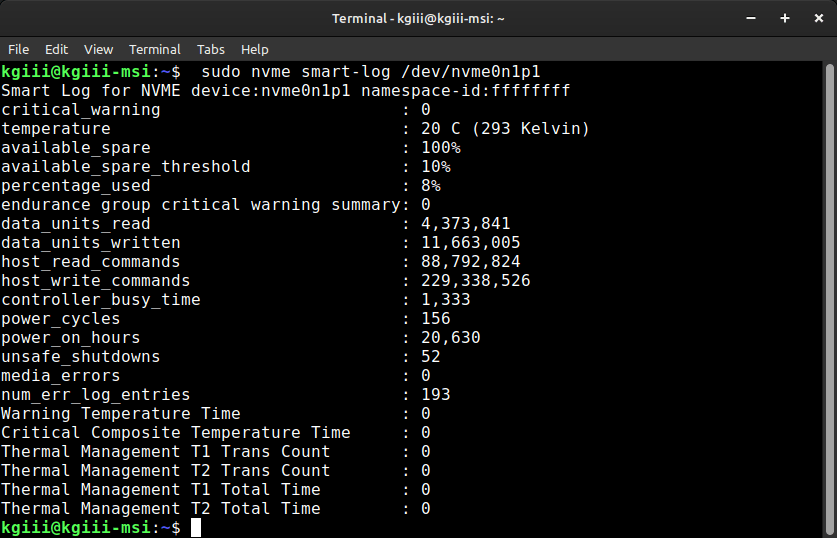
sudo nvme smart-log /dev/nvme0n1p1
This will then give you an output like so:
There you go, you now have your NVMe Information. It’s not too difficult to do.
Of course, you can pipe this output to other commands. Let’s say you wanted to know the current temperature of your NVMe SSD. You’d do that with the grep command. An example would be:
1
sudo nvme smart-log /dev/nvme0n1p1 | grep temperature
If you want to know the number of times you’ve powered the device on, you can do that by piping the output to grep again. For example:
So, you can use the nvme-cli application (the nvme command) for quite a bit. You can do a whole lot more with it, so be sure to check the man page if you’re interested in doing more than checking the temperature or how many times you’ve cycled the power on that device.
As NVMe SSDs get more common, you’ll likely start seeing this package installed by default. From what I can see right now, no major distro is including this by default. If you’re using an NVMe M.2 SSD, you might just want to install it. If nothing else, it’s yet another tool that might come in handy.
Closure:
Today’s article is a bit longer than some but I think it’s worth reading. If I didn’t think it was worth reading, I wouldn’t have written as much! There’s so much that I could have covered but I didn’t. Articles have to have only so many words before people lose interest.
I’d have loved to cover the history of computer memory (or perhaps even more about how we humans have recorded stuff) but that didn’t seem prudent. I figured I’d limit the number of words to 1,200, but I still managed to exceed that – though not by too many. Seriously, it’s a pretty fascinating bit of history. You should use Google (and/or YouTube) to see learn about all the different ways we’ve stored data, and that’s just scratching the surface!
Fascinating stuff, I tell you! Fascinating!
Thanks for reading! If you want to help, or if the site has helped you, you can donate, register to help, write an article, or buy inexpensive hosting to start your site. If you scroll down, you can sign up for the newsletter, vote for the article, and comment.
I probably shouldn’t say ‘disk’ but I think we’ll all agree that we know what I mean and today we’ll monitor disk usage with ‘gdu’. It’ll be fun! It won’t even be all that complicated! Read on and learn how to monitor disk usage with gdu. It won’t hurt!
If you’re using your storage, you might want to monitor your disk usage. If you’re running low on disk space, you might want to find out what’s using your disk space so that you can address that. Suffice it to say, that Linux is less than happy when you run low on disk space. Running out of disk space may even prevent system booting and you’ll have to go about it with a live instance, which nobody likes doing.
Oh, I’m sure I’ve covered this before. There are all sorts of tools you can use to monitor disk usage. Some are faster than others and gdu is not one of them. No, no… It’s not fast. But, it’s an option!
Speaking of options to monitor your disk usage, I’ve covered this before!
You might ask yourself why I’m covering this again. The answer is that I like to give you choices. The goal is to bring you up to speed, making you more efficient with your Linux usage. I want to make Linux more approachable for the novice (while still sharing stuff with the experienced users) and one of the ways to do that is to show you the variety of tools available. That way you can pick and choose among the choices. You can pick which works best for you.
In this case, we’ll be using an application known as GDU.
More On GDU:
The tool we’ll be using is known as ‘gdu‘. I’ll explain how to install gdu in Debian-based distros (like Ubuntu or Linux Mint), but you can find packages to install gdu easily. It’s easy to install, trust me.
I assume ‘gdu’ stands for ‘Go disk usage’, with ‘Go’ referring to the programming language and not for a space on a Monopoly board. It is a supposition because the man page and repository say nothing on the matter.
Once you do have gdu installed, you’ll be able to check the man page. Doing so will show you that gdu is described like so:
1
gdu - Pretty fast disk usage analyzer written in Go
I might argue the ‘pretty fast’ bit but I’m too lazy to compare and provide actual data. It took quite a while when I ran the application with instructions to scan my entire system (complete with external drives). I got distracted but this is a timed output:
1
2
3
4
5
$ time gdu /
real 9m8.842s
user 0m50.556s
sys 1m0.045s
I don’t think it’s all that speedy – but it’s neat. So, there’s that. Which is nice.
Still, it’s the correct tool for the job. Well, it’s a correct tool for the job. As you can see from the links above, there are many correct tools for the job. This is just one of them.
So then, let’s get this installed and use it…
Monitor Disk Usage With GDU:
You know it’s true. This application is terminal-based so you’ll need an open terminal. As I’m writing this for Debian distributions, you can usually just press CTRL + ALT + T to open up your default terminal.
Your command will differ if you’re not using apt. If you’re using apt, you can install gdu with this command:
1
sudo apt install gdu
When you’ve installed gdu, you can navigate to a directory and run the command like this:
1
gdu
You can also run gdu with a specified directory.
1
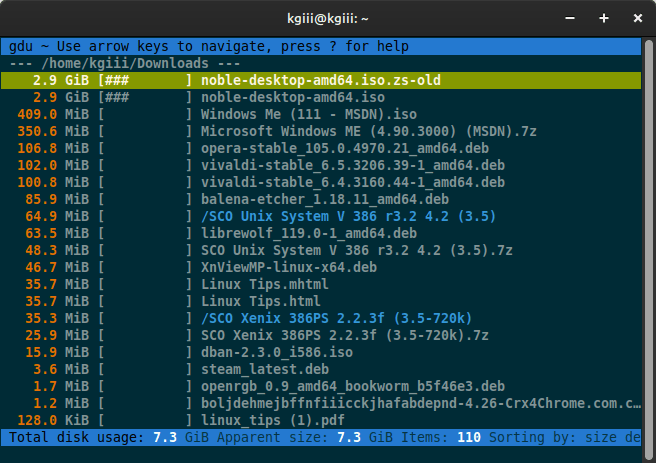
gdu ~/Downloads
An example output would look like this:
This is gdu in the terminal. You can probably figure it out from here. Yes, I have weird stuff.
You use your arrow keys to navigate. If you have any questions, press the question mark. There’s nothing advanced to it. If you wish to exit gdu, press CTRL + C and gdu will terminate properly.
Closure:
There you have it. You’re now using gdu to monitor disk usage. Well, you’re doing so in Debian-based distros. You’ll have to figure it out for your distro but they have packages and binary files available for others. It’s a pretty handy application, even though it’s not all that speedy.
Granted, as far as speed goes, I didn’t compare it with other applications. It doesn’t seem to be all that quick, but it does do the job as intended. It’s a handy way to visualize disk usage in the terminal and a tool worth testing.
Thanks for reading! If you want to help, or if the site has helped you, you can donate, register to help, write an article, or buy inexpensive hosting to start your site. If you scroll down, you can sign up for the newsletter, vote for the article, and comment.
This will be a fairly universal article, useful for various distros, for those who want to gather storage disk information with smartctl. This is not a very taxing article, and more could be written, but we’ll simply be using smartctl to gather basic storage device information.
Habit means I want to type ‘hard disk’. I’ll refrain from doing so. I guess I could call them ‘storage drives’ but I’m just going to call them ‘storage disks’, or ‘disk’ when I am referring to the singular.
This isn’t going to get you information about the health of your storage disks or anything like that. Depending on the disk, it will give you information about things like the physical size, trim status, serial number, RPM (for spinning disks), and things like that.
The tool we’ll be using is smartctl, but that’s installed by installing smartmontools. This is going to be an easy install for many distros and I’ll try to detail that as best as I am able.
smartctl:
The tool we’ll be using is smartctl and it’s a terminal-based application. This tool is useful for a variety of things. We’ll just be gathering basic information about our storage drives.
If you had smartctl installed already, you could check the man page. Doing so would reveal that the application is described like so:
smartctl – Control and Monitor Utility for SMART Disks
I suppose this could be considered controlling the drives (they’re not all disks anymore) but it’s definitely the tool for the job. Trust me on this! I wouldn’t steer you wrong, at least not intentionally. Oh, I do make mistakes, but they’re mostly harmless.
We’ve previously used this tool. Here’s a couple of articles for you:
So, in the weirdness of weirdness, if you want to use smartctl, you have to first install smartmontools. So, let’s cover that…
smartmontools:
First, you’re going to need to install smartmontools. We’ll cover how to do this, but it will be done via the terminal. You can use your GUI installer or you can (more often than not) just press CTRL + ALT + T and your default terminal will open.
With your terminal now open, pick the correct command to match your distro:
Debian/Ubuntu/etc:
1
sudo apt install smartmontools
OpenSUSE/SUSE/etc:
1
sudo zypper install smartmontools
RHEL/CentOS/etc:
1
sudo yum install smartmontools
Arch/Manjaro/etc:
1
sudo pacman -S smartmontools
If you use a mainstream distro, one of the above commands should install smartmontools and give you access to smartctl. There are other distros out there, but I think I’ve covered those appropriately.
Find Storage Information In Linux:
From here on out, the rest is pretty easy. With smartmontools installed, you can check the man page with this command:
1
man smartctl
The flag we’re interested in would be the
-i flag.
Before we go any further, we must first identify the disks we want to learn more about. For that, we’ll run the following command:
1
lsblk
Here’s an example output:
1
2
3
4
5
6
7
8
9
10
11
12
13
$ lsblk
NAME MAJ:MIN RM SIZE RO TYPE MOUNTPOINTS
sda 8:0 0 476.9G 0 disk
├─sda1 8:1 0 512M 0 part /boot/efi
└─sda2 8:2 0 476.4G 0 part /
sdb 8:16 1 58.6G 0 disk
└─sdb1 8:17 1 58.6G 0 part /media/kgiii/DISCOVERY
sdc 8:32 0 3.6T 0 disk
├─sdc1 8:33 0 991.1G 0 part /media/kgiii/elements1
├─sdc2 8:34 0 984.6G 0 part /media/kgiii/elements2
├─sdc3 8:35 0 976.7G 0 part /media/kgiii/elements3
└─sdc4 8:36 0 773.6G 0 part /media/kgiii/elements4
sr0 11:0 1 1024M 0 rom
We’re not interested in partitions. We’re just interested in physical disks. (Now that I’m this far through the article, I should have stuck with ‘drives’ instead of disks.)
If you pay attention to the output, you’ll see that the information we’re after is stuff like sda, sdb, or sdc. Those are all in the
/dev/ directory which means that we can check storage disk information with this syntax:
1
sudo smartctl -i /dev/<drive_ID>
Or, to provide an example…
1
sudo smartctl -i /dev/sda
This is a pretty good way to gather storage disk information. Here’s an example of the output from the previous command:
Copyright (C) 2002-20, Bruce Allen, Christian Franke, www.smartmontools.org
=== START OF INFORMATION SECTION ===
Device Model: TEAM T253X2512G
Serial Number: TPBF2006290040203664
Firmware Version: S1127B0
User Capacity: 512,110,190,592 bytes [512 GB]
Sector Size: 512 bytes logical/physical
Rotation Rate: Solid State Device
Form Factor: 2.5 inches
TRIM Command: Available, deterministic, zeroed
Device is: Not in smartctl database [for details use: -P showall]
ATA Version is: ACS-2 T13/2015-D revision 3
SATA Version is: SATA 3.2, 6.0 Gb/s (current: 6.0 Gb/s)
Local Time is: Tue Jan 16 21:46:59 2024 EST
SMART support is: Available - device has SMART capability.
SMART support is: Enabled
See? All sorts of information is available behind a simple terminal command! This is even something you can memorize in just a few minutes.
Closure:
I’m not sure when you’ll want to know this information, but it’s information and it is information that’s easily available to you. You simply need to install an application and run the commands listed above. I’m sure you can figure this out.
Thanks for reading! If you want to help, or if the site has helped you, you can donate, register to help, write an article, or buy inexpensive hosting to start your site. If you scroll down, you can sign up for the newsletter, vote for the article, and comment.