How To: Have A Proper Backup Of Your Data

In today’s article, we’re going to show you how to have a proper backup of your data. I’ve wanted to write this article for a while. Few people have a solid backup strategy and many people have no backup strategy at all. Read on while I try to share how to make a proper backup.

In the world of backups, you have some pretty extreme measures. On one hand, you have people who don’t backup any of their data. On the other hand, you have companies that are spending millions of dollars for constant incremental backups sent to disparate sources.

Somewhere between there is a ‘proper backup’. This is a backup of your data that’s reliable and inexpensive. It’s something you can do without investing a whole lot of money. It’s something you can do by just following a few simple rules.

For this exercise, we’re going to be using the ‘3-2-1 backup‘ method. After much research, and some pretty tragic data losses, I’ve concluded that the ‘3-2-1’ method is probably the best way to make a proper backup.

You can do this with any software you want. We won’t actually even discuss software in this article. You can use cut and paste, if you really want. The software process doesn’t matter for this article, oddly enough.

So then, let’s discuss this…

Decide What Data Is Important:

The first thing you need to do is figure out what data is important to you. 

For example, I don’t really backup any of the system’s files. I don’t do drive images. I never perform a backup of my operating system. Instead, I back up my personal files. (I haven’t hosed my OS in ages and I really don’t worry about doing so.)

I back up some text files that I’ve been working on for years. For example, I back up my pictures of friends, family, and locations. If anything, I back up more than I care to, because I’m kinda lazy in these regards. 

See, all I do is backup my /home/<user> directory, and all the directories and files within that directory. That’s it. That’s all of it. Doing it this way does mean I end up with stuff like my ~/Downloads being backed up needlessly, but disk space is cheap these days.

Why? I want my individual config and data files along with my personal files. So, I keep my home directory backed up. If the operating system fails, it’s just a few minutes to install the OS again – and another few minutes to move my backed up home directory to the fresh installation. That saves me all sorts of time configuring the new installation – which is typically done on a new device.

So, you need to decide what data is worth backing up. When you do that, you now need to learn about making a proper backup.

Decide Your Backup Frequency:

It’s up to you to decide how much data you’re willing to risk losing. You can’t sit there backing things up all the time (realistically, you can – if you’re using software to make constant backups in real time, but that’s computationally expensive and financially expensive).

Be realistic about this. You don’t need to be a hoarder in the physical world, and there’s no really good reason to be a hoarder of digital data. (I’m one to talk, one of the biggest bits of data I back up is my email – some of which is more than 20 years old!) I urge you all to be considerate when deciding what is worth preserving. If you’re never going to use the data again, there’s no reason to preserve it. If it can be easily recreated, you may not want to preserve it.

I would say that, as a general rule, I’m willing to lose a week’s worth of data – but I do have some redundancy. If it’s important, like family pictures, there will be the copy on the camera, a copy on external media, and a copy on the computer I’m using. Otherwise, I tend to do my backups once a week, usually on Sunday.

Everything else? Meh… Once a week is a good frequency for me. That’s been my effective schedule for a long time. Sometimes I’ll backup more frequently, because of a major change. Sometimes I’ll not have any special data and will let my backup schedule lapse a little.

This is a decision you’ll have to make. Which data requires redundancy?

Use 3-2-1 To Make A Proper Backup:

The 3-2-1 backup method is basically saying that you should have 3 backups at any one time. So, at any moment in time, you should have 3 backups.

You should have 2 copies of your data at your physical location. You have the one that is on the computer you’re using and another can be an external drive. (In case of drive failure.)

You should have 1 backup that’s off-site. You might think that a garage is a good spot and, for some people, it is. If it’s a detached garage, it’s unlikely to go up in flames if your house burns. But, what if there’s a flood? If there’s a flood, it’s likely to take out your garage at the same time it takes out your house.

Remember, these are the *important* files we’re concerned with. Think of all the worst eventualities and prepare for them.

If you have a friend that lives a distance away, swap disks with them every week/two-weeks/month. This way, you both have backups in separate locations.

Remember, the goal is redundancy. 

You can also use a safe deposit box at your bank. You can also set it up so that you can send your files to your friend’s house (onto your hardware) over the internet. Additionally, you can also use cloud storage. 

If you’re concerned about your private data being out there, learn to use encryption. Use your favorite search engine and learn how to encrypt your data. These days, it’s pretty easy. You can just compress your whole backup and encrypt that file, meaning it can’t be opened without the password.

Test Your Backup!

You need to verify that your backups are working. It is vital that you properly test your backups. In reality, you absolutely need to verify that your backup strategy is effective.

AN UNTESTED BACKUP IS NOT A BACKUP!

You don’t have to write the data back to your drive every time. After all, you have three copies to work with. But, you should consistently and regularly verify the integrity of your backups AND your recovery strategy.

After all, a backup by itself is nothing. You must also have a recovery strategy. That is, how do you get your data back after a catastrophic loss? How are you going to recover after a fire?

It could be as simple as downloading a disk image from the ‘net, to retrieving your drive from the garage and writing the data back to your new computer/fresh installation. But, if you haven’t tested that to ensure it’s working, it’s the same thing as having no backup at all!

For the umpteenth time:

RAID is NOT a backup!

Be Diligent:

A proper backup regimen requires diligence. Once you start on this path to making proper backups, you need to keep doing it. It’s up to you how often you do this, but you do need to adhere to a schedule – if you actually want the system to be effective.

You have a lot of choices to make. You get to decide all the things from frequency to location, from the data you want to preserve to storage devices you will use. We live in great times, as far as hardware is concerned. You can buy additional storage space for dirt cheap. Software choices abound.

Over time, you may find yourself having more confidence and reducing the types of files you that need redundancy. That’s not necessarily a bad thing. For example, you don’t really need to backup your desktop background image, but you do probably want to back up the last pictures you took before a family member passed away.

IMPORTANT:

You can exceed all of this. You can be more diligent. This can be improved upon, if you want to be even more diligent. Increased redundancy can be a great thing.

Think of this as the *minimal* backup strategy. The least you should have is 3-2-1 backup process listed in this article. It’s perfectly okay to have more than that. It’s perfectly okay to have multiple redundant off-site locations. It is absolutely perfectly okay to use both a buddy’s house and a reputable cloud storage company. You do need to be diligent, doing the backups as often as you’ve decided and doing that consistently. 

You get to make all those decisions. They’re your decisions to make. The value of your data should dictate your level of redundancy. The value of your data should dictate your frequency. Find the software that works for you, the locations that work for you, and the file types that you feel need to be preserved.

Closure:

There you have it. You now know about the 3-2-1 backup method. There are other sites that cover this, but I wanted to share it with my readers here and in my own way. It seems important that my readers know how to have a proper backup strategy.

Also, I’ve been meaning to write this article for a while, but I knew it was going to be pretty long. As you can see, this one is definitely one of the longer articles. I hope you enjoyed reading it as much as I enjoyed writing it – but I mostly hope you take this information to create a proper backup process that provides the redundancy you’ll need should you suffer catastrophic data loss.

Hopefully, this is also going to be a useful link for when we see people who have failed to backup their systems and now are facing data loss due to making that decision. Yes, they made a decision to not back up their data. If they didn’t back up their data, they either listened to bad advice or didn’t listen to good advice. Ideally, this link will point ’em back in the right direction.

Thanks for reading! If you want to help, or if the site has helped you, you can donate, register to help, write an article, or buy inexpensive hosting to start your own site. If you scroll down, you can sign up for the newsletter, vote for the article, and comment.

A Little About The ‘lscpu’ Command

In today’s article we’re going to do what the title says, we’re going to learn a little about the ‘lscpu’ command. We’ll just touch the ways you’re likely to use ‘lscpu’ and that’s it. Then again, there’s not much more to it than that, so it’s going to be easy enough for a new Linux user to understand. You’re invited to read on…

As mentioned in the last article, and in the article before that, I’m going to take some time to cover some of the basic commands. However, I’m going to try to intersperse them, that is mix them up a bit, so that it’s not too boring for myself and my regular readers who are beyond this level.

The first of these articles was:

A Little About The ‘lsusb’ Command.

This article will cover ‘lscpu’. If it’s not obvious, this command will list information about your CPU. In fact, the man page describes ‘lscpu’ like:

lscpu – display information about the CPU architecture

And, sure enough, that’s the information we’re after in this article.

Of course, this is another command that gets run in the terminal. It’s an application that comes with ‘util-linux’ and is something you shouldn’t need to install. You should be able to use the ‘lscpu’ command without installing anything. So, there’s that…

Rather than drag the intro out, let’s just jump into it…

About The ‘lscpu’ Command:

As I mentioned in the intro, ‘lscpu’ is a terminal command. Of course, this means you need an open terminal. You should open one now. If you don’t know how to open your terminal, just press CTRL + ALT + T and your default terminal should open.

With your terminal now open, simply run the ‘lscpu’ command:

Tada! You have all the information you really need to know about your CPU – and quite a bit more information. So, let’s see what else we can do with the ‘lscpu’ command.

Let’s say you want some extended information. You can go about that with the -e flag. That’s easy enough to do, a simple command. It looks like this:

The outcome from that command would probably look a bit like:

the output of lscpu
As you can see, this CPU isn’t anything all that fancy. It’s effective and efficient!

As you can see, there’s nothing too fancy there.

You can actually select the fields you want to output from that command. For example, you can see the CPU and the CORE fields like this:

The only other way you’re going to use ‘lscpu’ is likely to be with grep. For example, if you want to know what architecture your CPU supports, you can run this command:

There’s more to ‘lscpu’, but you’re not likely to really need it for anything. If you do need more from ‘lscpu’, you just check the man page like so:

The man page should help you with anything more than what’s covered in this article. There’s not all that much more that’s useful, we’ve at least examined the ‘lscpu’ command.

Closure:

Yup, there’s another article. This article does what it attempted to do – which is share the most useful ways to use the ‘lscpu’. If you find yourself in a position where you need fairly detailed CPU commands, then ‘lscpu’ is the command you’re looking for.

Thanks for reading! If you want to help, or if the site has helped you, you can donate, register to help, write an article, or buy inexpensive hosting to start your own site. If you scroll down, you can sign up for the newsletter, vote for the article, and comment.

Control Your WiFi With ‘rfkill’ And More

In today’s article, we’re going to learn how to control your WiFi with ‘rfkill’ and we’ll be learning a bit more than that. I think you’ll find ‘rfkill’ to be a nifty and useful terminal-based command to learn. Is this article appropriate for a beginner? Maybe? Maybe not? I’ll do my best to make it approachable for anyone at any level.

By the way, I’ve decided to intersperse the articles about simple commands like ‘lsusb’. I don’t want to bore my more advanced readers – and I don’t want to bore myself. I’ve decided to make the time necessary, even though I’m pretty busy. I’ll be busy for a little more than a week. (Ask me in private, if you want.)

Anyhow, you should learn about ‘rfkill’, as it’s a pretty handy tool for controlling your wireless. If you look at the name, there should be some indication that it’s actually more than just WiFi. You can use ‘rfkill’ to manage Bluetooth, for example. Bluetooth is also wireless communication. As such, you can use ‘rfkill’ to manage that as well.

So, what is ‘rfkill’? Let’s see how the man page defines it:

rfkill – tool for enabling and disabling wireless devices

See? It says what you’d expect, assuming you read the previous paragraph. The title only mentions WiFi, but that’s really due to space and convenience. You can use ‘rfkill’ to manage both WiFi and Bluetooth. Pretty handy, huh?

Well then, let’s just get the party started…

Control Your WiFi with ‘rfkill’:

Sure enough, you use ‘rfkill’ in the terminal. On Linux-Tips.us, we do a whole lot of stuff in the terminal. So, open your terminal now. If you don’t know how to open your terminal, just press CTRL + ALT + T and your terminal should just pop open.

With your terminal now open, let’s first gather some information:

The output should look a little bit like this, or a lot like this:

gathering information with rfkill
The output should be fairly easy to understand for my delightful readers! I have faith in you!

The information you’re after “ID,TYPE-DESC,SOFT,HARD” is easy to understand. 

The first column is the ID number and the second column is a description of the device. The third column is if there’s a ‘soft block’ on the device, and the fourth column is if there’s a ‘hard block’ on the device.

If you see a ‘soft block’, that’s when there’s some software that disabled the device. A ‘hard block’ is when there’s a hardware block on the device. If it is soft blocked, you’ll need a software solution to turn it on – like ‘rfkill’.

Additionally, when you see a ‘hard block’, it means there’s probably a physical switch (often an Fn + F* key combination, perhaps labeled something like ‘Airplane Mode’) that is keeping the device powered off. You need to physically enable the device to make it work.

Importantly, the ‘rfkill’ application can do nothing about a hard block. But, it can do something about a soft block. If you want to unblock WiFi, try this:

Using my computer’s output, to unblock the WiFi the command would be:

You can also unblock with the description. To unblock the WiFi with the description looks like:

Of course,  you can also do the opposite. Instead of ‘unblock’ you would use ‘block’. That means the opposite of the above command would be:

If you want, you can also just ‘toggle’ the devices. When you toggle it, it turns off if it was on – and it turns on if it was off. You do that with the ID. If I wanted to toggle the wireless, the command would look like:

That will turn my WiFi off (if it was on) or it will turn my WiFi on (if it was currently turned off). See? It’s pretty simple!

Well, I hope I’ve made it simple. If it’s not simple, I hope it’s at least approachable. Like always, feel free to drop a question as a comment. If I don’t have an answer, I’ll try to direct you to someone who does.

Also, don’t be afraid of the man page. There’s a lot more to ‘rfkill’ than I’ve covered in this article. We’ve mostly just scratched the surface. To check the man page:

That’ll give you all the information you want. Plus, I’m sure others have authored pages that will go into more depth. We tend to not do too much of that here. I just want you to be up and running, not Linux gurus. If you want to be a Linux guru, you’ll need a whole lot more than just this site!

Closure:

Well, I’m glad you made it through today’s article. I tried to keep it nice and simple, simply showing you a way to control your WiFi with ‘rfkill’. But, there’s more to it, including Bluetooth. I like to think I’ve made this approachable for even a new user, but maybe not…

Again, feel free to comment about this. Is it easy enough for a new person? How about a new person coming from a Google search? Is it easy enough for a novice, someone completely new to computers? (Probably not, but let me know what you think. Thanks!)

Thanks for reading! If you want to help, or if the site has helped you, you can donate, register to help, write an article, or buy inexpensive hosting to start your own site. If you scroll down, you can sign up for the newsletter, vote for the article, and comment.
A Little About The ‘lsusb’ Command.

Today’s article will not be all that long or all that complicated, as we’ll just be learning a little about the ‘lsusb’ command. It seems like a good idea to cover it now, early in the year. I’ve been meaning to get to writing this article for a while.

Over the next few days, you will probably see some similar-looking articles. This is just the start. There are other similar commands and we’re going to cover those. Many of my readers will know some (or all) about these commands, and that’s okay. After all, our goal is getting people up to speed.

Today’s command will be the ‘lsusb’ command. If you check the man page, it’s described accurately – like so:

lsusb – list USB devices

As you can see, you use the ‘lsusb’ command when you want to learn about your system’s USB buses and the devices connected to them. You shouldn’t need to install anything. The ‘lsusb’ application is almost certainly available by default.

We probably won’t be covering all the ‘lsusb’ options. We’re just going to cover those options that you’re most likely to use. There’s always the man page for when you want more options. There’s really no need to get to deep in an article like this.

About The ‘lsusb’ Command:

The ‘lsusb’ command is a command that’s run only in the terminal. So, of course, you’ll need to have an open terminal available. If you just press CTRL + ALT + T and your default terminal should open. Tada! It’s pure witchcraft!

With your terminal now open, the simplest form of ‘lsusb’ is to just run the command without any flags. Like so:

You’ll likely get an output similar to this:

output from the 'lsusb' command
This is just the ‘lsusb’ output from a handy laptop. It’s pretty basic, with nothing connected.

As you can see, it’s not always just the actual USB ports on the side of your device that are USB devices. In the above screenshot, you can see that the wireless card, webcam, and Bluetooth devices are all on the USB bus. They’re not actually connected to a physical USB port, they’re just using the same underlying tech without actually having physical ports.

There are other things you can do with ‘lsusb’, like view the output in tree format. This is great if you’ve got things like USB hubs with things attached to them. It’s good organization and the command is simply:

The only other ‘lsusb’ command you’re likely to use is the ‘verbose’ mode. Like oh so many other applications, that’s the -v flag. The command looks like:

This is not to be confused with lsusb -V – which will show you the version. If you do that, you’ll also learn that the ‘lsusb’ command is a part of the ‘usbutils’ package. 

There’s not all that much more to the ‘lsusb’ command. Those are the ‘lsusb’ commands I’ve found myself using more than any others. They’re also the most used commands I’d ask a user to run when diagnosing a problem with their USB devices. If you want, you can learn more by checking the man page:

There’s more information in the man page about running the ‘lsusb’ command. Feel free to check it out and ask any questions needed.

Closure:

I’m going to cover some pretty basic stuff in the next few articles. I may intersperse them with other articles, so that folks don’t get bored. Don’t be bashful, leave a comment or two if you want. I love getting new comments and the site’s starting to grow quite nicely. Get your comments in early!

Thanks for reading! If you want to help, or if the site has helped you, you can donate, register to help, write an article, or buy inexpensive hosting to start your own site. If you scroll down, you can sign up for the newsletter, vote for the article, and comment.
How To: Access Tor While Using T-Mobile

Today’s article is going to be a fairly trivial article, one aimed at specific people, where you’ll learn how to access Tor while using T-Mobile. This article might be easy enough for a new user, so there’s that. Even if you’re not using T-Mobile, if your access to Tor is blocked, this article might get you sorted;

Where to begin?

Well, Tor stands for ‘The Onion Project’, which is a way to browse the internet in a more anonymous fashion. If you’re unfamiliar with Tor, it’s easiest if you just read the Tor history page.

Basically speaking, the Tor browser is a more secure way to access the Onion network. It’s a way to stay fairly anonymous online, but nothing is completely secure – so keep that in mind. You use the Tor browser (based on Firefox) to browse dark web sites with .onion domain names and have a good chance at anonymity if you stay within the .onion network.

I’ve lately used a phone as a mobile hotspot. The provider is T-Mobile. For reasons known only to them, T-Mobile blocks Tor, preventing it from connecting. At the same time…

There are some underground ‘hacker’ forums that I like to monitor. As T-Mobile is blocking access to that site, I had to figure out how to access Tor while using T-Mobile. It took a few tries, but I have now figured it out. I write this article to save you some time and me some memory…

Access Tor While Using T-Mobile:

First, you’re going to need the Tor browser (though you could manually mess around with connecting and then use another browser). You can download the Tor project browser here. If you’re unfamiliar and using Linux, you don’t actually install the Tor browser (unless you want to), you just extract it and use the shortcuts the archive includes. However, the Tor browser project is where I’d go and I’d adhere to their defaults.

Now, try as hard as you want to connect…

T-Mobile isn’t going to allow you to connect and access Tor. If you follow these directions, you probably violate T-Mobile’s ToS, you can work around it. In my case, I used NordVPN – but any free proxy that lets you set the connection manually will let you do the same. To be clear, I am using NordVPN as a proxy.

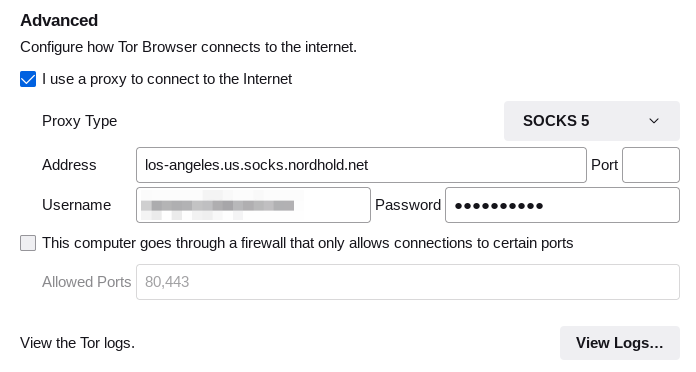
Open the hamburger menu. Select the Support option. When you open Settings, the Tor settings section should be the first section  you see. That’s good, it will save a lot of time. All you need to do is configure your VPN to work like a proxy. That’s pretty easy. So is finding a free proxy service.

I tried the bridge options and none of those worked. So, instead I decided to use the VPN option. Sure enough, that worked! So, find a free proxy (or VPN) that you can configure manually, You should check your paid VPN settings as they should let you manually configure it like a proxy. You can also try any one of the zillion free proxy lists out there.

Try this:

change the settings and use your VPN like a proxy.
Check your VPN provider for a ‘proxy’ setting and use that.

Be sure to set the proxy type correctly. If your VPN is even a little modern, SOCKS 5 is likely to be what you want. You should end up with something that looks like this:

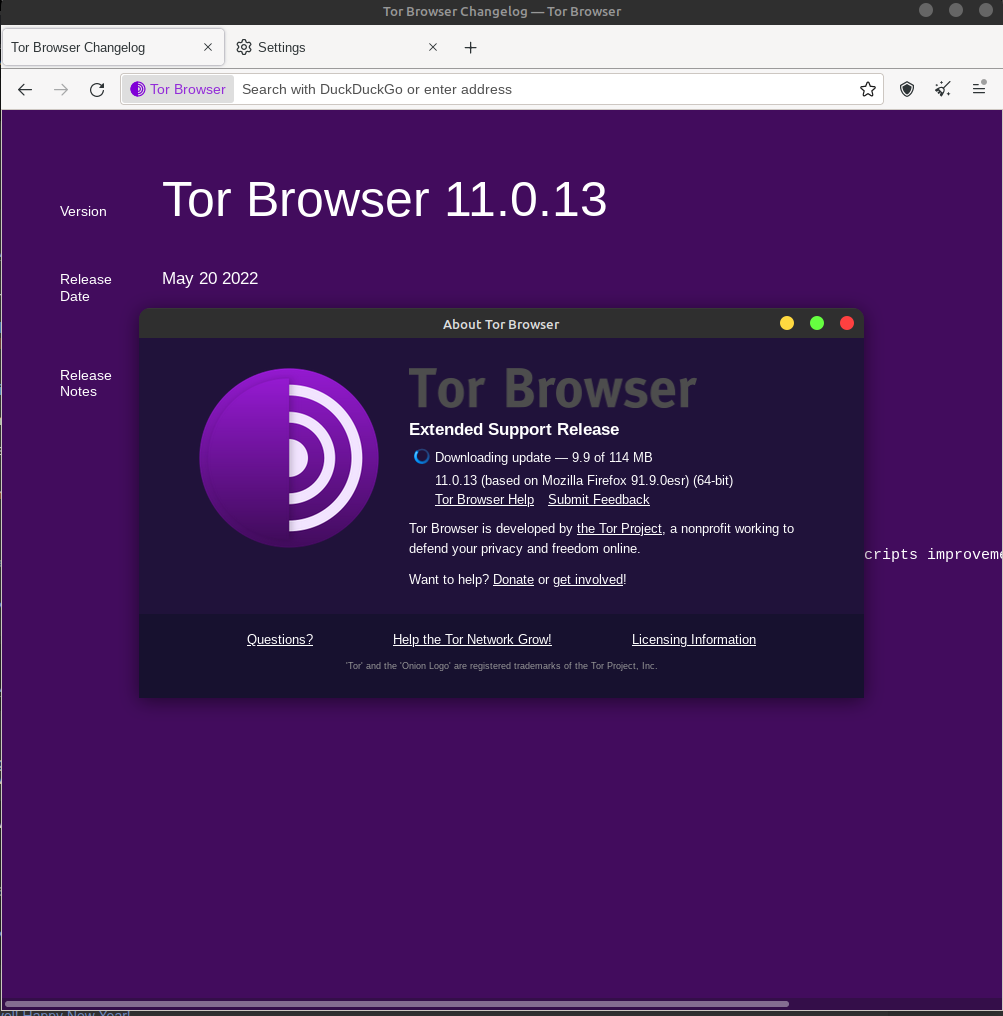
Tor browser connected with T-Mobile
You can indeed use Tor with T-Mobile. You can access Tor while using T-Mobile.

Also, you may need to reload Tor or grab a new identity, and then just be patient. Wait a minute to access Tor while using T-Mobile, as it can be a little slow. Adding the proxy means another layer, so it can take a little while longer. Plus, Tor has never been known for speed.

Closure:

There you have it, but you’ll only find this useful if you are wanting to access Tor on T-Mobile. This should work the same regardless of what OS your using. This article should work for Windows users, actually. If you want to access Tor while using T-Mobile, just use a proxy.

Thanks for reading! If you want to help, or if the site has helped you, you can donate, register to help, write an article, or buy inexpensive hosting to start your own site. If you scroll down, you can sign up for the newsletter, vote for the article, and comment.

Linux Tips
Creative Commons License
This work is licensed under a Creative Commons Attribution 4.0 International License.