Let’s Decompress A File (tar.gz) In The Terminal

Pretty much every Linux user has to look up how to decompress a file in the terminal. Ask them to do it by rote and they’ll balk, but it’s actually pretty easy. Heck, there are entire jokes and comic strips dedicated to it. The thing is, it’s actually pretty easy and this article is going to show you how.

The tool we’ll be using for this is called ‘tar’ and the man page helpfully describes it like this:

tar – an archiving utility

If one is curious, the .gz is for gzip. It’s both a file format and a compression utility. The .tar is a container for multiple files. Its name comes from tape archive, where one would store multiple compressed files in one file. Think of it as a container for .gz files, if that helps.

Today’s article is meant to be REALLY basic, so we’re only going to approach this with the tar command. The only goal of this article is to teach you how to decompress a .tar.gz from the terminal. (There are a dozen GUI ways to do this, but not all systems have a GUI available.)

Decompress A File:

This article requires an open terminal. You can do so with your keyboard – just press CTRL + ALT + T and your default terminal should open.

You’ll also need a .tar.gz, but I’m going to assume you already have. If you don’t have one, you’re bound to reach that eventuality so long as you continue to use Linux. It’s a preferred file distribution format for things like source code. 

Anyhow, it’s really simple. Navigate to the folder where your .tar.gz file exists and run the following command:

You really only need to remember the vzf. In order, those stand for verbose (tells you what’s going on), z (decompress the files inside), and f (means the name of the file you’re working on).

The x flag means extract and we’ll get back to that in a moment.

You can even tell tar to extract the files in a specific directory. That’d look like this:

But, that’s not too terribly important, so long as you clean up after yourself and don’t leave a bunch of clutter. 

Let’s get back to that x flag. See, if you want to go the other way, that is to compress some files, you just change the x to a c.

In this case, we’re only to cover compressing all the files in a specific folder. That’s a little something like this:

So, really, you only need to remember the “vzf” and x for extract or c for compress. That’s the basics of decompressing a file in the terminal. There are a zillion possible combinations and the man page for tar is about a mile long.

In the vast majority of cases, those are the only two ways you’re going to use the command. If you need something more specific, check man tar.

Closure:

And, there you have it. You have the very basics on how to decompress a file from the terminal. There’s a lot more to the tarball but we really don’t need to cover that. If you need more, there’s the manual – but you probably won’t need more than that.

Thanks for reading! If you want to help, or if the site has helped you, you can donate, register to help, write an article, or buy inexpensive hosting to start your own site. If you scroll down, you can sign up for the newsletter, vote for the article, and comment.
Let’s Learn About Halt

Today’s article is about the halt command. The reason we’re writing about the halt command today is because I was halfway through another article before I realized I’d already written an article on that subject. So, this is going to just be a nice, easy article.

And, yes, yes I did write more than half of an article that I’ve already written. I ain’t even intoxicated!

The command we’re looking at using today is called ‘halt’. For such a little command, here’s an interesting post about the difference between halt and shutdown. And, if that’s not enough, you can read the other answers and comments on that page. 

Anyhow, halt is described like this in the man page:

halt, poweroff, reboot – Halt, power-off or reboot the machine

Of those three, we’ll just be covering the halt. Yes, the man page contains all three in just one page. They’re all related. As I said, we’ll just be covering the useful features of halt command today.

And, without further ado…

The Halt Command:

This article requires an open terminal, like many other articles on this site. If you don’t know how to open the terminal, you can do so with your keyboard – just press CTRL + ALT + T and your default terminal should open.

Once you have the terminal open, the first use of halt would be just to halt the system:

That will halt your CPU. It probably won’t shutdown your computer all the way, it will just stop it. So too won’t the -f (force) flag. If you force it, it just stops the CPU. It looks like and requires sudo:

Finally, of the options we’ll cover, is the -p flag, and the -p stands for poweroff. It’s just another way to shut down your computer, and it obviously looks like this:

Those are about the only ways you’re ever going to use it, if you use it at all. It’s not a command that you’re likely to bump into but now you know it exists and how to use it.

Closure:

There you have it, another article. This one covers the halt command in Linux. It’s not a major article, but I needed one in a hurry – just to ensure there’s one scheduled. While my health is mostly returned, I’m still not so caught up that I have a bunch of extra articles. Feel free to step up and write one or two!

Thanks for reading! If you want to help, or if the site has helped you, you can donate, register to help, write an article, or buy inexpensive hosting to start your own site. If you scroll down, you can sign up for the newsletter, vote for the article, and comment.

Want To See The WiFi Password In The Terminal?

It’s remarkably easy (assuming one can gain access to a privileged account) to get the WiFi password from the terminal. It does generally require sudo or root. It’s literally three commands. It’s the kind of attack you’d possibly worry about in an office where you don’t regularly log out of your device when you leave it. It might be an akin to attack from the ‘evil maid‘, as well, but not just quite. 

It really requires only two pieces of knowledge. The first is how to gain elevated permissions on the device and the other is the name of the network device – usually easy enough to surmise. It’s pretty easy information to get under those circumstances – circumstances we may all have been guilty of. Perhaps we typed a sudo command and then walked off to get coffsssee while it updated itself? Who knows – but it’s really just that easy.

Is it a security issue? Not if your security is any good, it isn’t. But, if anyone has physical access to the device, they pretty much own the device. If your security is any good, nobody should get this far and internal practices would prevent fellow employees from doing much harm. I could speak for hours about security, I just can not seem to do it coherently. 

Anyhow, here’s how you view the wifi password in the terminal.

WiFi Password From The Terminal:

Obviously, you need an open terminal. Just press CTRL + ALT + T and your default terminal should open.

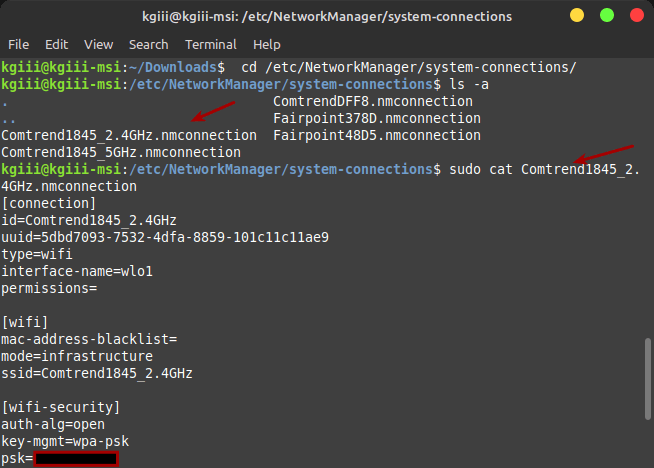
First, you must change to the directory where this sort of information is stored. 

Find the network name (SSID)… You can usually guess that, or narrow it down rapidly on sight, but you can also just find the SSID by typing iwgetid Either way, just enter this:

The password will be happily shown to you in plain text. I’m not even kidding. This is what the whole process looks like and shows you how easy it is:

I am elite hackor!
Tada! There it is in plain ol’ text, easily captured and saved away.

Obviously, I knew the sudo password – I’d have easily figured out the rest. Even if I didn’t, there really weren’t all that many choices and a little tab completion goes a long ways. It’s a good example of why you should lock your screen and logout of your computer if you’re going to be away from it. (Of course, there’s always a risk vs reward thing and it probably doesn’t really matter to most of us.)

Closure:

There you have it! You can now find the WiFi password from the terminal. This shouldn’t ever be a risk, because you already practice good security. But, it’s a fun little trick to know. It doesn’t take a whole lot of effort and it makes for another article. Another one is written and done!

Thanks for reading! If you want to help, or if the site has helped you, you can donate, register to help, write an article, or buy inexpensive hosting to start your own site. If you scroll down, you can sign up for the newsletter, vote for the article, and comment.

Monitor Network Usage On A Per-Application Basis

Today’s article is going to tell you how to use Nethogs to monitor network usage on a per-application basis. It’s actually easier than one might think and we’ll even show you how to install Nethogs on a variety of distros.

Why would you want to monitor this? Well, you may want to know which applications are eating up most of your bandwidth. Not everyone has unlimited bandwidth after all. You might also be looking for rogue applications/malware that’s using up some of your bandwidth. There are all sorts of reasons to monitor your network usage at this level. Feel free to leave a comment telling us how you intend to use Nethogs.

As stated, we’ll be using Nethogs. The man page describes it as:

nethogs – Net top tool grouping bandwidth per process

I suppose that’s mostly useful to those who know what ‘top‘ is. (There’s a future article about top and htop, when I get to it.) But, Nethogs is like a system monitor, except it’s a network monitor with some visual similarity with top. (Yes, that’s an ugly, ugly sentence.)

We’ll be using ‘sudo’ for all of these commands. It’s possible to use Nethogs without sudo, but we won’t be covering that here. If that’s something you’re interested in doing, a search engine will help you get there.

Monitor Network Usage:

Nethogs is a terminal-based application. As such, you’ll need an open terminal. Just press CTRL + ALT + T and your default terminal emulator should open right up.

Once your terminal is open, you can go ahead and install Nethogs. Pick the command that works with your system’s package manager.

Debian/Ubuntu:

RHEL/CentOS (will need to enable EPEL):

Fedora:

Arch/Derivatives: 

Once you have Nethogs installed, you can check the help files. In this case, the help files are better than the man files (I think) so just enter the following into your terminal:

Now, to run Nethogs, we’ll use sudo and just run it in the terminal. Believe it or not, this mode is generally just fine for anything you’re going to do.

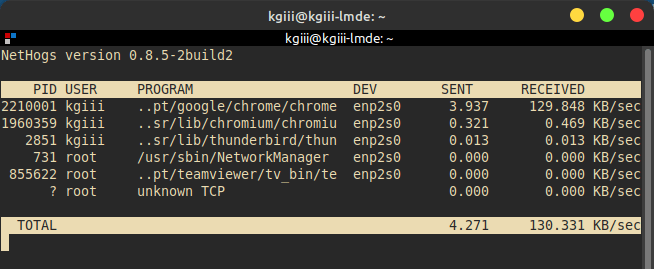
That’ll open Nethogs and start monitoring your network usage on a per-application basis. It looks something like this:

Nethogs running in the terminal.
As you can see, bandwidth monitoring on a per-application basis. Tada!

Now, if you’re going to leave it open, you can change the refresh rate. That’s done with the -d <seconds> flag. If you want it to refresh every 15 seconds, your command would look like this:

By the way, if you want to exit Nethogs, you just press Q and it closes – like top and htop do.

If you want, you can specify the network interface you want to use. It doesn’t require any flags, just the network interface name. (Read Also: how to change your network interface name.) An example of that command would be:

While the application is running, you can do some sorting/display changes with the M, R, and S keys. But it’s usually not all that complicated and sorting isn’t needed. If you’re dealing with hundreds of collections, then you may want to start sorting. Really, that’s about all you’ll ever need.

Closure:

And there you have it! You have another article to read. This one is about monitoring your network usage on a per-application basis, a pretty handy skill/tool to have. It’s pretty easy and the output is clear enough for all but the newest Linux users. If you find the tool useful, or already use the tool, please feel free to comment.

Thanks for reading! If you want to help, or if the site has helped you, you can donate, register to help, write an article, or buy inexpensive hosting to start your own site. If you scroll down, you can sign up for the newsletter, vote for the article, and comment.

Upgrade Ubuntu From The Terminal

Today’s article will show how to update and upgrade Ubuntu from the terminal. Of course, this will work on any system that uses apt, including Debian, Lubuntu, Linux Mint, etc… You can always upgrade when the GUI tells you to, but you can do it manually on your own time.

Once in a while, I come across someone who refuses to upgrade. This is a bad idea. Upgrades include things like security upgrades and they’re pretty much mandatory. It’s Linux, so you don’t “have to”, but it makes you a bad netizen because those security upgrades may very well mean your computer is being used as a spam relay or, worse, a part of a botnet.

So, please, upgrade your Ubuntu systems – and, really, all Linux boxes should get regular upgrades. I can’t emphasize this enough! Upgrade your system – if not for you then for the rest of us who have to deal with enough internet hostility. Malware exists for Linux, as does exploits for Linux and the software you have installed. Even if you don’t care about your own experiences, care about the rest of the people on the ‘net. Thanks!

For this article, we’ll be using apt. Apt is apt-get in disguise, but not quite the same. If you’re scripting you use apt-get, because it’s more stable. When you’re running commands yourself, use apt because it’s faster/easier. 

This article should be pretty quick and easy.

Upgrade Ubuntu From The Terminal:

Obviously, this article requires an open terminal. You can open one with your keyboard – just press CTRL + ALT + T and your default terminal should open.

Once you have your terminal open, we’ll go ahead and update the database (the cache) to see if any upgrades are available. To do that, you run:

It’ll tell you if upgrades are available and give you some more information – such as telling you how to see which application upgrades are available. In this case, we’re just going to upgrade everything. Like so:

That is sometimes interactive. It will want you to agree manually to the upgrades. You can just skip all that by adding a -y flag. Even better, you can now string both commands together and save some time monitoring the terminal. That command, and I use this pretty much exclusively by way of alias, is:

The && means that the next command will only run if the first has been completed successfully. You can even add autoremove to this string of commands and keep things a little cleaner automatically.

The autoremove will “remove packages that were automatically
installed to satisfy dependencies for other packages and are now no
longer needed as dependencies changed or the package(s) needing
them were removed in the meantime.” You might as well include it, as it’s pretty harmless and will save you some disk space.

Finally, there’s full-upgrade which is quite similar to the old apt-get dist-upgrade, in that it will upgrade you to a new release if both a new release is available and your settings are to upgrade to new releases (instead of staying on a LTS branch, for example). You’ll find that full-upgrade is also capable of deleting unneeded files all on its own.

To use full-upgrade, you’d still run the update first and then run the command. You can also pack them together, like so:

And there you have it. That’s about all you really need to know about upgrading Ubuntu from the terminal. It’s not hard, so just do it. Yeah, once in a blue moon it breaks something. That’s usually easily fixed and the risk is worth the benefits – to you and the rest of the internet.

Closure:

I can’t emphasize it enough – do your upgrades regularly. Now you know how to upgrade Ubuntu from the terminal, which is something I naturally do out of habit. I actually have it aliased to the ‘update’ command and it takes care of all that for me. I can’t remember the last time it broke anything – but it has to have been multiple years ago. Breakage isn’t a real risk, as things are usually heavily tested.

Thanks for reading! If you want to help, or if the site has helped you, you can donate, register to help, write an article, or buy inexpensive hosting to start your own site. If you scroll down, you can sign up for the newsletter, vote for the article, and comment.

Linux Tips
Creative Commons License
This work is licensed under a Creative Commons Attribution 4.0 International License.