Visualize Your Network Traffic With ‘darkstat’

Today’s article is a fun one, an article where you’ll learn how to visualize your traffic with darkstat. It’s a fun little tool that lets you graphically visualize your network traffic in your browser. While it’s likely more of an enterprise-level tool, there’s no reason you can’t use it as a home user.

So, if you’d like to learn how to visualize your traffic with ‘darkstat‘, read on and I’ll do my best to explain it. 

There’s a lot to the tool, but darkstat defines itself in the man page as:

darkstat – network statistics gatherer

We’ll only be using darkstat to visualize your network traffic in the browser, but there are quite a few options available. You’ll want to check the man page after you’ve got darkstat installed and have learned its basic usage.

I’ve previously covered tools like VNstat, which lets you monitor your bandwidth usage. You can even helpfully draw some graphs with the tool. This is quite different. You’ll see…

Visualize Your Network Traffic With ‘darkstat’:

This article requires an open terminal, like many other articles on this site. If you don’t know how to open the terminal, you can do so with your keyboard – just press CTRL + ALT + T and your default terminal should open.

First, you need to install darkstat. It should be in your default repositories for many of you. To save time, I’ll show you how to install it in Debian/Ubuntu-based distros. Just adjust the command to suit your system’s package manager:

With darkstat now installed, you need to start it – so that it monitors your network traffic. To do that, you’ll need to know the name of your network interfaces. It just so happens that I wrote that article last time:

How To: Show Your Network Interfaces

Armed with that data, you want to start darkstat and the format is:

So, for example, you might end up with one of the following commands:

Or maybe this type of command for a wireless connection:

After running that command, you’ll then want to open the following URL with your preferred browser:

http://0.0.0.0:<port_number>

If you used the port above, you’d connect to:

http://0.0.0.0:8080

The results should look something like this:
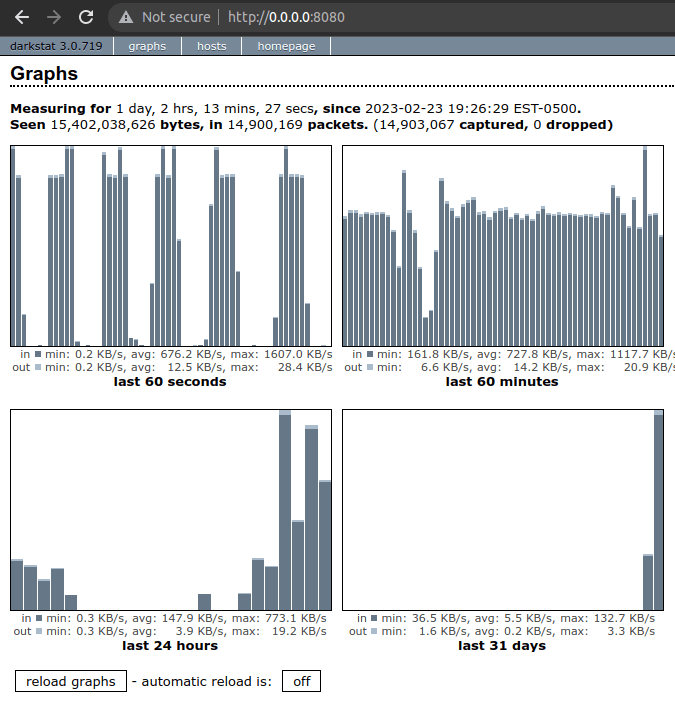
darkstat in operation
The output of the graph should be easy enough to understand.

You can also opt to see the hosts, those servers you’ve connected to, by simply clicking on the ‘hosts’ link. That’d look something like:
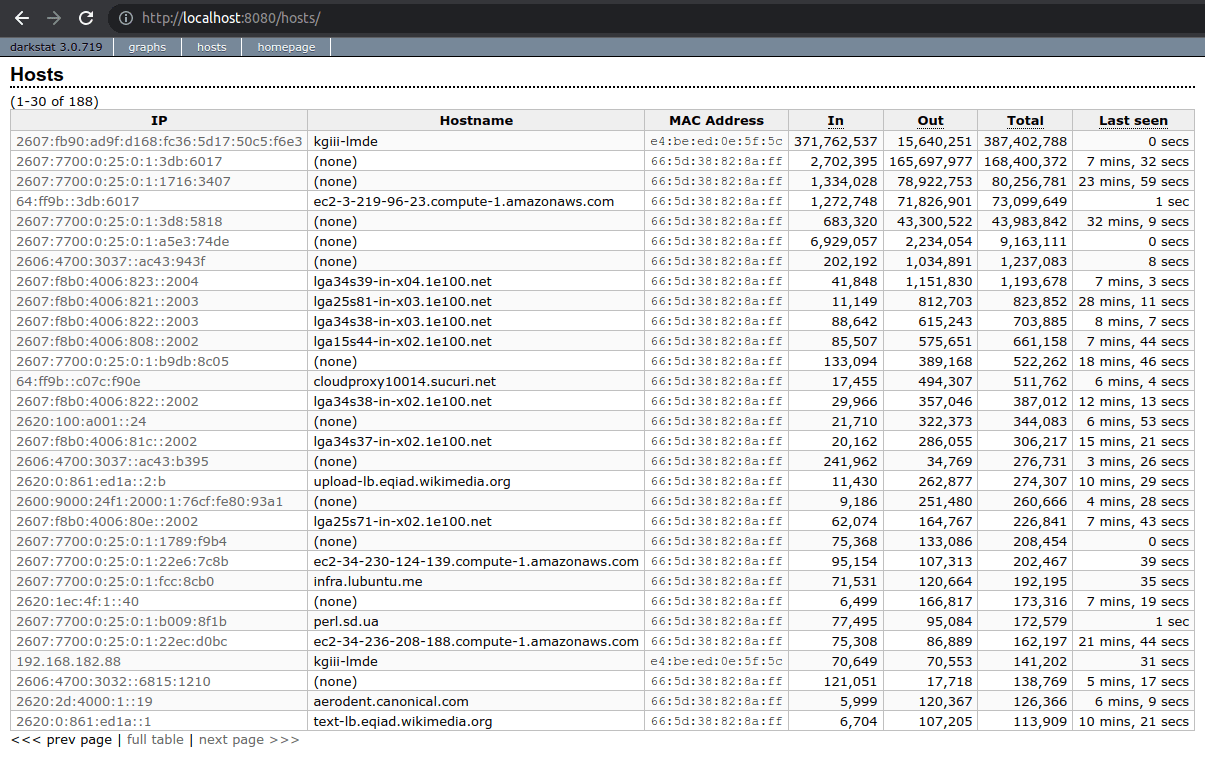
 

darkstat in action, showing the hosts
As you can see, this one shows the hosts you’ve connected to.

The darkstar application will run quietly in the background. It’ll keep running until you tell it not to. One way to kill darkstat would be:

As I mentioned above, darkstat has a number of different options. There’s a bunch more to it, but this is about all your regular user will need to visualize their network traffic. Of course, run man darkstat to view those options.

Closure:

There you go. You have another article, this one less short than the recent articles. I am not well, but I presume I will be. In the mean time, we’ll continue to have articles for as long as I’m able. This time, we learned about how you can visualize your traffic with darkstat. Who knows what the next article will be about.

Thanks for reading! If you want to help, or if the site has helped you, you can donate, register to help, write an article, or buy inexpensive hosting to start your own site. If you scroll down, you can sign up for the newsletter, vote for the article, and comment.

Another Way To Find The Binary For A Specific Command

In today’s article, we’re going to learn another way to find the binary for a specific command. This won’t be a very difficult article. It’s an article that will be easy enough for even new Linux users to follow. So, if you want to find the binary for a specific command, read on!

You’ll find some similarities between today’s command and the ‘which’ command, which we used in this article:

Find A Command’s Binary

Well, we’ll use the ‘whereis’ command in this article. The man pages for the ‘whereis’ command describe it ‘whereis’ thusly:

whereis – locate the binary, source, and manual page files for a command

You may recognize the command, as we’ve used it to find the man pages for a specific command. In that article, we discussed the possibility of using the ‘whereis’ command to do just this, but I feel it deserves its own article. The first article merely mentions the possibility, so an article specifically discussing this command’s use like this makes perfectly good sense to me.

So, let’s learn another way to…

find the binary For A Specific Command:

As you might have guessed, the ‘whereis’ command is a command used in the terminal. As such, you’ll need an open terminal. Just press CTRL + ALT + T and your default terminal should open.

Now, with your terminal now open, you can try to find the binary for a specific command. Let’s say you want to find the binary for ‘grep’. Then the command would look like this:

The output of which would look a whole lot like this:

whereis command finding the binary for grep
Where is grep? There it is! This will probably not work for Waldo. Or Carmen Sandiego. 

The extra fields are where the man page and info pages are located, and the first field is the path to the binary in question. So, if you want to find the binary file for Firefox, the pattern is:

So, for Firefox specifically, you’d run:

However, if you just want to find the binary for the specific command, you’d use the -b flag. That’s all you need to do in this case. It looks like this:

And that will output just the binary file’s location without the additional fields of man pages and info pages. See? It’s pretty easy after all.

Closure:

Well, there’s another article. This time around, we’ve learned another way to find the binary for a specific command. It’s another article in a long list of articles, indeed a growing list of articles. So, well, there’s that… Which is nice…

Thanks for reading! If you want to help, or if the site has helped you, you can donate, register to help, write an article, or buy inexpensive hosting to start your own site. If you scroll down, you can sign up for the newsletter, vote for the article, and comment.

Review: Ubuntu Cleaner

In today’s article, we’re going to review a piece of software known as ‘Ubuntu Cleaner’. It won’t be a very long article, as there’s not much to cover – as it’s fairly self-explanatory. If you’re interested in learning about ‘Ubuntu Cleaner’ then this is the article for you.

As the name implies, this software is designed to work with Ubuntu. You may find that it works fine with Ubuntu derivatives. It may also work with the various official Ubuntu flavors – in part or in whole. But, the key here is ‘Ubuntu’. It’s software designed for Ubuntu. If you don’t use Ubuntu, this may not be the software for you.

I guess this isn’t a review so much as it is making folks aware of Ubuntu Cleaner. It’s reasonably easy and safe, so it seemed like a good idea to share this with Linux-Tip’s Ubuntu users.

About ‘Ubuntu Cleaner’:

You’ll find that ‘Ubuntu Cleaner‘ does more or less what you’d expect it to do. In many ways, it’s similar to BleachBit. Though, you’ll sometimes read stories of people using BleachBit and hosing their systems. That’s extremely unlikely to happen with ‘Ubuntu Cleaner’.

In short, you’ll see that this application cleans your system. It deletes files you don’t need, reducing the amount of disk space used. It cleans the following things at the push of a button:

  • Clear browser cache
  • Clear APT cache
  • Clear thumbnail cache
  • Remove unneeded packages
  • Remove old kernels
  • Remove old installers

So, ‘Ubuntu Cleaner’ is a system cleaner. If you’re curious about the browser cache, it appears to work with Firefox and the major Chrome/Chromium-based browsers. It did not seem to recognize the Snap version of Firefox, but that could be a problem at my end or something they’re working on.

You can see that it clears other things, like running the APT commands you’d consider running manually. If you have extra kernels installed, it’ll remove them – leaving one kernel version as a backup. 

But, it does what it says it does on the label, it cleans Ubuntu.

Installing/Using ‘Ubuntu Cleaner’:

It’s easy enough to install ‘Ubuntu Cleaner’ in Ubuntu. You will need an open terminal. If you don’t know how to open the terminal, you can do so with your keyboard – just press CTRL + ALT + T and your default terminal should open.

With your terminal now open, simply follow the directions to install ‘Ubuntu Cleaner’ on their project page. I’ll copy them here, but be aware that things change and these installation directions may change:

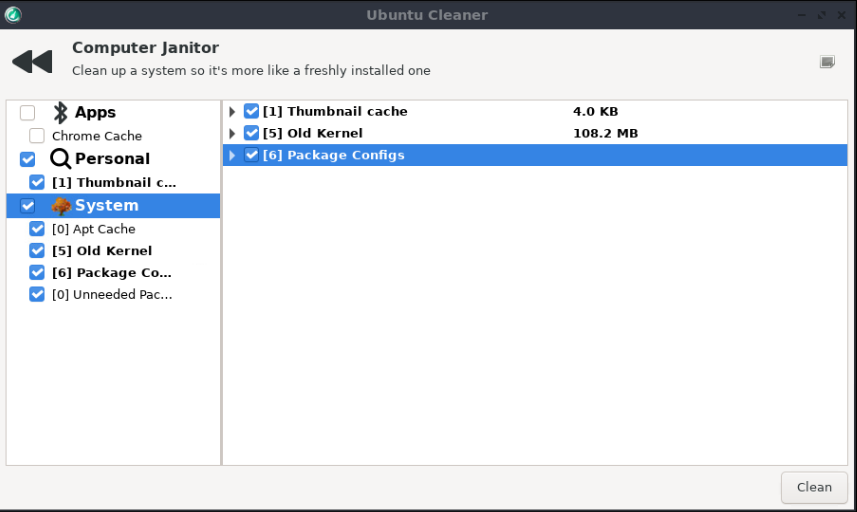
Then, open ‘Ubuntu Cleaner’ from your applications list and the rest is pretty obvious. On the left side of the screen, select the category of items you want to clean. On the right side, select the specifics you wish to have cleaned with ‘Ubuntu Cleaner’. When you’re done picking, push the button to clean your Ubuntu system. It’s not complicated, and looks like this:

Ubuntu Cleaner in action.
It’s pretty easy to understand how to use Ubuntu Cleaner.

See? It’s not all that complicated and it does what you’d expect it to do. It cleans Ubuntu’s system files – including your browser cache.

Thoughts and Closure:

These are all things you could manually clean yourself, including being able to run commands to remove your APT cache and the likes. But, if you’re one of those people who likes to stay on top of removing unused system files, this might be an application you’d like to use – assuming you’re an Ubuntu user.

On a scale of 1 to 10, I suppose I can rate it a 9. The application could do more, but it doesn’t need to. It does what it says on the tin and there’s little risk of it harming your system. Ubuntu Cleaner is a safe and effective way for Ubuntu users to remove system files.

If you’re an Ubuntu user, go ahead and install it. If you use an official Ubuntu flavor or a derivative, you can also try installing it – but it may not do things like remove the thumbnail cache. You can give it a shot. It’s unlikely to break anything.

Thanks for reading! If you want to help, or if the site has helped you, you can donate, register to help, write an article, or buy inexpensive hosting to start your own site. If you scroll down, you can sign up for the newsletter, vote for the article, and comment.
Fix The Application Menu For Shutter

Today’s article is pretty niche, one where we fix the application menu for Shutter. On one hand, if you don’t use Shutter, this probably isn’t the article for you – but you can still read it and learn something useful. On the other hand, it fixes a ‘problem’ with Shutter and I think this is a fine time to cover it.

So, if you use Shutter, read on! (Hint: Even if you don’t personally use Shutter, you can still benefit from this article.) You’ll just need to understand what was done and how to apply it to other shortcuts.

By the way, Shutter has been mentioned here (and elsewhere):

Take, Edit, And Upload Screenshots With Shutter

I use Shutter all the time. It’s my go-to when I need to share a screenshot. It’s handy and I recommend it to anyone who has to deal with a lot of screenshots. I also use Flameshot, but that’s less often.

Alas, when you install Shutter it wants to put the application menu shortcut under something like ‘Utility’, so it appears as an administration tool or doesn’t show up where you’d expect it to be. This is just silliness.

What Shutter should do is should show up under ‘Graphics’ in the application sub-menu! So, that’s what this article will do. It will show you how to fix the application menu for Shutter so that it shows up under ‘Graphics’.

This article shouldn’t be all that long. It seems to me that it should be pretty brief… We’ll just have to wait and see!

Also, as mentioned above, this article should be easy enough for my readers to extrapolate into resolving other application menu gaffes/choices. It’s a nice and easy article. Or at least I hope it is…

Fix The Application Menu For Shutter:

Now, when I did this, I did it with the GUI. You will not be doing it in the GUI, if you follow this article’s advice. When you do it graphically, it’s still pretty simple. It looks something like this:

You can use a GUI to change where the file is listed in the application menu.
Fixing the application menu to show Shutter under the ‘graphics’ heading.

That’d be a bit convoluted to explain because everyone’s using a different desktop environment and different file managers. So, instead of doing this is a GUI, we’re doing to do this in the terminal. (Of course we are.)

Open your default terminal now. If you don’t actually know how to, you can just press CTRL + ALT + T and your default terminal should open.

With your terminal now open, enter the following command:

That will open the .desktop file with Nano.

From there, scroll down to where you see “Categories” and change the ‘Utilities’ to ‘Graphics’. With that done, you need to save your changes. As we’re using Nano, you save your changes by just pressing CTRL + X, then Y, and then ENTER

The results should be immediate, though I’ve seen this require logging out and back in again. For the most part, it should just work – and it should work immediately. When you next open the application menu, you should find Shutter where it belongs – under the ‘Graphics’ sub-menu.

Now, you can do this with all sorts of other applications. If you don’t like the existing category, just change it until you do like the category. When you change that, the shortcut should appear in the expected sub-menu.

Feel free to try this will all the applications you want. It should work with any of them. If you do decide to do this in a GUI, you’ll need root and the files need to be edited as though they’re plain text. Enjoy!

Closure:

And there you have it… You have another article. In this article, you’ll have learned how to fix the application menu for Shutter – and other applications. Best of all, you’ll have done it in the terminal, which means you can do this with pretty much every operating system without needing to change the commands. The terminal is pretty awesome.

Thanks for reading! If you want to help, or if the site has helped you, you can donate, register to help, write an article, or buy inexpensive hosting to start your own site. If you scroll down, you can sign up for the newsletter, vote for the article, and comment.
Show RAM Information With Ramfetch

Today’s article is going to be an interesting one, an article where you learn how to show RAM information with Ramfetch. For many of you, I expect Ramfetch will be a completely new application, which is nice. However, this article should be simple enough for even a new user. Read on and learn more about your RAM!

By now, you’ve seen some of the following articles:

Neofetch
Screenfetch
CPUfetch

Well, this time around, we’re going to be using a similar application – but one meant specifically for RAM. The name of this application is ‘Ramfetch‘. Let’s just say the idea will be familiar, as you’re already aware of similar applications. At the end, you end up with a handy screen to screenshot to show your friend and family – or to learn from. Bragging rights is always a good reason!

So, then why would you want to do this? Well, Ramfetch gives you some good information about your RAM. It’ll do the basics, like show you what’s free, what’s available, and the total amount of RAM. But, it shows you quite a bit more than that, and it’s data worth looking at for those who want to know more about their RAM.

What we’ll be doing is cloning a git repository, moving a file, and changing the permissions to ensure it can be executed so that you can run the command from anywhere within the terminal.

You’ll need ‘git’ installed, and that should be installed by default in pretty much every major distro. If it’s not, check your package manager – or simply follow the URL in the article and perform the operations manually.

With all that said, let’s just jump into the article!

Show RAM Information With Ramfetch:

Of course, you’re going to need an open terminal. Ramfetch is a terminal-based tool. So, open your default terminal emulator. If you don’t know how to open the terminal, you can do so with your keyboard – just press CTRL + ALT + T and your default terminal should open.

UPDATE: Without letting me know, they changed things up. Follow these new instructions.

With your terminal open, let’s clone the project:

Now, let’s move it to a directory where you can always use it from the terminal, regardless of which directory you’re in:

The next step is to make Ramfetch executable:

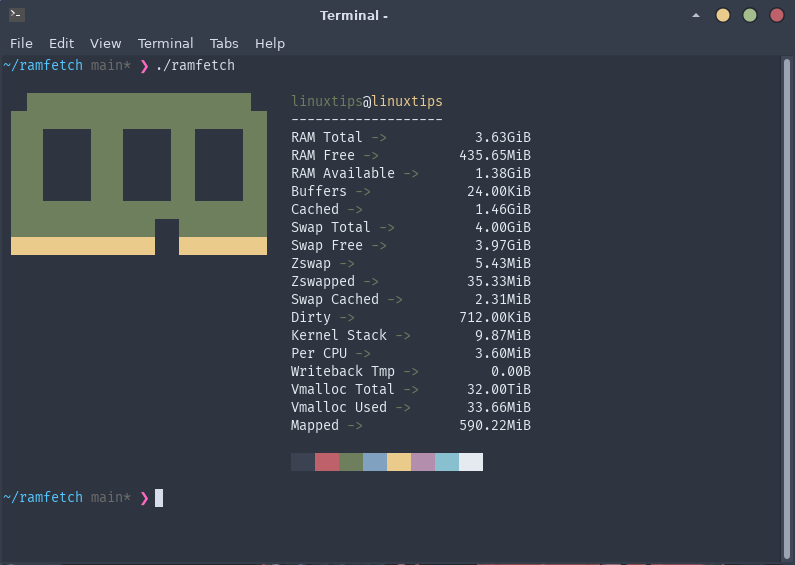
With that said and done, just execute the ‘ramfetch’ command to show RAM information with Ramfetch. It’s simply:

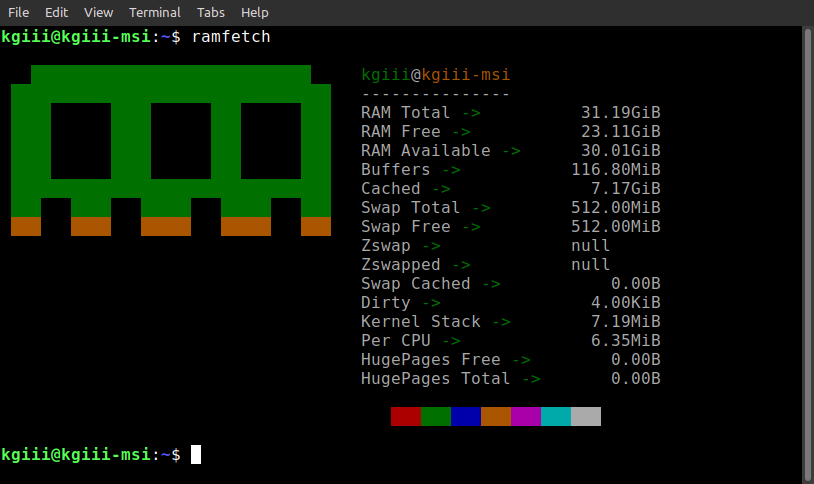
Your output might look a little something like this:

ramfetch output
See? It gives you quite a bit of information about your RAM. Handy, huh?

There you have it. You can now show RAM information with Ramfetch! Pretty simple, huh? There’s no man page and the ramfetch --help command doesn’t really show you any other ways to run Ramfetch.

Here’s a better image, as supplied by the author of Ramfetch (o69mar):

Another Ramfetch image.
It does indeed look better, so there’s that!

Closure:

There’s another article said and done. Welcome to the new year and I hope you had a safe New Year’s Eve this year. We start the new year off with a simple enough command, learning how to show RAM information with Ramfetch.

I’ve not missed a publication schedule yet, so we’ll see how much longer this can go on. (I’m sure I’ll miss a publication deadline at some point, but today is not that day. In fact, I wrote this days ahead of time!) So far, so good! I never thought it’d reach this level, by the way.

Thanks for reading! If you want to help, or if the site has helped you, you can donate, register to help, write an article, or buy inexpensive hosting to start your own site. If you scroll down, you can sign up for the newsletter, vote for the article, and comment.

Linux Tips
Creative Commons License
This work is licensed under a Creative Commons Attribution 4.0 International License.